
Bat Instruction Manual


Construction Manual www.oldschoolmodels.com Page 9
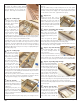
leading edge.
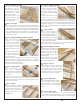
The throttle servo was mounted next to the fuel tank. We've also
marked off the location of the receiver and rx battery. These are
offset to the port side to help with the lateral balance.
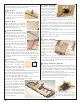
Electric power
The electric setup is a bit less
complicated, but you still
need to plan. In the photo
you'll see that the battery
mounted just behind the
firewall. At the top of the
photo is the receiver and the
ESC.
Recommended Control Throws:
The amount of control throw should be adjusted as closely as
possible using mechanical means, rather than making large
changes electronically at the radio.
By moving the position of the clevis at the control horn toward
the outermost hole, you will decrease the amount of control throw
of the control surface. Moving it toward the control surface will
increase the amount of throw. Moving the pushrod wire at the
servo arm will have the opposite effect: Moving it closer to center
will decrease throw, and away from center will increase throw. Work
with a combination of the two to achieve something relatively
close to these throws that are good for everyday sport flying. If
competing in pattern, you'll probably want to dial these down a bit
to give a smoother appearance to your maneuvers.
Elevons 1/2” up/down (35% expo)
(Expert tip: Once the control throws have been set, cut a few pieces of
medium silicone fuel tubing (or heat shrink tubing) to go around each
of the clevises. This will keep them from opening during flight.)
Preflight:
Charge both the transmitter and receiver pack for your airplane.
Use the recommended charger supplied with your particular radio
system, following the instructions provided with the radio. In most
cases, the radio should be charged the night before going out
flying.
Check the radio installation and make sure all the control
surfaces are moving correctly (i.e. the correct direction and with
the recommended throws). Test run the engine and make sure it
transitions smoothly from idle to full throttle and back. Also ensure
the engine is tuned according to the manufacturer’s instructions,
and it will run consistently and constantly at full throttle when
adjusted.
Check all the control horns, servo horns and clevises to make
sure they are secure and in good condition. Replace any items
that would be considered questionable. Failure of any of these
components in flight would mean the loss of your aircraft.
Range check your radio before flying
Before each flying session, range check your radio. This is
accomplished by turning on your transmitter with the antenna
collapsed. Turn on the radio in your airplane, but do not attach the
arming switch.
With your airplane on the ground, you should be able to walk 30
paces away from your airplane and still have complete control of
all functions.
If not, don’t attempt to fly! Have your radio equipment checked
out by the manufacturer.
Flying:
I normally don't write about flying our kits, but I want to make a few
notes here, as this isn't the typical kit.
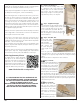
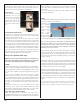
Launching the
kit is normally
done the same
way you'd
throw a paper
airplane, just
with a little
more "umphf".
Hold it similarly
to what's shown here - by the skid, throttle up, then throw the Bat
forward and just slightly nose-up.
And I do mean slightly - not 45°.
Also, I need to stress the care that needs to be taken when hand-
launching any airplane. You've got the potential for serious harm
should you lose your grip. If you're unsure of safely doing this
yourself, please ask for assistance from another pilot to launch the
Bat while you're on the controls.
After launching, allow it to gain speed before pulling up or turning.
Then you're off to the races. You'll find the Bat is quite comfortable
at high and low speeds. The only thing you'll need to watch is your
speed in the turns as it will loose altitude quickly if you don't keep
up a bit of speed.
Landings are just like most, other than you'll typically want to land
in the grass, rather than pavement. Either way, lower the throttle
and allow the Bat to bleed off speed on the base, crosswind, and
final approach. Because the Bat has little drag, it does take a while
for the speed to bleed off, so plan accordingly.
Now, when you're flying, and you don't have the C.G. correct, you
might find that the Bat has radical changes in climbing and diving
even with slight movements by you - especially at higher speeds.
This is called porpoising and that means the Bat is tail-heavy. Climb
to a few mistakes high, lower the throttle and gently glide it into a
landing. Re-distribute to give you a bit more nose weight and try
again.
Once properly balanced, you'll find that the Bat can be many things - a
radically powerful combat machine, a small field flyer that is extremely
aerobatic, and even slight bits of a glider when you reduce the power.