
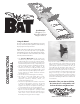
Bat Instruction Manual


Page 8 www.oldschoolmodels.com Construction Manual
they're also resting up against the
servo. (But don't glue the servo in
place.)
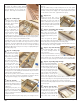
When that's finished you can use a
combination of the S4 and S2 parts
on either side of the servo to match
the servo's width. This makes it so
the strap (S3) can be used to hold the
servo firmly inside this mount.
You'll need to drill a couple of
mounting holes for the strap and use
the servo's mounting screws to hold
it place.
When it's all together, you can then trim away the extra bulk of S1
to help lighten it, and sand as needed to knock off even a bit more
weight.
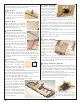
You should end up with a very light weight mount that can then be
glued to the internal sheeting once the engine has been located
and you know where the pushrod will run. And the servo will still
be removable.
This completes assembly of the Bat airframe.
nTank / Battery compartment fuel proofing
If you're using a glow engine, it is strongly recommended that you
fuel proof the inside of the tank compartment. As you know, fuel
has a nasty way of penetrating wood, causing it to disintegrate
over time. Spray (or brush) this on, also remembering to protect
the underside of the hatch.
nCovering
Now it is time to cover the Bat. Double check that all surfaces are
smooth and ready to cover. Sand as necessary, then cover the
entire airframe with the covering/finish of your choice.
Note that if you’re powering with an electric motor, you’ll need to
make an exit for the cooling air to escape the rear of the airframe.
nElevons
It's time to attach the elevons. Although you can use hinges
(not included), we chose to hinge the surfaces using the iron-on
covering as the hinge. As this is a small, light-weight design, this
works well and saves you the chance of splintering through the thin
1/8" elevons.
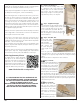
To do this, cut four lengths of covering
about 5/8" wide, and 14-3/4" long (just
shy of the elevon's full length). Fold a seam
down the middle of the entire length of
these pieces, so the adhesive side is facing
outward.
Now, hold the elevon in position as
we've shown in this diagram and tack the
covering into the hinge gap, little by little, working your way down
the elevon - making sure the elevon is centered on the trailing
edge. When the covering has been applied into the gap, then you
can iron down the edges.
When one side is finished, flip it over, bend the elevon the other
way and iron a second strip to the reverse side.
Then do the same for the other elevon.
nControl horns, servo & pushrod installation
If you haven't already, install the elevon servos and attach the servo
hatches, remembering that
the port hatch is a mirror image of the
starboard hatch.
Attach the control arms so they're directly in line with the servo
arms, then attach your pushrods.
Now, before we install anything else,
everything you do from here on out needs to
be carefully considered because of the hyper-
sensitive nature of the Bat's C.G. location.
nRecommended C.G. setting
The Bat's design of a simple flying wing
makes it EXTREMELY sensitive to the C.G.
location. Having the C.G. off by as little
as a 1/8" can be the difference between
going home with a pile of broken parts,
and successfully flying again and again.
CAUTION! DO NOT SKIP THIS STEP!
The C.G. location for the Bat is 2-1/4" back from the leading edge
of the wing. That puts it right on the leading edge of the main
spars. And if installed properly, the skid has a pre-drilled hole in it
that should line up with the location.
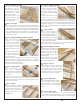
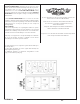
Because of all this, you need to pay attention to how and where
things are installed. Obviously the engine/motor has to be mounted
to the firewall, but most of the other things (fuel tank, battery, ESC,
receiver, throttle servo) can be mounted most anywhere inside the
center section of the Bat.
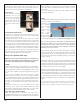
Following are two photos showing what worked for us in both
electric and glow setups. Your mileage may vary, but this should
help you get started in the right direction.
Recommended power.
We always give recommendations for power systems in
our kits, and the same is true for the Bat. We've had
great fun with the recommended power systems, but as
long as you keep a good eye on the C.G. (and lateral
balance) you can strap on a little more power and really
streak through the skies.
Obviously some common
sense needs to be applied
here, but the structure is
strong and can withstand
a little overpowering with
no problems.
Glow power
Mounting the engine is a fairly
simple thing. We chose to
mount it at a slight angle to
allow the muffler to clear the
Attach covering
into this gap first.
RX
Battery
RX
Throttle
Servo