
Bat Instruction Manual


Construction Manual www.oldschoolmodels.com Page 7
similar to what we've shown here and be fairly easy to turn with
your fingers. This forms an easy to turn hatch latch that will catch
on the rear sub spar to hold the hatch in place.
n Step 34 - H6
Locate H6 from LP2. Glue this across
hatch as shown to strengthen it.
Make sure it is centered and just
covering the edge of the H5 circle
installed earlier.
n Step 35 - Skid
Flip the airframe back on it's top (up-side-
down). Measure and draw a light pencil
line that is the exact center of the airframe
- similar to what's shown here.
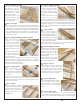
n Step 36 - Skid and supports
Locate SK from LP1. This is the bottom
skid. The thicker section is the rear and
should be positioned so lines up with the
rear of the trailing edge and the pre-cut
hole is positioned so it is beneath leading
edge of the spar.
Locate the 1/8" square basswood and
cut two 8" lengths. Bevel the leading and
trailing edges a bit to make them more
aerodynamic.
Now glue these pieces in place, starting
with the skid. Make sure it is 90° to the
airframe's sheeting. Then add the basswood supports to either
side of the skid. We found it easiest to glue the front of the 1/8"
supports to the flat portion of the sheeting first, then work your
way back to complete gluing the rear portion of the supports to
the sheeting.
n Step 37 - Sanding
Now is the time to get quite familiar
with the sanding tools of your choice.
Take the time to perform a good
sanding, rounding the leading edge
and blending it into the wingtips. Go
over the entire wing, making sure the
sheeting is smooth and the trailing edges are blended into the cap
strips, continuing the curvature of the wing. Pound out the extra
time on those wing tips to make sure they are smooth.
Round the leading edges of the vertical fins.
Also locate both elevons (from BP1). Sand bevels into the leading
edge of both elevons, and round off their back edges.
The idea is to spend some time
caressing this awesome airframe
you've created, smoothing the rough
edges until it's something so slippery
that it will cut through the air like a
knife through melted butter.
What you should end up will be thing
of beauty - something that looks
pretty darn close to this (but without
the servo hatches which I haven't told
you how to install yet.)
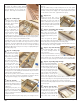
n Step 38 - Servo hatch
Locate both SHs from LP2.
these are the servo hatches,
and the servos are mounted
to the underside of them.
Using your leftover 1/4"
square basswood, cut 8
pieces that are roughly a
1/4" wider than the servos you are using. Glue two pieces together
to form 4 mounting rails. Lightly sand the ends of the rails to true
them up.
Now take one SH and place your servo on it as shown. Make sure
that the servo arm is centered in the slot in both directions. Now
carefully glue one of the standoffs you just created to SH, on each
side of the servo - as shown in the photo. Take care not to glue the
servo to these pieces, or to SH.
So the same for the other hatch, but make sure it's a mirror image
of the first one.
You can then mount your servos to these rails using whatever
hardware was supplied the servos - and drilling the appropriate
sized mounting holes into the rails.
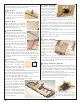
n Step 39 - Servo hatch
Position the servo
hatches as shown,
making sure the cutouts
are up-next to the
vertical fins. We prefer
to place the cutouts
towards the rear of the
airframe to keep the
pushrods as short as
possible.
When in place, use a 1/16" bit to drill through the 4 pre-cut
mounting holes in each hatch, into the 1/4" basswood underneath.
Later on, you can use the supplied 2-56 x 3/4” self tapping screws
to hold these in position.
n Step 40 - Throttle servo (glow only)
If you choose to power your Bat with the glow, then you'll need
to plan for a throttle servo. It's too soon to mount it yet, as you
don't have the engine installed, however it is a good time to make
the servo mount. Here's a way that we created a very light-weight
mount that allows the servo to be removed.
Located on LP1 are two S4s. On LP2 are S1, two S2s and S3. Gather
up these parts, along with scrap 1/4" square basswood.
Using S1 as the base, center the servo, allowing the top of the
servo with the arm to overhang the top edge.
Now cut a few pieces of 1/4" square
to "sandwich" the mounting ears of
the servo, and glue them in place so
Sand this lip to
match airfoil