
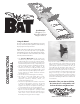
Bat Instruction Manual


Page 6 www.oldschoolmodels.com Construction Manual
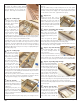
centered on the rib and run from the rear of the leading edge
sheeting to the front of the trailing edge sheeting.
Measure, cut, and glue each strip in position.
When you get to either of the R5 ribs, the strip should be positioned
so it's flush with R5 outer edge.
n Step 24 - Release the airframe from the board
Now it's time to remove the airframe from your building board. Flip
it over and carefully trim away all of the alignment tabs on the rear
of each rib. Be careful when trimming them as you want to make
the cut so it is a continuation of the airfoil shape.
Remove the small "lip" which the trailing edge rested on. When
properly removed, there will be a 1/16th "step" that will allow the
sheeting to rest flush against the surface of the trailing edge.
Lightly sand as necessary and remove any lumps or globs of glue
that may have happened during the build so far.
n Step 25 - Bottom leading edge sheeting
Locate the remaining two LSH
from BP5 and BP7. Using the
same techniques as you did
on the top side, now it's time
to form and glue the leading
edge sheeting to the bottom of
both sides of the wing.
n Step 26 - Bottom center sheeting
Locate the two pieces of un-cut 1/16" x 4" x 12" sheeting. These
two pieces are used to form the center sheeting of the bottom
surface and need to be edge-glued together.
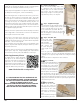
When edge gluing the sheeting
pieces together, first make sure
the edges are flat (give a quick,
swipe or two with a sanding
block). Then tape the two pieces
together as shown here with
a piece of tape. As you lift the
sheeting from the board you’ll
see that the tape will act as a
hinge allowing you to put a small amount of adhesive in the joint.
When the adhesive is applied, place the sheeting back down on
the waxed paper, so that it’s flat (as shown in the photo). When
cured, you’ll now have a single, longer piece of sheeting.
You’ll need to join a few pieces together to make it long enough to
reach from the leading edge sheeting to the trailing edge.
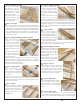
n Step 27 - Bottom center sheeting
Using the sheeting from the
previous step it's time to
measure, cut and glue in place
the center sheeting.
This piece extends from the
rear of the leading edge
sheeting, to the front of the
trailing edge.
This sheeting should be just
shy of covering the R3 ribs on each side, as it should be just wide
enough to cover the vertical fin and R2 ribs. R3 should be clearly
visible as it will be used as a "platform" in the next step.
n Step 28 - Bottom trailing edge sheeting.
Locate the remaining two TSH
from BP4-BP7. Using the same
technique you used to apply the
top trailing edge sheeting, now
glue these bottom trailing edge
sheets in place.
These are glued to the back
of each rib, as well as where it
touches the trailing edge and center sheeting.
Do this for the port and starboard sides.
Again, these pieces are slightly longer than they need to be so trim
off the extra so it is flush with the outer edge of the R5s.
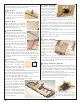
n Step 29 - Bottom box sheeting
Locate BSHG (glow) or BSHE (electric
from LP2. This is glued to the bottom
of the airframe, flush with the firewall
and ending at the center sheeting as
shown here. Sand as necessary, then
glue in position.
n Step 30 - Bottom cap strips
Cut and attach the bottom cap strips using the same techniques as
you did for the top strips.
n Step 31 - Hatch
Now flip the fuselage upright. Locate
H3 from BP6. This is sized for the electric
version, so if you're using glow, you'll
need to trim it to the proper length.
Make any trim from the edge opposite the circular cutout.
Now locate H2 from LP2. There is an engraved line on this piece.
When glued in place, this line should run along the front edge
of H3, the engraved "H2" should not be seen, and it should be
centered on H3.
n Step 32 - Hatch
Locate H5 from LP2. This is glued into
the pre-cut hole in H3 as shown here. We
found that a little thin CA did the trick.
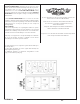
n Step 33 - Hatch latch
Locate H4 from LP2, as well as the following hardware:
1 - 4-40 x 1" socket head cap screw
2 - 4-40 lock nuts
2 - #4 washers
1 - 4-40 nut
Slide one washer onto the 4-40 x 1" cap
screw, then push it through the hole in
H3 from the top as shown here. Now,
from the underside, slip on another
washer, then thread on the 4-40 nut (not
the lock nut). Run this all the way up the
screw and when tightened, it should just
allow the bolt to turn in the hatch freely, and without a lot a slop.
Now thread on one of the 4-40 lock nuts all the way to jam against
the 4-40 nut previously installed.
Next push on H4, then thread the last 4-40 lock nut all the way to
jam against H4 and lock it in position. This assembly should look