
Bat Instruction Manual


Construction Manual www.oldschoolmodels.com Page 5
sure it is completely seated in each rib's
rear cutout. Do a little at a time, making
sure that the ribs are properly positioned
(Don't be afraid to use one of those 90°
triangles - that's why we included them.)
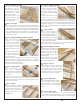
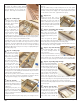
n Step 16 - Leading edge
Locate the other length of
1/4" square x 36" square
balsa stick. This is used as
the leading edge.
Also locate two other
pieces - but the ones you
choose is dependent on
the type of power you're
going to use with your Bat.
If you choose to power
your Bat with the glorious sounds of a snarling, nitro-powered,
single-cylinder, locate both R1Gs from LP1. If you're using a quieter,
cleaner, electric setup, locate both R1Es from LP1.
Carefully slide each of the R1E or R1G pieces onto the leading
edge strip as shown here. Make sure they are both in the same
orientation. The square (diamond) cutout in those pieces will be a
snug fit onto the 1/4" strip so use care as to not snap the leading
edge balsa. Move these two pieces so they're roughly midway on
the leading edge strip.
n Step 17 - Leading edge
Using the same technique
you used for the trailing
edge, glue the leading
edge in place, making sure
it's completely seated in
the notches of each rib.
Start at one end, do a little
at a time and work your
way towards the center
section. Once you reach
that point, you can fine-
tune the positioning of the R1E or R1G pieces over the plans. Make
sure they are 90° to the building board and that they're seated on
both the upper and lower spars.
Glue those in position, and continue to work your way towards
the other the other end of the spar. Make sure that the ribs are
properly positioned (yup, keep using that 90° triangle.)
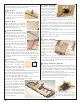
n Step 18 - Firewall
Locate F1 from LP1. This is the
firewall and is glued in place to
the front edge of both R1G (or
R1E) pieces.
Before gluing it in place, use a
saw and cut away the leading
edge in the area between the
R1 pieces. (I know it's shown here, but we found it better and easier
to remove it now.)
Now glue the firewall in place using epoxy. Use enough to secure
it in place, but don't overdo it, as it can have an impact on the C.G.
later on.
Also we advise using a couple small pieces of the 1/8" square
basswood to form inside gussets between the R1 sides and the
firewall. Cut two pieces roughly 1-1/4" long and glue them in place
on the inside corners of R1 - again with some epoxy.
n Step 19 - H1
Locate H1 from LP2. This is
attached to the top of the firewall,
flush with it's front face and the
sides of whichever R1 pieces you
used. This forms a lip to hold down
the front edge of the battery/radio
hatch. Glue this in place.
n Step 20 - Top trailing edge sheeting
Locate two TSH from BP4-
BP7. These are used as the
trailing edge sheeting and are
slightly longer than they need
to be.
These are glued up against
the outer edge of the vertical fin, and to the back of each rib, as
well as where this sheeting touches the trailing edge.
Do this to the port and starboard sides, then trim off the extra so it
is flush with the outer edge of the R5s.
n Step 21 - Top center sheeting
Locate CSH from BP4. This is the
top center sheeting between the
two vertical fins.
Check the fit and sand as necessary
to get a good fit between the two
fins as shown here. Once satisfied with fit, remove it, apply glue,
and secure it in place, making sure it's attached to the R1Bs and R2s.
n Step 22 - Top leading edge sheeting
Locate two LSH from BP4-BP7.
It will need butt-up against the
leading edge and wrap around
to cover roughly half of the top
spar. As the sheeting we buy
can vary in density, you might
have to apply a bit of Windex
®
glass cleaner to loosen up the
grain. Soak the outer side of
the wood to expand the fibers. Now hold it to curvature needed,
then use a hair dryer or covering heat-gun to help “set” the balsa’s
bend as it dries. Once dry, the you can glue it in position.
Glue it to the leading edge first, then to each of the ribs and finally
to the top spar.
n Step 23 - Top cap strips
Once all the glue has cured
from the previous step, it's time
to attach the top cap strips.
There are pre-cut strips in BP5
and BP7, so use these for this
step. Each strip should be