
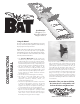
Bat Instruction Manual


Page 4 www.oldschoolmodels.com Construction Manual
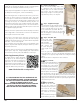
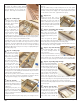
nStep 5 - Vertical fin assembly
Now using the same
techniques you used in
steps 3 and 4, go back and
assemble the other vertical
fin assembly as a mirror
image of the first one.
Refer to this photo for an
example of what your two
fins should look like after
they are completed.
nStep 6 - Lower spar
Locate one of the 1/4” square x 36” basswood strips. This will form
the lower spar. Position it over the plan, measure the length and
cut. We prefer to tack-glue this piece to the waxed paper, holding
it in place using a few small drops of medium CA, instead of t-pins.
Be sure it is aligned properly and straight over it's entire length.
The alignment of this spar is critical as the rest of the Bat's airframe
is based off of this piece.
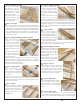
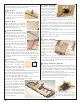
n Step 7 - Wing Assembly (Vertical fin assemblies)
Locate both vertical fin
assemblies you created
earlier. These are now glued
in position as shown here.
When properly positioned
the R2 portion of each
assembly should face each
other.
Apply a little glue inside the
rib's pre-cut squares and
just a touch on the bottom
of the rear standoff.
Gently push the fin assembly in place, making sure it is properly
aligned according to the plans. Also make sure it is pushed
completely onto the spar and that it is a perfect 90° to the building
board (use the supplied triangles).
Do the same for the other vertical fin.
n Step 8 - Upper sub-spar
Locate another length of 1/4"
square by 36" basswood.
Measure and cut two lengths that
will connect the two vertical fins
as shown here.
The first one fits into the rear
portion of the cutout just in front of the vertical fins. The second
one fits into the square cutout that is about 1/2-way back on the
bottom of the vertical fin.
n Step 9 - R4 ribs
Locate all four R4 ribs from BP2.
Two ribs are glued into place on
each side of the vertical fins, as
shown here. Make sure they are
properly aligned and 90° to the
building board.
n Step 10 - Wing tip assemblies
Locate both T1s from BP1,
both T2s, and T3s from BP3,
as well as both T4s, and T5s
from BP2 and BP3. Using
these pieces, you'll make both
wing tips.
It won't matter which pieces
you use on the top and
bottom, as it will all come out the same. You'll use one longer piece
(T3 or T5) and one shorter piece (T2 or T4) per face. Their tabs fit
into the pre-cut notches in T1. Apply glue, then push them in place
making sure they are 90° to T1. Then use the alternate pieces you
didn't use to complete the other face T1. Make two complete wing
tip assemblies.
n Step 11 - R5 ribs
You'll see that the edges of
the T2-T5 pieces protrude a
bit from the inside edge of T1.
These small edges need to be
sanded down so the assembly
will rest flat against R5. Do this
for both wing tip assemblies.
Now locate both R5 ribs, then glue the wing tip assemblies to
them, making a port and starboard wing tip.
n Step 12 - Wing tip assemblies
Install both R5 assemblies in
place to each end of the Bat's
airframe. Take care to glue
the port tip to the port side,
and the starboard tip to the
starboard side.
Make sure they are properly
aligned and 90° to the building
board while the glue cures.
n Step 13 - Top spar
Locate the last un-cut 1/4" square x 36"
basswood stick as it will be used for the
top spar. Measure and cut it to length.
Then glue it in place, making sure it is
completely pressed into and glued to
each of the pre-cut slots of each rib.
n Step 14 - R1b sub-ribs
Locate both R1B sub-ribs from BP2.
These are glued in place as shown,
making sure they are aligned with the
plans, as well as 90° to the building
surface.
n Step 15 - Trailing edge
Locate one length of 1/4" square x 36" square balsa stick. This
is used as the trailing edge. Measure and cut it to length. Then
starting at one end, glue the trailing edge to each rib, making