
Installation Guide


30
31
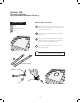
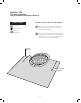
TOOLS & PARTS
Gloves
Safety Equipment
Exterior Clear
Pure Silicone
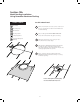
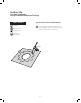
Reinstall the trimmed tiles at the sides of the roof
cutout, making sure to install them in the same
pattern as they were removed, from bottom to top.
These tiles need to be installed on top of the Formable
Aluminum Flashing.
Make any required adjustments in trimming the tiles
or shingles for a proper fit around the side of the
formable flashing collar. A “proper fit” is one that is
within 1”-2” of the aluminum vertical wall.
Attach these tiles with nails, caulk the heads of the
nails with Exterior Silicone.
1
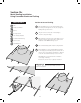
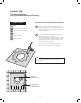
Reinstall the final tiles along the uphill edge of the
formable flashing. This requires the row of tiles to
be lifted slightly and may be necessary to loosen their
attachments.
Secure the tiles with nails, caulk the heads of the nails
with sealant.
2
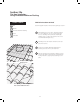
Paint the Formable Aluminum Flashing to match the
color of the tiles or shingles, if desired.
TIP
Reinstall Tiles
Quick setting mortar may be used to fill in the gaps
between the tile and aluminum collar to provide
proper run-off of water.
Check all areas for proper sealing and water run-off.
3
1
2
3
Install remaining components of the tubular skylight
as instructed in standard installation starting in
Section 4c.
4
Section-13h
Tile Roof Intallation
Using Formable Aluminum Flashing