
Installation Guide


22
23
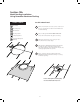
Drill
Drill Bit
Formable Aluminum Flashing
Pencil
Spike/Rod
TOOLS & PARTS
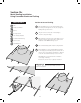
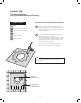
After finding your roof location, drill up through the
roof. Then drive a 4”-6” rod or spike up through
the roof sheathing until it pushes the tile/shingles
upward on the roof side. (An assistant on the roof is
recommended during this step.)
Start with regular installation instructions beginning in Section 1.
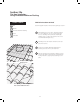
Carefully remove the lifted tile and remove the rod/
spike from it’s hole.
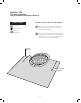
2
Position the Formable Aluminum Flashing piece
perfectly centered over the punctured hole.
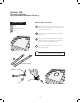
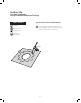
3
Trace the opening of the formable collar base so that
your tiles are marked. This will assist in trimming the
roofing materials to properly fit the flashing once in
place.
4
Flash Piece Centered over
Puncture Hole
The Opening Of The Flashing’s Collar
Base Is Traced Onto The Tiles
3
4
Find Hole Location On Roof
1
Section-13a
Tile Roof Intallation
Using Formable Aluminum Flashing