
Installation Guide


19
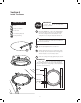
(2) 2-1/2” Pan Head Sheet
Metal Screws (Not Included)
3/32” Bit
Drill
Phillips Drill Bit
TOOLS & PARTS
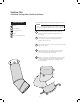
On roof, locate and install Top Adjustable Tube (pink
label) into roof flashing. Install Ceiling Ring at ceiling.
Install Bottom Adjustable Tube (blue label) in attic as
seen in diagram.
1
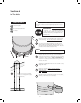
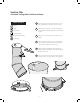
Frame 2 x 4 support between joists. Span from roof
to ceiling with a length of 2 x 4 flat to outside of each
Adjustable Tube creating a “spine”.
2
Put a (2) 2-1/2” pan-head, sheet metal screw (not
included) in each connecting extension.
3
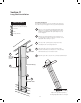
Slide next tube section in and attach with screw/s.
Continue until all but one extension is connected. Cut
and install last section of extension tube.
4
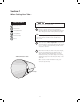
Tape ALL joints. Go to Section 9 to continue standard install.
5
Long Shaft Installation
For long shaft installation, use steps listed below, referring to
those listed on previous pages for more specific install details.
Section-11
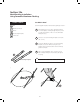
Long Shaft Installation
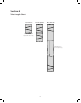
Optional Long Shaft Installation,
showing Adjustable Tubes at an angle.
Extension Tube(s)
Top Adjustable
Tube
Bottom
Adjustable Tube
2 x 4 Support
(2) 2-1/2”
Sheet Metal
Screws
3
2
1
5
5
1