
Installation Guide


PAGE 5
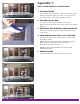
1. GETTING STARTED
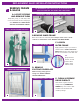
• Grasp each end of the Glass/Frame Unit and remove
from packaging.
• Have each person grasp one end of the unit. Do not lift in
the middle, the frame will flex away from the door glass.
• Place Glass/Frame Unit on a table or other flat, solid and
stable surface that is larger than the Glass/Frame Unit, with
the Outer Frame face down. Outer Frame has clips attached.
(see Fig. A & B)
Clip
Alignment Arrows
Final Assembly Tall Tab
Shipping Tabs
Resolve
®
Sealant
FINAL ASSEMBLY POSITION
BEFORE YOU BEGIN REVIEW THE FOLLOWING AND
BECOME FAMILIAR WITH THE GLASS/FRAME UNIT:
• Keep your old doorglass and frame until the ODL Doorglass
and ZEEL
®
Frame unit is completely installed.
• ZEEL’s innovative clip system is designed for easy and more
secure installation and for a one-time use. It is important
to ensure the clips are aligned prior to locking clips. Once
engaged the clips cannot be disengaged.
• Two people are required to install.
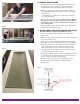
• Become familiar with the Glass/Frame Unit (see Fig. A and Fig.
B) and these instructions before beginning. This will be very
helpful. To assist, before you begin, tape a small note “A” at
one end of the inner frame and another note “A” at the other
end of the outer frame. (see Fig. C) In step 4 these notes should
be on the same end.
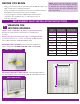
• Note how the frame is seated on the glass for shipping.
Shipping Tabs are short and Final Assembly Tabs are long. The
Outer Frame has Clips attached. (see Fig. B)
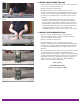
• For the Final Assemble (Step 4) the longer tabs of the Inner
Frame will be aligned with the Clips of the Outer Frame and
the large arrows from both frames will be aligned. (see Fig. D)
• You may wish to watch the ZEEL
®
Frame and doorglass
installation and assembly video to confirm the process at
zeel.odl.com/install.
Fig. A.
OUTER FRAME WITH CLIPS (goes outside your home)
INNER FRAME (goes inside your home)
Fig. D.
ZEEL
®
FRAME ASSEMBLY INSTRUCTIONS
Fig.C
Fig. B.
Final Assembly Tall Tab
Clip
Alignment Arrow
Shipping Tab
Resolve
®
Sealant
SHIPPING POSITION