
Installation Guide
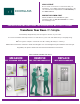


PAGE 6
Fig.3-A
Fig.3-B
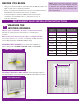
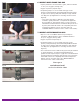
2. REMOVE INNER FRAME
• The Glass/Frame Unit is packaged with the frame in the
shipping position. Short tabs of the Inner Frame are
engaged in the Clip of the Outer Frame. (see Fig. B).
• Gently loosen the short tabs out of the Clips, working
around the frame until all of the tabs are out of the Clips.
(see Fig. 2-A)
– Important: Do not pull up on one end of the frame or
the tabs may break.
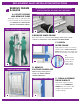
• Remove Inner Frame and set aside. (Remember to identify
the opposite end of the Outer Frame. Those ends will be
switched to the same side in Step 4 for final assembly. (see
Fig. C and Fig. 4-A.)
• Inspect Outer Frame to ensure all Clips are in the vertical
(straight up and down) position.
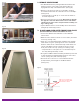
3. PLACE DOOR OVER OUTER FRAME AND GLASS
(OUTSIDE FRAME GOES OUTSIDE YOUR HOME-IT HAS CLIPS)
• Position the Outer Frame and Glass on the table/flat
surface area.
• Make sure the outside of the door is face down, the inside
is face up. (see Fig. 3-A)
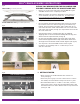
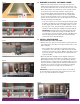
• Align door over the Outer Frame and Glass and carefully
lower the door’s glass opening/cutout area so the Outer
Frame is under the door with metal clips inside the door’s
cutout area. Make sure the outside of the door is face
down, the inside is face up. (see Fig. 3-A and Fig. 3-B.)
– Important: Do not drop the door on the frame clips as
this may damage the Clips or Tabs.
• Doorglass and Outer Frame assembly should be positioned
so that the frame is aligned with the bottom of the door
cutout. (see Fig 3-B.) and seated properly.
• Ensure the door cutout is in contact with the Resolve
(foam) Sealant, pressed tight to the Outer Frame
(see Fig. 3-C.)
Fig.3-C
Edge of door cutout and
glass in good contact with
frame/resolve sealant
Fig. 2-A.