
Installation Guide


4
1
CHAPTER
ONE
Chapter 1: Overview
1.1 Identifying your model
To Identify if your light is an M6 (Mast light) or an A6 (Underwater light) please refer to the packaging or
label on the rear of the PCB.
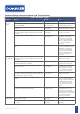
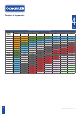
1.2 DC Power / Fuse Ratings
The majority of installations will utilize onboard 12/24v DC power supply from a marine battery. However,
if AC to DC power supply is being used, allow at least 15% reserve for voltage fluctuations due to variables
beyond your control such as ambient temperature and supply voltage fluctuations to ensure your lights are
always receiving the proper voltage and to ensure the power supply is not “overworked” causing premature
failure. Use chart below in determining power supplies.
Model Power Consumption in Watts 15% reserve in Watts Recommended Fuse Values.
12vDC 24vDC
M6 6 6.9 3 Amp 3 Amp
A6 12 13.8 3 Amp 3 Amp
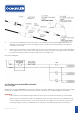
1.3 Tools and Materials
• Phillips head screwdriver
• Drill
• Marine sealant - 3M 4200 or equivalent
• Zip-ties
• Waterproof Cable Connectors / Butt Splices and Waterproof Heat Shrink
• Sandpaper
1.4 Finding The Mounting Location - (Both A6 Gen2 Lights)
OceanLED M6/A6 lights are suitable for installation on aluminum, steel or composite structures. Check
compatibility between fixing screws and mounting surface. The M6 light should be placed on mast
spreaders for the best rig illumination. The A6 light should be placed 10-20cm / 4-8” below the waterline.
1.5 Spacing
When installing multiple lights, even spacing is important for the best visual appearance.
M6 - Ensure lights do not foul with any rigging hardware to avoid damage.
OceanLED INSTALL / M6-A6 / 280417 / v7.0