User Manual Internet Radio WR-220 Please read this user manual carefully before using the receiver.
Contents LocationofControls ........................................1 Remotecontrol...............................................2 EnterencryptioncodeoftheWi-Firouter...............3 ConnecttheradiowithyourWi-FiRouter...............5 Startusinginternetradio ...................................6 MyFavorite ...............................................6 Internet Radio...........................................7 Media Centre............................................7 A larm Setting.........................
Location of Controls Front 1. LCD Display 1 2 3 45 67 8 9 10 2. Dial Control - Rotate the dial to adjust volume level Adjust LCD backlight level under Standby - Push the dial to confirm / select menu options - Push to stop/resume playback of the radio 3. Speaker 4. On/off - Press to power on/ Standby Back 5. Local - Quick access the local stations in your country 6. Menu - Press to enter menu 7.
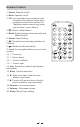
Remote Control 1. Power: Standby on/off 2. Mute: Speaker on/off 3. 0-9: Input numbers for encryption code, recall favorite stations, enter index number to select item from the list Toggle the same numeric key gives you a choice to input letters 4. : Return to Main Menu 5. Mode: Switch between Internet radio and Media Centre 6. Alarm: Alarm Setting 7. : Preset the current playing station to Favorite 8. : Recall the favorite station 9. Local: Access radio stations in your local country 10.
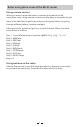
Enter encryption code of the Wi-Fi router Using remote control When you want to enter the letters, numbers or symbols for the encryption code, using remote control would be easy to complete the job. Here is the definition of each key and press the same button to cycling through different letters / symbol available After each entry, press the right key to input the next. When it is done, press Enter to confirm. Key 1: 1 and different kind of symbols !@#$%^&*()_+[]{};:'”\|,.
Before you start Please ensure the following is ready: ž You have a broadband internet connection. ž A wireless broadband router is connected to the internet successfully. The radio supports Wireless B, G and N connection (Wireless N router can also be used with the setting on B or G). ž You know the Wired Equivalent Privacy (WEP) or Wi-Fi Protected Access (WPA) data encryption code/password. You need to key in the correct code when the radio is connected to the wireless router for network connection.
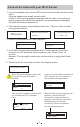
Connect the radio with your Wi-Fi Router 1. Insert the adaptor plug into the DC socket located at the rear side of the radio. Plug the adaptor into a wall socket outlet. Caution: Use only the adaptor supplied with the radio. Connecting a power supply with a different rating will cause permanent damage to the radio and may be hazardous. 2. The radio will power on and display as follow. Choose to start configuring network. Configure Network? Boot up and connect to Welcome network No 3.
Start using internet radio Press
¢ Recall a station Press the button on the remote controller or press the button briefly on the unit to recall the Favorite list. You can enter the Index number to quickly scroll to the radio station you want to listen. e.g., On the remote controller, press 2 8 and Enter, it will scroll to the station no. 28. ¢ Edit your favorite list On the Favorite list, choose the radio station you want to edit then press the right " key on the remote controller.
Media Centre UPnP (Universal Plug and Play) You can stream music from the Networked device which supports UPnP function to the radio to play. For instance, most of the latest computer laptop supports UPnP, and you can stream music from Windows Media Player application on the computer and listen on your radio. Please make sure your computer laptop is on the same Wi-Fi network as the Radio before you start using this function. 1.
2.1.4 From the ‘Media Sharing’ windows, the radio will be listed as an unknown device. Click on the unknown device listed, then click the ‘Allow’ button and then click ‘OK’. Allowing the Radio to Connect: 2.2 Windows 7 / Windows Media Player 12 2.2.1 If you are using WMP 12, simply go to and choose to retrieve the music files you would like to add to library. 2.2.
ii) Choose iii) Set the network location iv) Choose Home network 10
v) Create a homegroup, then choose the kind of media file to be accessed, such as music..etc. vi) Launch the Windows Media Player, select and choose from the drop down list. vii) You can now enjoy the music streaming from the windows media player.
Music streaming via UPnP 1. Once the UPnP server is configure to share media files with your radio, you can start music streaming. 2. On the main menu, select and choose 3. It may take a few seconds for the radio to complete the scan for available UPnP servers. If no UPnP servers are found, it will show . 4. After a successful scan is done, select your UPnP server. 5. The radio will show the media categories available from the UPnP server, e.g. ‘Music’, ‘Playlists’ etc. 6.
4. After the above settings are completed, press the left ! button to exit and make sure the Alarm is turned on. You will see the Alarm icon appeared on the display if it is activated. Sleep Timer Setting You can set the timer to let the radio go standby after certain time elapsed in the range of 15 minutes to 180 minutes. You can press button on the remote controller to set the timer. You will see the icon appeared on the display if the timer is set. Alarm Sleep Timer iRadio 1.
We have already set the channels according to the requirement in different countries. Choose the country you are staying from the list to get the correct channel. The is set by default, press on the Remote controller or push the to edit the country selection. Date and Time The radio will set your local time automatically after wifi connection. You can choose to manual set the time if you want.
¢ Level: Bright and Dim Bright - the display will stay at the selected level when there is operation on the radio or if the mode is selected in as described above. Dim - the display will dim to the selected level when mode is selected. ¢ Dimmer on Standby When the radio is on Standby, rotate the dial to adjust your prefer backlight level which you feel comfortable especially during night time.
Add your favorite URL You can add your favorite radio station if you know the published URL of the radio. We provide an embedded server for your radio and you can manage your favorite stations anytime to add or edit the list. Follow the steps below to access the embedded server: 1. Connect your PC to the same Wi-Fi network as your radio. 2.
Note: Ensure your mobile devices are on the same Wi-Fi network as the radio. The radio will be discovered as the Speaker source with name on your mobile devices. Choose the to be the speaker to play music, our radio will start playing the selected music from your mobile device.
Trouble Shooting Problem Solutions Cause • Confirm that a Wi-Fi or Ethernet Wired connected PC can access the internet (i.e. can browse the web) using the same network. • Check that a DHCP server is available, or that you have configured a static IP address on the radio. • Check that you firewall is not blocking any outgoing ports. As a minimum the radio needs access to UDP and TCP ports 80,554,1755,5000 and 7070.
1. If the Internet Radio keeps re-buffering radio station: The Internet Radio is streaming the data from the radio station via your broadband connection, if there is a high error rate on your broadband connection, or the connection is intermittent, then it will cause the Internet Radio to pause until the connection is re-established and it has received enough data to start playing again.
Technical Specification Model: WR-220 Power input: 5V 1A Power voltage: 100-240V~50/60Hz Wireless Network: IEEE802.11b/g/n Security Protocol: WEP/WPA/WPA2 Audio output power: 2W (RMS) Audio sockets: 3.5mm earphone jack, 3.
FCC Warning This device complies with Part 15 of the FCC Rules. Operation is subject to the following two conditions: (1) This device may not cause harmful interference, and (2) this device must accept any interference received, including interference that may cause undesired operation. NOTE : Any changes or modifications to this unit not expressly approved by the party responsible for compliance could void the user's authority to operate the equipment.