
Operation Manual


Starting PageScope Direct Print
3
3-3
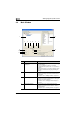
5 [Add Job Setting] button Select a printer in the “Registered Printers/Job
Settings” list, and then click this button to add a job
setting for a registered printer.
For details, refer to “Adding a Job Setting” on
page 5-1.
6 [Edit Job Setting] button Select a job setting in the “Registered Printers/Job
Settings” list, and then click this button to change the
print settings for a programmed job setting.
For details, refer to “Changing a Job Setting” on
page 5-3.
7 [Delete Job Setting] button Select a job setting in the “Registered Printers/Job
Settings” list, and then click this button to delete a
programmed job setting.
For details, refer to “Deleting a Job Setting” on
page 5-4.
8 “Details of Printers/Job
Setting” box
This box displays the print settings for the job setting
that is selected in the “Registered Printers/Job
Settings” list.
9 [Print a File] button Click this button to specify the file to be printed from
the main window.
For details, refer to “Specifying a File From the Main
Window” on page 6-5.
10 [Job Status View] button Click this button to view the printing status.
For details, refer to “Checking the Printing Status” on
page 9-1.
11 [Log View] button Click this button to view the log of files that have been
printed.
For details, refer to “Viewing the Print Log” on
page 9-3.
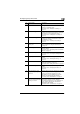
12 “Use Hot Folders” check box If this check box is selected, hot folders (folders
monitored for printing) can be used.
For details, refer to “Using Hot Folders” on page 6-6.
13 [Edit Hot Folders] button Click this button to specify the settings for the hot
folders.
For details, refer to “Setting up hot folders” on
page 6-6.
14 “Edit Job Setting for each
drag-and-drop printing.”
check box
If this check box is selected, a dialog box for changing
the print settings of the job setting appears each time
printing is performed by dragging a file to the
appropriate icon on the desktop or by using the
shortcut menu (displayed by right-clicking).
For details, refer to “Administrators” on page 7-1.
15 “Edit Authentication/Account
Track for each drag-and-drop
printing.” check box
If this check box is selected, a dialog box for
authentication appears each time printing is
performed by dragging a file to the appropriate icon
on the desktop or by using the shortcut menu
(displayed by right-clicking).
For details, refer to “General Users” on page 7-2.
No. Element Name Description