
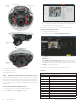
Quick Installation Guide


4
www.observint.com
© 2018, 2020 Observint Technologies. All rights reserved.
Step 4. Modify Network Parameters
NOTE: If the camera LAN extension cable is attached to a Network Video Recorder (NVR), skip this step.
The camera will receive network conguration settings from the NVR. Refer to the documentation available
for your NVR rmware for more information.
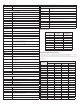
You can change the network parameters of devices that are active.
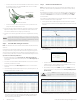
1. In the list of devices discovered, click on the device you want to change the network settings for, and
then click the select box to check it. See below.
Modify Network Parameters
2. In the popup window, edit the current network parameters, and then enter the admin user password
in the eld at the bottom.
a. Enable DHCP: You can select Enable DHCP to acquire compatible network settings from
a DHCP server installed on the LAN. However, these settings can be changed by the DHCP
server. Since it is recommended to use an unchanging IP address, you can use DHCP to acquire
compatible network settings, and then uncheck Enable DHCP and save that conguration to
retain the new network parameters.
b. In the example below, the IPv4 address was changed to 192.168.3.100, and the IPv4 Gateway
was changed to 192.168.3.1. The Subnet Mask here did not need to change. These settings were
determined to be compatible with the network router and other devices that share the same
router.
3. Click OK to save your settings. The parameter change(s) will be shown device’s network parameters
(see below).
Step 5. Login to the camera
NOTE: If the camera LAN extension cable is attached to a Network Video Recorder (NVR), skip this step.
Microsoft® IE is used to access your camera remotely. IE must run as an Administrator to use all features
available through a remote login to the camera.
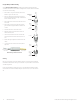
Setting MS Internet Explorer to run as an Administrator
Window 10:
To run IE as an Administrator:
1. Find MS IE in the start menu. Usually this is found in the Windows Accessories group.
2. Pin the entry to Start.
3. Right click on the Internet Explorer tile, and then select More | Run as administrator.
Run as
administrator
To login to the camera from a computer on the same LAN:
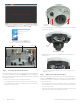
1. Open your Microsoft Internet Explorer (IE) browser on your computer and enter the IP address of the
camera in the URL eld. In the example below, the IP address of the camera is 192.168.3.100.
2. In the login window, enter admin for the User Name and the password you created in the
Password eld, the click Login.
3. If this is the rst time you are logging into a camera, you may see the message in the following screen.
If this appears, follow the sub-steps below.
a. Click on the message to install the plugin.