-
PrintShop Web Skinning Guide
-
PrintShop Web Skinning Guide Document version: PSW 2.1 R3250 Date: October, 2007 Objectif Lune - Contact Information Objectif Lune Inc. 2030 Pie IX, Suite 500 Montréal, QC Canada H1V 2C8 Tel.: 514-875-5863 Fax: 514-342-5294 www.objectiflune.com To find an Objectif Lune office near you and for more information on our products and services, visit: www.objectiflune.
-
Table of Contents Introduction................................................................................................................................................. 5 Skinning....................................................................................................................................................... 5 Templates and styles.................................................................................................................................. 6 Getting started...
-
Overview tables....................................................................................................................................... 29 Head...........................................................................................................................................................30 Subhead.....................................................................................................................................................30 Content..............................
-
Introduction With the introduction of version 2.0 the PrintShop Web (PSW) web site is fully skinnable, everything except the actual textual content of the page can - and will - vary from skin to skin. A skin is a series of files that control the presentation of the web site. To allow PSW to be skinnable, style is completely separated from contents. The web page use standard HTML elements, user defined classes and unique IDs.
-
PSW can use different skins for each company, allowing your customers to use the system in their own house style or a style that closely matches their house style (depending on the time and effort you have spend to match there corporate site). Users of that company can access the PSW web site via a personalized URL which will invoke their skin. Personalized URL is controlled by the PSW administrators by defining an URL variable for each company. For example: http:/www.yourprintshopweb.
-
Getting started Creating a skin for the first time can be a daunting and sometimes a time consuming task. This section gives you an overview of useful tools and sources on the web. Creating your own skin Before creating your own skins you should have some basic knowledge of HTML and CSS. There are fine books on these subjects and you will find a lot of information on the web. The web is probably your best source.
-
The style.php file in Notepad++ Browser extensions The toughest part will be to keep your skin compatible with the various browsers and browser versions. You can download and install additional browser extensions that will help you during skin creation. Typically these extensions expose the hierarchical structure of your web page allowing you to identify tag names, ids and CSS classes quickly. These extensions are available for all popular web browsers and can be downloaded for free.
-
The ID and class details are exposed by the Web Developer extension PrintShop Web Skinning Guide | 9
-
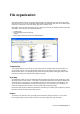
File organization Skins are organized under the Templates folder located in the PSW web site folder. Each skin has its own directory tree. The name of this folder will be visible in the Skin-pull down menu in the Web design section of a company and in the web design page in the Settings-menu. Skin folders stores the items required to render a skin and can contain an unlimited number of files and sub folders. A skin consists of the following elements: • • • • Template.
-
Web design parameters By editing the web design settings of a company you can specify company specific colors, fonts and logo. Using special functions a skin can retrieve these parameters and use them in the Style.php file.
-
The template file The Template.php file contains HTML code with a few snippets of PHP. These PHP snippets control the rendering of PSW function blocks on apage by page basis. Examples of functions blocks are: the menu bar, sub menus, the user info bar, the main content area. A sample PSW web page showing various function blocks Function blocks The design and positions of these blocks can be changed by altering the Style.php file and changing the code and its position in Template.php.
-
0){ ?>
-
As you can see the PHP snippets perform a function_exists check. You should not alter these checks but you may add HTML tags and information inside or outside these checks. To meet your design you will probably need to add additional
and/or
tags to change the positioning of the function blocks. Page title The tag is part of the <head> and contains the name of the web page. The contents of this tag are shown in the browser title bar - at the very top of the window.</p>
</li>
<li>
<h6><a class="text-decoration-none text-link fw-bold" href="/manual/objectif-lune/printshop-web/4-3-2-1-2-1-english/page-15.html">PAGE 15</a></h6>
<p>In the picture above additional text is added to the user info bar (the text PSW). You may hard code this text, in this case it is retrieved using the generateAdditionalInfo function. The returned value depends on the selected language and can be changed by editing the cAddiontalInfo string in the Edit Language page (Settings). Menu This function generates the main menu bar.</p>
</li>
<li>
<h6><a class="text-decoration-none text-link fw-bold" href="/manual/objectif-lune/printshop-web/4-3-2-1-2-1-english/page-16.html">PAGE 16</a></h6>
<p>Sub menus Sub menus are uses throughout the PSW web site. A good example is the Settings sub menu and sub menus inside the Publication Types and Companies sections. These sub menus typically show a list of items that can be used to navigate to a sub item of that section. Using the Style files you will be able to alter the look of these list items, for example changing the color of the list item when you place the mouse over the item (hover).</p>
</li>
<li>
<h6><a class="text-decoration-none text-link fw-bold" href="/manual/objectif-lune/printshop-web/4-3-2-1-2-1-english/page-17.html">PAGE 17</a></h6>
<p>Style.php The style files hold the styling parameters for your skin. It defines the fonts,colors, borders, backgrounds, width and height specifications of the user interface elements.</p>
</li>
<li>
<h6><a class="text-decoration-none text-link fw-bold" href="/manual/objectif-lune/printshop-web/4-3-2-1-2-1-english/page-18.html">PAGE 18</a></h6>
<p>CSS Syntax The CSS syntax is made up of the following parts: a selector, a property and a value: selector {property: value} Normally the selector is the HTML element/tag you wish to style, the property is the attribute you wish to change, and each property can take a value. A colon is used to separate the property and its value. They are surrounded by curly braces, see the snippet below: h1 {color: lime} You can specify more than one property, the properties should be separated by a semicolon.</p>
</li>
<li>
<h6><a class="text-decoration-none text-link fw-bold" href="/manual/objectif-lune/printshop-web/4-3-2-1-2-1-english/page-19.html">PAGE 19</a></h6>
<p>You can insert comments in CSS to explain your settings. Like HTML comments, CSS comments will be ignored by the browser. A CSS comment begins with "/*", and ends with "*/". /* Submenu and Search items start here */ #search, #submenu, #submenu1, #submenu2, #preview, #summary { width: 100%; } /* multi-line comment here */ Global styles The Style.php file holds the style definitions that apply to all pages in the system. At the beginning of the file the skin_customization.</p>
</li>
<li>
<h6><a class="text-decoration-none text-link fw-bold" href="/manual/objectif-lune/printshop-web/4-3-2-1-2-1-english/page-20.html">PAGE 20</a></h6>
<p>Browser exceptions To solve browser specific rendering issues you can create style exceptions for a specific browser or browser version. Below a snippet from the style-moz.php exception file (FireFox). /* ** Mozilla specific style sheet entries */ * { -moz-box-sizing: border-box; } .formLabel, .downloadLineLabel, .formStatic, .fieldComment, .formStaticUnits, .formStaticPrice, .formLink, .formStaticFlex, .formSelect, .formField, .formFieldNoWidth, .progressLabel, .progressBarWrapper, .progressBarItemDone, .</p>
</li>
<li>
<h6><a class="text-decoration-none text-link fw-bold" href="/manual/objectif-lune/printshop-web/4-3-2-1-2-1-english/page-21.html">PAGE 21</a></h6>
<p>Operating systems The operations system names use the following abbreviations: • • • • nt = Windows XP nt = Windows 2003 Server nt = Windows NT mac = Mac OS X Note: Exceptions made for FireFox are stored in a moz exception file. When making an exception for a specific version of FireFox the version number should refer to the Mozilla engine, this number differs from the FireFox version number.</p>
</li>
<li>
<h6><a class="text-decoration-none text-link fw-bold" href="/manual/objectif-lune/printshop-web/4-3-2-1-2-1-english/page-22.html">PAGE 22</a></h6>
<p>Header The information stated in the header div is used to display the main page header or title. This is the place to show a system wide logo or the logo of your customer. The default skin showing the PSW logo as the header image Replacing content The HTML snippet below shows the header div containing a < h1> tag. Using the Style.php you can replace its contents by a logo uploaded in the Edit Web Design page. This allows the system to show a company specific image or logo.</p>
</li>
<li>
<h6><a class="text-decoration-none text-link fw-bold" href="/manual/objectif-lune/printshop-web/4-3-2-1-2-1-english/page-23.html">PAGE 23</a></h6>
<p>User information The User Info block displays the name of the logged on user, an option that lets the user edit his or her personal information and the Log off option. The Edit User Info is optional and depends on the users role. In the default the user User Info block is dark blue and placed just above the Menu bar In the default skin the User Info bar is placed just above the Menu bar. Using styling parameters the two seem to be surrounded by border.</p>
</li>
<li>
<h6><a class="text-decoration-none text-link fw-bold" href="/manual/objectif-lune/printshop-web/4-3-2-1-2-1-english/page-24.html">PAGE 24</a></h6>
<p>Adding additional information The User Info bar has additional information. The code in the template file uses generateUserInfo to retrieve the cAdditionalInfo text from the language strings. The value for this string can be changed using the Edit language page in the Settings section. This variable is used for a global language dependent message. In the default setup the value for this string is PSW. Hard coded text and other elements can be added to the HTML code.</p>
</li>
<li>
<h6><a class="text-decoration-none text-link fw-bold" href="/manual/objectif-lune/printshop-web/4-3-2-1-2-1-english/page-25.html">PAGE 25</a></h6>
<p>Menu bar The Menu bar provides access to the main sections of PSW. Like the User Info bar the items of the Menu bar are created using HTML lists, which means that you can change its orientation by altering the CSS file. In the default skin the Menu bar is placed directly beneath the User Info bar Styling the menu items The Menu bar is generated using HTML lists, within the list items hyperlinks (<a> tags) are used to define the target when the user clicks the item.</p>
</li>
<li>
<h6><a class="text-decoration-none text-link fw-bold" href="/manual/objectif-lune/printshop-web/4-3-2-1-2-1-english/page-26.html">PAGE 26</a></h6>
<p>#menu div { background-color: <? generateSkinContrastColor(); ?>; padding: 1px; color: #000000; } #menu ul { list-style: none; margin: 0; display: inline; } #menu li { display: inline; line-height: 2em; margin: 0; } #menu .selected a { background-color: <? generateSkinContrastColorHighLight(1.1); ?>; } #menu li a { text-decoration: none; padding: 5px 5px; } #menu li a:hover { background-color: <? generateSkinContrastColorHighLight(0.</p>
</li>
<li>
<h6><a class="text-decoration-none text-link fw-bold" href="/manual/objectif-lune/printshop-web/4-3-2-1-2-1-english/page-27.html">PAGE 27</a></h6>
<p>Creating a Tabbed menu Below is a sample of the Menu bar where the menu items have a tabbed style. To achieve this a repeating background image is added to the <li> tag. Space is added between the items by adding a right margin. To complete the design border attributes are set for top, left and right sides of the <li> tag.</p>
</li>
<li>
<h6><a class="text-decoration-none text-link fw-bold" href="/manual/objectif-lune/printshop-web/4-3-2-1-2-1-english/page-28.html">PAGE 28</a></h6>
<p>Background The <body> tag has two attributes to specify backgrounds. The background can be a color and/or an image. These attributes can be added directly in the Template.php file (bgcolor and background) or to the Style.php file. Adding a background image Background-images can be used in most HTML elements - not just for the whole page (body) and can be used for simple but effective results, such as rounded corners. Example: body { background-image: url("images/main-bg.</p>
</li>
<li>
<h6><a class="text-decoration-none text-link fw-bold" href="/manual/objectif-lune/printshop-web/4-3-2-1-2-1-english/page-29.html">PAGE 29</a></h6>
<p>Overview tables Overview pages show tabular data (for example the Companies, Users and Publication Types pages). An overview table is build using the table tag and follows the regular HTML <table> tag structure.</p>
</li>
<li>
<h6><a class="text-decoration-none text-link fw-bold" href="/manual/objectif-lune/printshop-web/4-3-2-1-2-1-english/page-30.html">PAGE 30</a></h6>
<p><td id="cCompanyCode_3" class="text" ><a href='site.php?pageid=company_properties&id=3' >44p</a></td> </tr> <tr class="record level0"> <td id="fnCheckCompanyID[]_1" class="checkbox" > <input type="checkbox" class="formCheckbox " id="1Field" name="fnCheckCompanyID[]" value="1"/> </td> <td id="cCompanyName_1" class="text" ><a href='site.php?pageid=company_properties&id=1'>Objectif Lune</a></td> <td id="cCompanyCode_1" class="text" ><a href='site.</p>
</li>
<li>
<h6><a class="text-decoration-none text-link fw-bold" href="/manual/objectif-lune/printshop-web/4-3-2-1-2-1-english/page-31.html">PAGE 31</a></h6>
<p>Content The rows (<tr> tag) that form the body of the table have the record class selector. In hierarchical overviews a second class selector is used to specify the level in the hierarchy. The <td> tags contained by the table row can have different class selectors. This depends on the type of content, examples are: text, icon and check box. In the skins supplied with PSW the background color for the element is set when the user places the cursor over a specific row (hovers). #tableOverview tr.</p>
</li>
<li>
<h6><a class="text-decoration-none text-link fw-bold" href="/manual/objectif-lune/printshop-web/4-3-2-1-2-1-english/page-32.html">PAGE 32</a></h6>
<p>Edit forms A form is an area that can contain form fields. Form fields are objects that allow the visitor to enter information - for example text boxes, drop-down menus or radio buttons. When the visitor clicks a submit or save button, the content of the form is sent to PSW. The Edit User Info form The following sample shows a stripped down source code of an edit form. Like the overview pages all elements are surrounded by a content <div> tag. The first child of this tag is the <form> tag.</p>
</li>
<li>
<h6><a class="text-decoration-none text-link fw-bold" href="/manual/objectif-lune/printshop-web/4-3-2-1-2-1-english/page-33.html">PAGE 33</a></h6>
<p><input type="password" class="formField" id="fcPasswordField" name="fcPassword" value="administrator"> </div> <!-- A warning item, by default this node is invisible to the user --> <div id="personEditInfoForm_fcPassword_Required" class="warnings"> <div class="warningTable"> <span class="warningLabel"> </span><span class="warningIcon"> <span class="warningItem">Password is a required field!</span></span> </div> </div> <!-- A pulldown menu --> <div class="formLine" id="fnLanguageIDLine"> <span class="for</p>
</li>
<li>
<h6><a class="text-decoration-none text-link fw-bold" href="/manual/objectif-lune/printshop-web/4-3-2-1-2-1-english/page-34.html">PAGE 34</a></h6>
<p>Form head The first content element is the form header. In the default skin the information in this tag is used to visually group the elements in the form. .formHeader { display: block; width: 100%; background-color: <? generateSkinMainColor(); ?>; color: #FFFFFF; padding: 2px; font-weight: bold; } Form lines Each line in an edit form is enclosed by a <div> tag. This element has an unique id and a Formline class. Normally each line contains two child elements: a label and a field.</p>
</li>
<li>
<h6><a class="text-decoration-none text-link fw-bold" href="/manual/objectif-lune/printshop-web/4-3-2-1-2-1-english/page-35.html">PAGE 35</a></h6>
<p>The warningLabel <span> is used as spacer to make sure that the warning icon and message align with the field of the accompanying form line. The warningIcon <span> holds the actual warning message which is stored in a separate <span> tag. The warning icon is set using CSS. The following snippet shows background-image attributes for the warning icon. .warningIcon { display: inline-block; width: 73%; background-image: url(../../images/icon_alert.</p>
</li>
<li>
<h6><a class="text-decoration-none text-link fw-bold" href="/manual/objectif-lune/printshop-web/4-3-2-1-2-1-english/page-36.html">PAGE 36</a></h6>
<p>Sub menus Several sections have one or multiple sub menus. Sub menus are used to navigate to sub sections of that specific section. Sub menus have their own classes and styles. The sub menu of the Settings section Like the Main menu and the User Info block the sub menus are created using HTML lists (<ul> tag and <li> tags).</p>
</li>
<li>
<h6><a class="text-decoration-none text-link fw-bold" href="/manual/objectif-lune/printshop-web/4-3-2-1-2-1-english/page-37.html">PAGE 37</a></h6>
<p></div> The list items have two class selectors. The first defines the indent level. The sub menu of the Settings section uses sub levels for the items that relate to the Email subsection. The second selector is optional and will only be set to mark the selected menu item. This allows you to visually mark the selected item by changing its style in the style documents. #submenu li.level0{ } #submenu li.level1{ padding-left: 1.5em; } #submenu .selected{ font-weight: bold; } Multiple sub menus The Template.</p>
</li>
<li>
<h6><a class="text-decoration-none text-link fw-bold" href="/manual/objectif-lune/printshop-web/4-3-2-1-2-1-english/page-38.html">PAGE 38</a></h6>
<p>Special variables In this section we list the special variables you can use in the Template.php and Style.php files. Variables for Template.php The functions in this section can be used in the Template.php file. generateString The generateString function retrieves a language string based on the supplied parameter. It is used to insert language dependent text. <? generateString(cSystemName); ?> /* Renders to following text */ PrintShop Web Custom strings can be added to the language strings.</p>
</li>
<li>
<h6><a class="text-decoration-none text-link fw-bold" href="/manual/objectif-lune/printshop-web/4-3-2-1-2-1-english/page-39.html">PAGE 39</a></h6>
<p>The edit Web Design page These values are retrieved from the PSW database and or calculated based on these values. You can set these values per company in the companies Web Design page. The first few lines of the Style.php document are as follows: <?php include_once "../../functions/skin_customization.</p>
</li>
<li>
<h6><a class="text-decoration-none text-link fw-bold" href="/manual/objectif-lune/printshop-web/4-3-2-1-2-1-english/page-40.html">PAGE 40</a></h6>
<p>generateSkinFont The generateSkinFont function retrieves the font information set in the Edit Web Design page of the PSW site. The value entered in the Edit Web Design page (Font family) can be a single font name or a comma separated list. Below an example on how the Font family can be set using this function: input, select, body, textarea { font-size: 70%; line-height: 1.</p>
</li>
<li>
<h6><a class="text-decoration-none text-link fw-bold" href="/manual/objectif-lune/printshop-web/4-3-2-1-2-1-english/page-41.html">PAGE 41</a></h6>
<p>generateSkinContrastColorHighLight The generateSkinContrastColorHighLight function retrieves the skins contrast color set in the Edit Web Design page. A parameter can be supplied to change the tint of the color. Fractional values are used, where 0.0 will be black, 1.0 the original color and higher values will result in a lighter tint of this color. Below an example on how this color can be set using this function. In this case the background color of the selected menu item will have a lighter color: #menu .</p>
</li>
<li>
<h6><a class="text-decoration-none text-link fw-bold" href="/manual/objectif-lune/printshop-web/4-3-2-1-2-1-english/page-42.html">PAGE 42</a></h6>
<p>generateSkinLogo The generateSkinLogo retrieves the path to the header image specified in the Edit Web Design page. If no image is specified the path of the header image from the system default skin will be returned. Below an example on how this function can be used in your Style.</p>
</li>
<li>
<h6><a class="text-decoration-none text-link fw-bold" href="/manual/objectif-lune/printshop-web/4-3-2-1-2-1-english/page-43.html">PAGE 43</a></h6>
<p>ELECTRONIC END USER LICENSE AGREEMENT FOR PRINTSHOP WEB NOTICE TO USER: THIS IS A CONTRACT. BY INSTALLING THIS SOFTWARE YOU ACCEPT ALL THE TERMS AND CONDITIONS OF THIS AGREEMENT. This Objectif Lune End User License Agreement accompanies the PrintShop Web product and related explanatory materials ("Software"). The term "Software" also shall include any upgrades, modified versions or updates of the Software licensed to you by Objectif Lune. Please read this Agreement carefully.</p>
</li>
</ul>
</nav>
</div>
</section>
</section>
</main>
<footer class="page-footer">
<div class="container flex-column py-3 py-sm-4">
<div class="row mb-1 mb-sm-2 mb-md-5">
<a href="/" class="brand offset-sm-0 col-sm-4 col-md-3 col-lg-2 offset-2 col-8 text-center text-md-start"><img class="logo-small" src="/assets/img/brand-large.png" alt="Manualshelf"/></a>
</div>
<div class="row">
<dl class="text-center text-sm-start col-sm-3">
<dt class="fw-bold">Who We Are</dt>
<dd><a class="text-decoration-none" href="/about">About Us</a></dd>
<dd><a class="text-decoration-none" href="/company">Company</a></dd>
<dd><a class="text-decoration-none" href="/careers">Careers</a></dd>
<dd><a class="text-decoration-none" href="/terms">Terms & Privacy</a></dd>
</dl>
<dl class="text-center text-sm-start col-sm-3">
<dt class="fw-bold">Resources</dt>
<dd><a class="text-decoration-none" href="/brands">List of Manufacturers</a></dd>
<dd><a class="text-decoration-none" href="/">Support</a></dd>
<dd><a class="text-decoration-none" href="/press">For the Press</a></dd>
<dd><a class="text-decoration-none" href="/press#assets">Media assets</a></dd>
<dd><a class="text-decoration-none" href="/faq">FAQ</a></dd>
</dl>
<dl class="text-center text-sm-start col-sm-3">
<dt class="fw-bold">Get in touch</dt>
<dd><a class="text-decoration-none" href="#">Blog</a></dd>
<dd><a class="text-decoration-none" href="#">Email</a></dd>
<dd><a class="text-decoration-none" href="/dmca">DMCA</a></dd>
</dl>
</div>
<div class="row">
<div class="text-center text-sm-start col-sm-4 pe-sm-0">
<a href="https://www.facebook.com/pages/ManualShelf/1488826334681423" class="fs-5 text-center d-inline-block social rounded-2 align-middle text-decoration-none me-2"><i class="fab fa-facebook-f"></i></a>
<a href="https://www.twitter.com/ManualShelf" class="fs-5 text-center d-inline-block social rounded-2 align-middle text-decoration-none me-2"><i class="fab fa-twitter"></i></a>
<a href="https://plus.google.com/+ManualShelf" class="fs-5 text-center d-inline-block social rounded-2 align-middle text-decoration-none me-2"><i class="fab fa-google-plus-g"></i></a>
<a href="http://www.pinterest.com/ManualShelf" class="fs-5 text-center d-inline-block social rounded-2 align-middle text-decoration-none"><i class="fab fa-pinterest-p"></i></a>
</div>
<div class="col col-sm-8 d-flex flex-column align-items-center flex-sm-row flex-wrap flex-sm-nowrap justify-content-center justify-content-sm-end">
<div class="copy w-auto d-flex align-items-center justify-content-center justify-content-sm-end mt-2 mt-sm-0 me-2">ManualShelf © 2013-2025</div>
<select class="form-select form-select-sm w-auto mt-2 mt-sm-0">
<option value="usa">USA</option>
</select>
<div>
</div>
</div>
<!-- /22287960372/pixel -->
<div id='pixel'>
<script>
googletag.cmd.push(function() { googletag.display('pixel'); });
</script>
</div>
</footer>
<!-- JavaScript -->
<script src="/assets/js/jquery-3.3.1.min.js"></script>
<script src="/assets/js/bootstrap.bundle.min.js"></script>
<script src="/assets/js/jquery.autocomplete.min.js"></script>
<!-- Support code -->
<script type="text/javascript">
$.extend({
redirectPost: function(location, args) {
var form = '';
$.each(args, function(key, value) {
form += '<input type="hidden" name="' + key + '" value="' + value + '">';
});
form = '<form id="s1" action="' + location + '" method="POST">' + form + '</form>';
$(document.body).append(form);
$("#s1").submit();
}
});
$(document).ready(function(){
$("#query").autocomplete({
minChars: 3,
groupBy: 'type',
paramName: 'q',
dataType: 'json',
serviceUrl: '/autocomplete',
noCache: true,
showNoSuggestionNotice: true,
noSuggestionNotice: 'Zarro results found',
onSelect: function (suggestion) {
$.redirectPost(suggestion.data.url, {highlight: encodeURIComponent(JSON.stringify(suggestion.data.hls))});
}
});
var toc = $('.toc-selector');
if (toc.length) {
var slideParams = { duration: 800, easing: 'linear' };
toc.click(function() {
$(this).toggleClass('open');
var section = $('.toc-content');
var isCollapsed = section.attr('data-collapsed') === 'true';
if (isCollapsed) {
section.slideDown(slideParams)
section.attr('data-collapsed', 'false')
} else {
section.slideUp(slideParams);
section.attr('data-collapsed', 'true')
}
});
}
});
var lastSmall = $(window).width() < 576;
$(window).resize(function() {
var newSmall = $(window).width() < 576;
if (lastSmall != newSmall) {
lastSmall = newSmall;
window.location.href = window.location.href;
}
});
</script>
</body>
</html>