
7.0


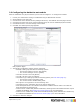


Table Of Contents

2.2 Configuring the Authorize.net module
After the installation of a payment module you will need to configure it. To configure the module:
1. Launch your web browser and log in to PSM Web using an administrator account.
2. Select Settings in the menu bar.
3. Click Overview in the Modules section (Settings side menu). The Modules Overview page is shown.
4. Click the plus-symbol next to the Payment Modules group to view the installed payment modules.
5. Click Authorize.net to view the settings of the module.
6. Click Edit. The Edit Properties page appears.
Edit properties pages
7. The following configuation options must be configured:
▪ Gateway: Radio group field with the following options:
▪ Test use this setting to use the Test gateway
▪ Live use this setting to use Live gateway
▪ Test URL: the URL to the Test gateway
▪ Live URL: the URL to the Live gateway
▪ Transaction Type: Radio group with the following options (see Test mode (Page 5)):
▪ Test use this mode to set testing mode
▪ Live use this mode to disable testing mode
▪ API Login ID: the Login ID for the account being used
▪ Transaction Key:the Transaction Key for the account being used
▪ Order Description Prefix: the contents of this field is combined with the order id to create the
Order Description for Authorize.net
▪ Check for AVS: enables AVS (Address Verification) checking where individual AVS checks may be
enabled and disabled. See AVS and CCV checks (Page 6) for more information.
▪ Check for CCV: enables CCV (Credit Card Verification)checking where individual CCV checks may
be enabled and disabled. See AVS and CCV checks (Page 6) for more information.
8. Click Save to store the changes.
Objectif Lune Inc. © 2010 4