PrintShop Mail Web Authorize.
Copyright Information Copyright © 1994-2010 Objectif Lune Inc. All Rights Reserved. No part of this publication may be reproduced, transmitted, transcribed, stored in a retrieval system, or translated into any other language or computer language in whole or in part, in any form or by any means, whether it be electronic, mechanical, magnetic, optical, manual or otherwise, without prior written consent of Objectif Lune Inc. Objectif Lune Inc.
Table of contents 1 Introduction ..................................................................................................................................................................................................... 1 2 Authorize.net.................................................................................................................................................................................................... 2 2.1 Requirements ................................................
1 Introduction Payment modules allow your store to communicate with merchant banks to transfer money following a sale. Payment modules allow you to collect money following a sale. With the introduction of PrintShop Mail Web 7 administrators can install additional payment module. Payment modules require a Business To Consumer license on the PSM Web dongle. Authorize.net is a payment gateway service provider for merchants in the USA. The Authorize.
2 Authorize.net The workflow for a shop owner to add Authorize.net to his webshop is the following: 1. Apply for an Authorize.net account 2. Configure the account on the Authorize.net website 3. Add the Authorize.net payment connector to PSM Web 4. Configure the Authorize.net payment connector The following sections will guide you through this process and explain how to configure the module. Objectif Lune Inc.
2.1 Requirements Please ensure that the following requirements have been met before using the payment connector: 1. Installation: The installation constists of the following steps: ▪ Install PrintShop Mail Web 7.0 or upgrade to this version. ▪ Configure PSM Web by completing the First Run Wizard. ▪ Install the payment module as described in the PSM Web - Administrator Guide. 2.
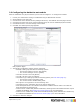
2.2 Configuring the Authorize.net module After the installation of a payment module you will need to configure it. To configure the module: 1. 2. 3. 4. 5. 6. Launch your web browser and log in to PSM Web using an administrator account. Select Settings in the menu bar. Click Overview in the Modules section (Settings side menu). The Modules Overview page is shown. Click the plus-symbol next to the Payment Modules group to view the installed payment modules. Click Authorize.
2.3 Test mode With a Developer account the test mode setting will influence the response codes generated by Authorize.net. If the test mode is enabled the amount of the order will determine which response code will be returned by the payment gateway and if the transaction will be successful or not. If you set the test mode off all transactions will succeed no matter what the amount is. Please note that the AVS and CCV options should be unchecked as a Developer account does not support these options.
2.4 AVS and CCV checks If you are planning on using AVS (Address Verification) and/or CCV (Credit Card Validation) checks it's important to configure your Authorize.net account correctly. The AVS and CCV checks are additional; this means that those checks could fail but you could still have a successful transaction. In the Authorize.net account you can specify which response you would allow. It's important to allow all responses in this account and to limit the responses in the Authorize.
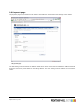
2.5 Payment page The payment page for the Authorize.net module varies based on the AVS and CCV settings of the module. The payment page The AVS setting controls whether the address fields will be shown. When AVS is enabled the address fields will be shown and will be preset based on the billing address. The CCV setting controls whether the CCV field is shown. Objectif Lune Inc.