
2020.1
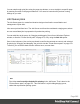


Table Of Contents
- Table of Contents
- Welcome to PrintShop Mail Connect 2020.1
- Setup And Configuration
- System and Hardware Considerations
- Installation and Activation
- Preferences
- Clean-up Service preferences
- Database Connection preferences
- Editing preferences
- Email preferences
- Emmet preferences
- Engines preferences
- Hardware for Digital Signing preferences
- Language preferences
- Logging preferences
- Parallel Processing preferences
- Print preferences
- Project Wizards preferences
- Save preferences
- Scripting preferences
- Engines preferences
- Parallel Processing preferences
- Known Issues
- Uninstalling
- General information
- The Designer
- Designer basics
- Content elements
- Snippets
- Styling and formatting
- Personalizing content
- Preferences
- Clean-up Service preferences
- Database Connection preferences
- Editing preferences
- Email preferences
- Emmet preferences
- Engines preferences
- Hardware for Digital Signing preferences
- Language preferences
- Logging preferences
- Parallel Processing preferences
- Print preferences
- Project Wizards preferences
- Save preferences
- Scripting preferences
- Writing your own scripts
- Script types
- Creating a new Standard Script
- Writing a script
- Setting the scope of a script
- Managing scripts
- Testing scripts
- Optimizing scripts
- The script flow: when scripts run
- Selectors in Connect
- Loading a snippet via a script
- Loading content using a server's API
- Using scripts in Dynamic Tables
- Control Scripts
- Post Pagination Scripts
- Translating templates
- Designer User Interface
- Designer Script API
- Generating output
- Print Manager
- PrintShop Mail Connect Release Notes
- OL PrintShop Mail Connect Release Notes 2020.1
- Previous Releases
- License Update Required for Upgrade to Connect 2019.x
- Backup before Upgrading
- Overview
- OL Connect 2019.2 Enhancements
- Connect 2019.2 Designer Improvements
- Connect 2019.2 Output Improvements
- Print Manager Improvements
- Known Issues
- License Update Required for Upgrade to Connect 2019.1
- Overview
- OL Connect 2019.1 Enhancements
- Connect 2019.1 Designer Updates
- Connect 2019.1 Output updates
- Print Wizard and Preset Wizard Improvements
- Known Issues
- Overview
- Connect 2018.2.1 Enhancements/Fixes
- Connect 2018.2 Enhancements
- Connect 2018.2 Designer Updates
- Connect 2018.2 Output updates
- Print Wizard and Preset Wizard Improvements
- Connect 2018.2 Print Manager updates
- Known Issues
- Overview
- Connect 2018.1.6 Enhancements/Fixes
- Connect 2018.1.5 Enhancements/Fixes
- Connect 2018.1.4 Enhancements/Fixes
- Connect 2018.1.3 Enhancements/Fixes
- Connect 2018.1.2 Enhancements/Fixes
- Connect 2018.1.1 Enhancements/Fixes
- Connect 2018.1 General Enhancements
- Connect 2018.1 Designer Enhancements/Fixes
- Connect 2018.1 Output Enhancements/Fixes
- Connect 2018.1 Print Manager Enhancements/Fixes
- Known Issues
- Overview
- Connect 1.8 General Enhancements and Fixes
- Connect 1.8 Performance Related Enhancements and Fixes
- Connect 1.8 Designer Enhancements and Fixes
- Connect 1.8 Output Enhancements and Fixes
- Connect 1.8 Print Manager Enhancements and Fixes
- Known Issues
- Overview
- Connect 1.7.1 General Enhancements and Fixes
- Connect 1.7.1 Designer Enhancements and Fixes
- Connect 1.7.1 Output Enhancements and Fixes
- Known Issues
- Overview
- Connect 1.6.1 General Enhancements and Fixes
- Connect 1.6.1 Designer Enhancements and Fixes
- Connect 1.6.1 Output Enhancements and Fixes
- Known Issues
- Overview
- Connect 1.5 Designer Enhancements and Fixes
- Connect 1.5 Output Enhancements and Fixes
- Connect 1.5 General Enhancements and Fixes
- Known Issues
- Overview
- Connect 1.4.2 Enhancements and Fixes
- Connect 1.4.1 New Features and Enhancements
- Connect 1.4.1 Designer Enhancements and Fixes
- Connect 1.4.1 Output Enhancements and Fixes
- Known Issues
- Knowledge Base
- Legal Notices and Acknowledgements

l
Printer: The relevant printer, if applicable.
l
Job ID: The relevant Job ID, if applicable.
l
Details: The actual message itself.
The following controls are available to the right of the Messages table, or via right mouse click
context menu:
l
Clear Log Items button / Clear Log context menu option: Click to clear the current log.
This does not delete log files, but it does delete the messages displayed onscreen.
l
Copy selected items to clipboard button / Copy context menu option: Click to copy
all messages to the clipboard. Useful for pasting messages into external software.
l
/ Always select last log entry button / Tail context menu options: Click to toggle
auto-scrolling on/off. Auto-scrolling ensures the most recent message is always displayed
when it is added to the log.
Job History pane
The Job History pane displays a list of all the print jobs that have been processed through the
Print Manager (except for those which have been explicitly removed).
l
Filter: Use this search functionality to reduce the data-set displayed in the table.
Type in a search word and then hit Enter to filter the table using the entered search word.
For example, select "business" to display only those entries that feature the text
"business".
To clear the filtering, delete the contents of the Filter box and press Enter.
Note
The Filter applies to the entire data set, so if you were to search for the text "Med"
the filter would return all those jobs that featured "Med" in the title, plus all those that
in any hot folders that featured "Med", plus all jobs whose priority had been set to
"Medium".
The search is case insensitive. Thus a search for "med" would return "Medium", as
Page 985