
2018.1
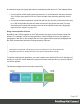
Table Of Contents
- Table of Contents
- Welcome to PrintShop Mail Connect 2018.1
- Setup And Configuration
- System and Hardware Considerations
- Installation and Activation
- Where to obtain the installers
- Installation - important information
- Installation - How to guides
- Activation
- Installation prerequisites
- User accounts and security
- Installing PrintShop Mail Connect on Machines without Internet Access
- Installation Wizard
- Running connect installer in Silent Mode
- Activating a License
- Migrating to a new workstation
- Preferences
- Connect: a peek under the hood
- Known Issues
- Business Graphics: Backward Compatibility Issues
- Minor differences in PCL, AFPDS and IPDS output introduced in 2018.1
- Windows Server 2016 issue
- No switch for case sensitivity in Dynamic Printer Rules editor
- Limit of 100MB of image files within a single job
- Print Output: Booklet Impositioning changes introduced in 2018.1
- Installation Paths with Multi-Byte Characters
- Switching Languages
- GoDaddy Certificates
- MySQL Compatibility
- Available Printer Models
- Colour Model in Stylesheets
- Image Preview in Designer
- VIPP Output
- Uninstalling
- Connect: a peek under the hood
- Connect File Types
- The Designer
- Codabar Settings
- Code 128 Settings
- Code 39 Settings
- Data Matrix Settings
- EAN-128 Settings
- EAN-13 Settings
- EAN-8 Settings
- Interleaved 2 of 5 Settings
- PDF417 Settings
- QR Code Settings
- UPC-A Settings
- UPC-E Settings
- Designer Script API
- Designer Script API
- Examples
- Examples
- Examples
- Examples
- Examples
- Examples
- Examples
- Examples
- Examples
- Examples
- Examples
- Examples
- Examples
- Example
- Example
- Example
- Example
- Example
- Examples
- Creating a table of contents
- Example
- Examples
- Examples
- Examples
- Examples
- Replace elements with a snippet
- Replace elements with a set of snippets
- Example
- Example
- Creating a Date object from a string
- Control Script API
- Examples
- Designer Script API
- Generating output
- Print output
- Email output
- Optimizing a template
- Generating Print output
- Saving Printing options in Print Presets
- Connect Printing options that cannot be changed from within the Printer Wizard
- Print Using Standard Print Output Settings
- Print Using Advanced Printer Wizard
- Adding print output models to the Print Wizard
- Splitting printing into more than one file
- Print output variables
- Generating Email output
- Print Manager
- Print Manager Introduction Video
- Print Manager usage
- Print Manager Interface
- Overview
- Connect 2018.1.6 Enhancements/Fixes
- Connect 2018.1.5 Enhancements/Fixes
- Connect 2018.1.4 Enhancements/Fixes
- Connect 2018.1.3 Enhancements/Fixes
- Connect 2018.1.2 Enhancements/Fixes
- Connect 2018.1.1 Enhancements/Fixes
- Connect 2018.1 General Enhancements
- Connect 2018.1 Designer Enhancements/Fixes
- Connect 2018.1 Output Enhancements/Fixes
- Connect 1.8 Print Manager Enhancements/Fixes
- Known Issues
- Overview
- Connect 2018.1.2 Enhancements/Fixes
- Connect 2018.1.1 Enhancements/Fixes
- Connect 2018.1 General Enhancements
- Connect 2018.1 Designer Enhancements/Fixes
- Connect 2018.1 Output Enhancements/Fixes
- Connect 1.8 Print Manager Enhancements/Fixes
- Known Issues
- Overview
- Connect 2018.1.1 Enhancements/Fixes
- Connect 2018.1 General Enhancements
- Connect 2018.1 Designer Enhancements/Fixes
- Connect 2018.1 Output Enhancements/Fixes
- Connect 1.8 Print Manager Enhancements/Fixes
- Known Issues
- Overview
- Connect 2018.1 General Enhancements
- Connect 2018.1 Designer Enhancements/Fixes
- Connect 2018.1 Output Enhancements/Fixes
- Connect 1.8 Print Manager Enhancements/Fixes
- Known Issues
- Previous Releases
- Overview
- Connect 1.8 General Enhancements and Fixes
- Connect 1.8 Performance Related Enhancements and Fixes
- Connect 1.8 Designer Enhancements and Fixes
- Connect 1.8 Output Enhancements and Fixes
- Connect 1.8 Print Manager Enhancements and Fixes
- Known Issues
- Overview
- Connect 1.7.1 General Enhancements and Fixes
- Connect 1.7.1 Designer Enhancements and Fixes
- Connect 1.7.1 Output Enhancements and Fixes
- Known Issues
- Overview
- Connect 1.6.1 General Enhancements and Fixes
- Connect 1.6.1 Designer Enhancements and Fixes
- Connect 1.6.1 Output Enhancements and Fixes
- Known Issues
- Overview
- Connect 1.5 Designer Enhancements and Fixes
- Connect 1.5 Output Enhancements and Fixes
- Connect 1.5 General Enhancements and Fixes
- Known Issues
- Overview
- Connect 1.4.2 Enhancements and Fixes
- Connect 1.4.1 New Features and Enhancements
- Connect 1.4.1 Designer Enhancements and Fixes
- Connect 1.4.1 Output Enhancements and Fixes
- Known Issues
- Legal Notices and Acknowledgements

Styling your templates with CSS files
Note
Email clients do not read CSS files and some even remove a <style> tag when it is present in the
email's header. Nevertheless, CSS files can be used with the Email context in the Designer. When
generating output from the Email context, the Designer converts all CSS rules that apply to the
content of the email to inline style tags, as if local formatting was applied.
Step 1: edit CSS
Editing CSS using a property sheet
1.
Select Edit > Stylesheets.
2.
Click the downward pointing arrow next to Global and select the context that you want to
edit styles for, or select the Global CSS file to edit CSS rules that apply to all contexts.
3.
Click New, or click one of the selectors that are already listed and click Edit.
4. Type a CSS selector. This can be:
l A class: .class. Class rules apply to all HTML elements with that class. When you
create a class, choose a name that indicates what the class is used for, e.g. ‘small’
for a class that gives elements the font size ‘small’. The class name has to be
preceded by a dot, e.g. .small.
l An ID: #id. An ID is always preceded by #, e.g. #sender. When you create an ID,
choose a name that indicates what the ID is used for, e.g. #sender would refer to the
HTML element with information about the sender.
Note
Each ID should be unique and can only be used once in each section.
l An HTML element: p, h1, table, etc. Type the tag name without the angle brackets.
l A combination of HTML elements, separated by a comma. The CSS rule will apply
to all HTML elements that are listed in the selector. For instance, a CSS rule with
the selector h1, p applies to first level headings as well as paragraphs.
Page 243