
1.8


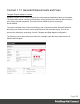


Table Of Contents
- Table of Contents
- Welcome to PrintShop Mail Connect 1.8
- Setup And Configuration
- System and Hardware Considerations
- Installation and Activation
- Where to obtain the installers
- Installation - important information
- Installation - How to guides
- Activation
- Installation Prerequisites
- User accounts and security
- The Importance of User Credentials on Installing and Running PrintShop Mail C...
- Installing PrintShop Mail Connect on Machines without Internet Access
- Installation Wizard
- Running connect installer in Silent Mode
- Activating a License
- Migrating to a new workstation
- Known Issues
- Uninstalling
- Connect: a peek under the hood
- Connect File Types
- The Designer
- Designer basics
- Content elements
- Snippets
- Styling and formatting
- Personalizing Content
- Writing your own scripts
- Designer User Interface
- Designer Script API
- Designer Script API
- Examples
- Examples
- Examples
- Examples
- Examples
- Examples
- Examples
- Examples
- Examples
- Examples
- Examples
- Examples
- Examples
- Example
- Example
- Example
- Example
- Example
- Examples
- Creating a table of contents
- Example
- Examples
- Examples
- Examples
- Examples
- Replace elements with a snippet
- Replace elements with a set of snippets
- Example
- Example
- Creating a Date object from a string
- Control Script API
- Examples
- Generating output
- Print output
- Email output
- Optimizing a template
- Generating Print output
- Saving Printing options in Print Presets
- Connect Printing options that cannot be changed from within the Printer Wizard
- Print Using Standard Print Output Settings
- Print Using Advanced Printer Wizard
- Adding print output models to the Print Wizard
- Splitting printing into more than one file
- Print output variables
- Generating Email output
- Print Manager
- Print Manager Introduction Video
- Print Manager usage
- Print Manager Interface
- Overview
- Connect 1.8 General Enhancements and Fixes
- Connect 1.8 Performance Related Enhancements and Fixes
- Connect 1.8 Designer Enhancements and Fixes
- Connect 1.8 Output Enhancements and Fixes
- Connect 1.8 Print Manager Enhancements and Fixes
- Known Issues
- Previous Releases
- Overview
- Connect 1.7.1 General Enhancements and Fixes
- Connect 1.7.1 Designer Enhancements and Fixes
- Connect 1.7.1 Output Enhancements and Fixes
- Known Issues
- Overview
- Connect 1.6.1 General Enhancements and Fixes
- Connect 1.6.1 Designer Enhancements and Fixes
- Connect 1.6.1 Output Enhancements and Fixes
- Known Issues
- Overview
- Connect 1.5 Designer Enhancements and Fixes
- Connect 1.5 Output Enhancements and Fixes
- Connect 1.5 General Enhancements and Fixes
- Known Issues
- Overview
- Connect 1.4.2 Enhancements and Fixes
- Connect 1.4.1 New Features and Enhancements
- Connect 1.4.1 Designer Enhancements and Fixes
- Connect 1.4.1 Output Enhancements and Fixes
- Known Issues
- Legal Notices and Acknowledgements

Known Issues
Installation Paths with Multi-Byte Characters
When installing the Traditional Chinese or Japanese versions of Connect, if the user specifies
an alternative installation path containing multi-byte/wide-char characters it can break some of
the links to the Connect-related shortcuts in the Start Menu and cause an error to appear at the
end of the installer. The workaround for the moment is to use the default installation path. The
problem will be addressed in a later release.
Switching Languages
Changing the language using the Window>Preferences>Language Setting menu option
does not currently change all of the strings in the application to the selected language. This is a
known issue and will be fixed in a later release.
In the meantime we offer the following workaround for anyone who needs to change the
language:
1. Go to the .ini files for the Designer and Server Config:
l C:\Program Files\Objectif Lune\OL Connect\Connect Designer\Designer.ini
l C:\Program Files\Objectif Lune\OL Connect\Connect Server
Configuration\ServerConfig.ini
2. Change the language parameter to the required one under Duser.language=en | es | de |
fr | it | ja | ko | pt | tw | zh
Only one of the above language tags should be selected. Once saved, Connect will appear in
the selected language at next start-up.
GoDaddy Certificates
When installing Connect offline, dialogs allow installing the GoDaddy certificates. Most users
should use the default settings and click Next. In some cases, however, this may not work
correctly. For this reason those users should activate Place all certificates in the following
store and then select the Trusted Root Certification Authorities as the target certificate store.
Page 655