
1.8


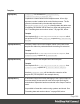
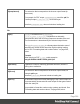
Table Of Contents
- Table of Contents
- Welcome to PrintShop Mail Connect 1.8
- Setup And Configuration
- System and Hardware Considerations
- Installation and Activation
- Where to obtain the installers
- Installation - important information
- Installation - How to guides
- Activation
- Installation Prerequisites
- User accounts and security
- The Importance of User Credentials on Installing and Running PrintShop Mail C...
- Installing PrintShop Mail Connect on Machines without Internet Access
- Installation Wizard
- Running connect installer in Silent Mode
- Activating a License
- Migrating to a new workstation
- Known Issues
- Uninstalling
- Connect: a peek under the hood
- Connect File Types
- The Designer
- Designer basics
- Content elements
- Snippets
- Styling and formatting
- Personalizing Content
- Writing your own scripts
- Designer User Interface
- Designer Script API
- Designer Script API
- Examples
- Examples
- Examples
- Examples
- Examples
- Examples
- Examples
- Examples
- Examples
- Examples
- Examples
- Examples
- Examples
- Example
- Example
- Example
- Example
- Example
- Examples
- Creating a table of contents
- Example
- Examples
- Examples
- Examples
- Examples
- Replace elements with a snippet
- Replace elements with a set of snippets
- Example
- Example
- Creating a Date object from a string
- Control Script API
- Examples
- Generating output
- Print output
- Email output
- Optimizing a template
- Generating Print output
- Saving Printing options in Print Presets
- Connect Printing options that cannot be changed from within the Printer Wizard
- Print Using Standard Print Output Settings
- Print Using Advanced Printer Wizard
- Adding print output models to the Print Wizard
- Splitting printing into more than one file
- Print output variables
- Generating Email output
- Print Manager
- Print Manager Introduction Video
- Print Manager usage
- Print Manager Interface
- Overview
- Connect 1.8 General Enhancements and Fixes
- Connect 1.8 Performance Related Enhancements and Fixes
- Connect 1.8 Designer Enhancements and Fixes
- Connect 1.8 Output Enhancements and Fixes
- Connect 1.8 Print Manager Enhancements and Fixes
- Known Issues
- Previous Releases
- Overview
- Connect 1.7.1 General Enhancements and Fixes
- Connect 1.7.1 Designer Enhancements and Fixes
- Connect 1.7.1 Output Enhancements and Fixes
- Known Issues
- Overview
- Connect 1.6.1 General Enhancements and Fixes
- Connect 1.6.1 Designer Enhancements and Fixes
- Connect 1.6.1 Output Enhancements and Fixes
- Known Issues
- Overview
- Connect 1.5 Designer Enhancements and Fixes
- Connect 1.5 Output Enhancements and Fixes
- Connect 1.5 General Enhancements and Fixes
- Known Issues
- Overview
- Connect 1.4.2 Enhancements and Fixes
- Connect 1.4.1 New Features and Enhancements
- Connect 1.4.1 Designer Enhancements and Fixes
- Connect 1.4.1 Output Enhancements and Fixes
- Known Issues
- Legal Notices and Acknowledgements

Connect Printing options that cannot be changed from
within the Printer Wizard
There are a number of settings for the Print context and Print sections that have an impact on
how Print sections are printed, which cannot be influenced through either a Job Creation
Preset or an Output Creation Preset.
These settings are:
l
Duplex printing. Duplex printing has to be enabled for a Print section, in order to print
that section on both sides of the paper. The same applies to Mixplex printing.
See "Enabling double-sided printing (Duplex, Mixplex)" on page89.
l
Finishing. The Print context , as well as each of the Print sections, can have its own
Finishing settings. In printing, Finishing is the way pages are bound together after they
are printed.
See "Setting the binding style for the Print context" on page81 and "Setting the binding
style for a Print section" on page88.
Also see "Finishing Options" on page473 for an explanation of the Finishing options.
l
Bleed. The margins around a page are called the Bleed. It can be used on some printers
to ensure that no unprinted edges occur in the final trimmed document.
See "Page settings: size, margins and bleed" on page91.
Print Using Standard Print Output Settings
When using the File >Print... option, the Print Configuration dialog appears. This dialog allows
you to print the template using Default printer settings, or the Last Used printer settings or by
using previously created Printing Presets.
To learn how to create Printing Presets please see Job Creation Presets and Output Creation
Presets.
l
Configuration Selection Group:
l
Output Creation: Use the drop-down to select existing Output Creation Presets.
Use the Gear button to edit the currently selected Preset or to reload the list of
Presets from the system.
Page 584