
1.8


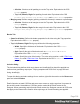

Table Of Contents
- Table of Contents
- Welcome to PrintShop Mail Connect 1.8
- Setup And Configuration
- System and Hardware Considerations
- Installation and Activation
- Where to obtain the installers
- Installation - important information
- Installation - How to guides
- Activation
- Installation Prerequisites
- User accounts and security
- The Importance of User Credentials on Installing and Running PrintShop Mail C...
- Installing PrintShop Mail Connect on Machines without Internet Access
- Installation Wizard
- Running connect installer in Silent Mode
- Activating a License
- Migrating to a new workstation
- Known Issues
- Uninstalling
- Connect: a peek under the hood
- Connect File Types
- The Designer
- Designer basics
- Content elements
- Snippets
- Styling and formatting
- Personalizing Content
- Writing your own scripts
- Designer User Interface
- Designer Script API
- Designer Script API
- Examples
- Examples
- Examples
- Examples
- Examples
- Examples
- Examples
- Examples
- Examples
- Examples
- Examples
- Examples
- Examples
- Example
- Example
- Example
- Example
- Example
- Examples
- Creating a table of contents
- Example
- Examples
- Examples
- Examples
- Examples
- Replace elements with a snippet
- Replace elements with a set of snippets
- Example
- Example
- Creating a Date object from a string
- Control Script API
- Examples
- Generating output
- Print output
- Email output
- Optimizing a template
- Generating Print output
- Saving Printing options in Print Presets
- Connect Printing options that cannot be changed from within the Printer Wizard
- Print Using Standard Print Output Settings
- Print Using Advanced Printer Wizard
- Adding print output models to the Print Wizard
- Splitting printing into more than one file
- Print output variables
- Generating Email output
- Print Manager
- Print Manager Introduction Video
- Print Manager usage
- Print Manager Interface
- Overview
- Connect 1.8 General Enhancements and Fixes
- Connect 1.8 Performance Related Enhancements and Fixes
- Connect 1.8 Designer Enhancements and Fixes
- Connect 1.8 Output Enhancements and Fixes
- Connect 1.8 Print Manager Enhancements and Fixes
- Known Issues
- Previous Releases
- Overview
- Connect 1.7.1 General Enhancements and Fixes
- Connect 1.7.1 Designer Enhancements and Fixes
- Connect 1.7.1 Output Enhancements and Fixes
- Known Issues
- Overview
- Connect 1.6.1 General Enhancements and Fixes
- Connect 1.6.1 Designer Enhancements and Fixes
- Connect 1.6.1 Output Enhancements and Fixes
- Known Issues
- Overview
- Connect 1.5 Designer Enhancements and Fixes
- Connect 1.5 Output Enhancements and Fixes
- Connect 1.5 General Enhancements and Fixes
- Known Issues
- Overview
- Connect 1.4.2 Enhancements and Fixes
- Connect 1.4.1 New Features and Enhancements
- Connect 1.4.1 Designer Enhancements and Fixes
- Connect 1.4.1 Output Enhancements and Fixes
- Known Issues
- Legal Notices and Acknowledgements

l
Untagged Images Group: Defines color profiles for any image that does not specifically
have color profiles or color settings enabled.
l
RGB: Use the drop-down to select a color profile for RGB colors. The list displays
ICC profiles located in "%USERPROFILE%\Connect\color-profiles\rgb".
l
CMYK: Use the drop-down to select a color profile for CMYK colors. The list
displays ICC profiles located in "%USERPROFILE%\Connect\color-profiles\cmyk"
l
Gray: Use the drop-down to select a color profile for Grayscale. The list displays
ICC profiles located in "%USERPROFILE%\Connect\color-profiles\gray"
l
Options Group:
l
Rendering intent: Use the drop-down to specify how colors are converted that are
out of range of a profile. For example, you may use tricks like reducing the
saturation of the entire print so that a color that is out of range still appears a bit
more vibrant than ones that are in range. Rendering intents use different methods to
trick the eye into believing that the print can reproduce irreproducible colors.
Edit Label Properties
The Edit Label Properties defines how a Pie Chart Label displays its title and data. It contains
two options:
l
Label: Enter a title for Labels and Legends when they are shown (see "Pie Chart
Properties dialog" on page328).
l
Value: Use the drop-down to select which Value to use as data within the Pie Chart as
well as for Label and Legend values.
Find/Replace Dialog
The Find/Replace dialog can replace text within the current template. The scope of the
replacement depends on the currently selected tab in the Workspace. If the Source tab is
selected, the replace will affect the HTML source code. If the Design tab is selected, the replace
will affect the text on the page. If the Preview tab is selected, the Replace feature is inactive.
Note
When replacing text in the Design tab, formatting in the replaced text will be removed. If formatting
is necessary in the new text, select the Source tab before opening the Find/Replace dialog and
include the required HTML tags in the replacement text.
Page 313