
1.8

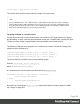
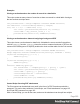
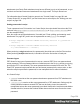

Table Of Contents
- Table of Contents
- Welcome to PrintShop Mail Connect 1.8
- Setup And Configuration
- System and Hardware Considerations
- Installation and Activation
- Where to obtain the installers
- Installation - important information
- Installation - How to guides
- Activation
- Installation Prerequisites
- User accounts and security
- The Importance of User Credentials on Installing and Running PrintShop Mail C...
- Installing PrintShop Mail Connect on Machines without Internet Access
- Installation Wizard
- Running connect installer in Silent Mode
- Activating a License
- Migrating to a new workstation
- Known Issues
- Uninstalling
- Connect: a peek under the hood
- Connect File Types
- The Designer
- Designer basics
- Content elements
- Snippets
- Styling and formatting
- Personalizing Content
- Writing your own scripts
- Designer User Interface
- Designer Script API
- Designer Script API
- Examples
- Examples
- Examples
- Examples
- Examples
- Examples
- Examples
- Examples
- Examples
- Examples
- Examples
- Examples
- Examples
- Example
- Example
- Example
- Example
- Example
- Examples
- Creating a table of contents
- Example
- Examples
- Examples
- Examples
- Examples
- Replace elements with a snippet
- Replace elements with a set of snippets
- Example
- Example
- Creating a Date object from a string
- Control Script API
- Examples
- Generating output
- Print output
- Email output
- Optimizing a template
- Generating Print output
- Saving Printing options in Print Presets
- Connect Printing options that cannot be changed from within the Printer Wizard
- Print Using Standard Print Output Settings
- Print Using Advanced Printer Wizard
- Adding print output models to the Print Wizard
- Splitting printing into more than one file
- Print output variables
- Generating Email output
- Print Manager
- Print Manager Introduction Video
- Print Manager usage
- Print Manager Interface
- Overview
- Connect 1.8 General Enhancements and Fixes
- Connect 1.8 Performance Related Enhancements and Fixes
- Connect 1.8 Designer Enhancements and Fixes
- Connect 1.8 Output Enhancements and Fixes
- Connect 1.8 Print Manager Enhancements and Fixes
- Known Issues
- Previous Releases
- Overview
- Connect 1.7.1 General Enhancements and Fixes
- Connect 1.7.1 Designer Enhancements and Fixes
- Connect 1.7.1 Output Enhancements and Fixes
- Known Issues
- Overview
- Connect 1.6.1 General Enhancements and Fixes
- Connect 1.6.1 Designer Enhancements and Fixes
- Connect 1.6.1 Output Enhancements and Fixes
- Known Issues
- Overview
- Connect 1.5 Designer Enhancements and Fixes
- Connect 1.5 Output Enhancements and Fixes
- Connect 1.5 General Enhancements and Fixes
- Known Issues
- Overview
- Connect 1.4.2 Enhancements and Fixes
- Connect 1.4.1 New Features and Enhancements
- Connect 1.4.1 Designer Enhancements and Fixes
- Connect 1.4.1 Output Enhancements and Fixes
- Known Issues
- Legal Notices and Acknowledgements

Examples
Cloning a section based on the number of records in a detail table
This script creates as many clones of a section as there are records in a detail table. It assigns
the new sections a unique name.
var printSections = merge.template.contexts.PRINT.sections;
var numClones = record.tables['detail'].length;
for( var i = 0; i < numClones; i++){
var clone = printSections["Section 1"].clone();
clone.name = "my_section_clone_" + i;
printSections["Section 1"].addAfter(clone);
}
Cloning a section based on data and assigning a background PDF
This script clones a section based on data fields. It disables the source section first and then
calls the addPolicy function. addPolicy clones the section, renames it and sets a PDF from the
resources as its background. It explicitly enables the clone and then adds it to the Print context.
var printSections = merge.template.contexts.PRINT.sections;
merge.template.contexts.PRINT.sections["Policy"].enabled = false;
if(record.fields.policy_a == 1) {
addPolicy('a');
}
if(record.fields.policy_b == 1) {
addPolicy('b');
}
function addPolicy(policy){
var resourceUrl = 'images/policy-' + policy + '.pdf';
var clone = printSections["Policy"].clone();
clone.name = "policy_" + policy;
clone.background.url = resourceUrl;
clone.enabled = true;
printSections["Policy"].addAfter(clone);
}
Control Script: Securing PDF attachments
The Print context can be attached to an email in the form of a PDF file and secured with a
password. This can be done without a Control Script, see "Email attachments" on page125
and "Email PDF password" on page125.
With a Control Script, you can do the same, and more: the attachment can be split into multiple
Page 293