
1.7


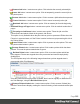


Table Of Contents
- Table of Contents
- Welcome to PrintShop Mail Connect 1.7.1
- Setup And Configuration
- System and Hardware Considerations
- Installation and Activation
- Where to Obtain the Installers
- Installation - important information
- Installation - How to guides
- Activation
- Installation Prerequisites
- User accounts and security
- The Importance of User Credentials on Installing and Running PrintShop Mail C...
- Installing PrintShop Mail Connect on Machines without Internet Access
- Installation Wizard
- Running connect installer in Silent Mode
- Activating a License
- Migrating to a new workstation
- Uninstalling
- The Designer
- Basic Steps
- Content elements
- Snippets
- Styling and formatting
- Personalizing Content
- Writing your own scripts
- Designer User Interface
- Script API
- Designer Scripts API
- Examples
- Examples
- Examples
- Examples
- Examples
- Examples
- Examples
- Examples
- Examples
- Examples
- Examples
- Examples
- Examples
- Example
- Example
- Example
- Example
- Example
- Examples
- Creating a table of contents
- Example
- Examples
- Examples
- Examples
- Examples
- Replace elements with a snippet
- Replace elements with a set of snippets
- Example
- Example
- Control Script API
- Generating output
- Print output
- Email output
- Optimizing a template
- Generating Print output
- Saving Printing options in Printing Presets.
- Connect Printing options that cannot be changed from within the Printer Wizard.
- Print Using Standard Print Output Settings
- Print Using Advanced Printer Wizard
- Adding print output models to the Print Wizard
- Splitting printing into more than one file
- Variables available in the Output
- Generating Tags for Image Output
- Generating Email output
- Print Manager
- General Information
- Release Notes
- Overview
- Connect 1.7.1 General Enhancements and Fixes
- Connect 1.7.1 Designer Enhancements and Fixes
- Connect 1.7.1 Output Enhancements and Fixes
- Known Issues
- Previous Releases
- Overview
- Connect 1.6.1 General Enhancements and Fixes
- Connect 1.6.1 Designer Enhancements and Fixes
- Connect 1.6.1 Output Enhancements and Fixes
- Known Issues
- Overview
- Connect 1.4.2 Enhancements and Fixes
- Connect 1.4.1 New Features and Enhancements
- Connect 1.4.1 Designer Enhancements and Fixes
- Connect 1.4.1 Output Enhancements and Fixes
- Known Issues
- Legal Notices and Acknowledgments

throughout the Print Manager.
To test the printer settings, one can run Check Printer Capabilities in the "Printer Capabilities
pane" on page566.
The printer options that can be set include:
l
Printer Details:
l
Enable Printer: Check to enable the printer settings.
l
Printer Type: Select the type of printer to add, from the drop down list.
l
Name: Enter a name that describes the printer in the list.
l
IP Address: Enter the IP Address or machine name of the printer.
l
Port (IPDSOnly): Enter the port on which the printer communicates.
l
LPR (PCL and PostScript Only): Enter the printer queue.
Tip
RAW will work as a generic queue option for most PCLand PostScript
printers.
Those PCL and PostScript printers that support multiple queues can
have multiple entries in the Print Manager. One for each Queue.
l
Hot Folder subsection: Defines folders from which print output files are
automatically captured and sent to the appropriate printer queue.
l
Enable Hot Folders: Check to enable hot folders. Then enter the folders
from which the Print Manager will capture print files automatically and
send them to the appropriate Priority queue on the printer. There are
High, Medium and Low priority queues available and each can be set
here.
l
Extended Options (IPDS only) subsection: Defines logging of printer
activities.
Page 561