
1.7


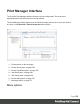

Table Of Contents
- Table of Contents
- Welcome to PrintShop Mail Connect 1.7.1
- Setup And Configuration
- System and Hardware Considerations
- Installation and Activation
- Where to Obtain the Installers
- Installation - important information
- Installation - How to guides
- Activation
- Installation Prerequisites
- User accounts and security
- The Importance of User Credentials on Installing and Running PrintShop Mail C...
- Installing PrintShop Mail Connect on Machines without Internet Access
- Installation Wizard
- Running connect installer in Silent Mode
- Activating a License
- Migrating to a new workstation
- Uninstalling
- The Designer
- Basic Steps
- Content elements
- Snippets
- Styling and formatting
- Personalizing Content
- Writing your own scripts
- Designer User Interface
- Script API
- Designer Scripts API
- Examples
- Examples
- Examples
- Examples
- Examples
- Examples
- Examples
- Examples
- Examples
- Examples
- Examples
- Examples
- Examples
- Example
- Example
- Example
- Example
- Example
- Examples
- Creating a table of contents
- Example
- Examples
- Examples
- Examples
- Examples
- Replace elements with a snippet
- Replace elements with a set of snippets
- Example
- Example
- Control Script API
- Generating output
- Print output
- Email output
- Optimizing a template
- Generating Print output
- Saving Printing options in Printing Presets.
- Connect Printing options that cannot be changed from within the Printer Wizard.
- Print Using Standard Print Output Settings
- Print Using Advanced Printer Wizard
- Adding print output models to the Print Wizard
- Splitting printing into more than one file
- Variables available in the Output
- Generating Tags for Image Output
- Generating Email output
- Print Manager
- General Information
- Release Notes
- Overview
- Connect 1.7.1 General Enhancements and Fixes
- Connect 1.7.1 Designer Enhancements and Fixes
- Connect 1.7.1 Output Enhancements and Fixes
- Known Issues
- Previous Releases
- Overview
- Connect 1.6.1 General Enhancements and Fixes
- Connect 1.6.1 Designer Enhancements and Fixes
- Connect 1.6.1 Output Enhancements and Fixes
- Known Issues
- Overview
- Connect 1.4.2 Enhancements and Fixes
- Connect 1.4.1 New Features and Enhancements
- Connect 1.4.1 Designer Enhancements and Fixes
- Connect 1.4.1 Output Enhancements and Fixes
- Known Issues
- Legal Notices and Acknowledgments

l
Add job with Page Range: Click to load an file directly and add it to the printer queue
while specifying the page range to print.
l
Add Printer: Click to add a new printer using the "Printer Settings Dialog" below.
l
Edit Printer: Click to edit the currently selected printer using the "Printer Settings
Dialog" below.
l
Delete: Click to delete the currently selected printer.
l
Pause: Click to pause the currently selected printer's queue, which prevents any new
jobs from being printed.
l
Resume: Click to resume the currently selected printer's queue. Any job within the
queue will start being printed.
l
Pause HotFolder: Click to pause the hot folder for the currently selected printer. This
does not prevent jobs in the printer queue from generating output - only new jobs will stop
being captured in the Hot Folder. This button is only activated when the Hot Folder is
currently active.
l
Resume HotFolder: Click to resume capturing new jobs in the Hot Folder for the
currently selected printer. This button is only activated when the Hot Folder is paused.
l
Expand: Click to expand the current printer details within the Printer pane, if not
already expanded.
l
Collapse: Click to hide the current printer details within the Printer pane, if they were
currently expanded.
Printer Settings Dialog
This dialog allows you to add printers to the Print Manager, or to modify settings for those
already available. The settings differ between printer types, with IPDS printers having more
options than the others.
Each logical grouping of printer setting appears in their own subsection in the dialog. These
can be folded up or down (to make them visible, or hidden) by clicking on the blue title bar atop
every subsection.
Once the settings are complete, press the Finish button to apply the new settings.
In the case of Add Printer, this adds the newly entered printer to the Print Manager and
automatically makes it available in the "Job Queue pane" on page566.
If modifying an existing printer (via Edit Printer option) the printer settings are then updated
Page 560