
1.7


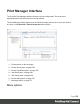

Table Of Contents
- Table of Contents
- Welcome to PrintShop Mail Connect 1.7.1
- Setup And Configuration
- System and Hardware Considerations
- Installation and Activation
- Where to Obtain the Installers
- Installation - important information
- Installation - How to guides
- Activation
- Installation Prerequisites
- User accounts and security
- The Importance of User Credentials on Installing and Running PrintShop Mail C...
- Installing PrintShop Mail Connect on Machines without Internet Access
- Installation Wizard
- Running connect installer in Silent Mode
- Activating a License
- Migrating to a new workstation
- Uninstalling
- The Designer
- Basic Steps
- Content elements
- Snippets
- Styling and formatting
- Personalizing Content
- Writing your own scripts
- Designer User Interface
- Script API
- Designer Scripts API
- Examples
- Examples
- Examples
- Examples
- Examples
- Examples
- Examples
- Examples
- Examples
- Examples
- Examples
- Examples
- Examples
- Example
- Example
- Example
- Example
- Example
- Examples
- Creating a table of contents
- Example
- Examples
- Examples
- Examples
- Examples
- Replace elements with a snippet
- Replace elements with a set of snippets
- Example
- Example
- Control Script API
- Generating output
- Print output
- Email output
- Optimizing a template
- Generating Print output
- Saving Printing options in Printing Presets.
- Connect Printing options that cannot be changed from within the Printer Wizard.
- Print Using Standard Print Output Settings
- Print Using Advanced Printer Wizard
- Adding print output models to the Print Wizard
- Splitting printing into more than one file
- Variables available in the Output
- Generating Tags for Image Output
- Generating Email output
- Print Manager
- General Information
- Release Notes
- Overview
- Connect 1.7.1 General Enhancements and Fixes
- Connect 1.7.1 Designer Enhancements and Fixes
- Connect 1.7.1 Output Enhancements and Fixes
- Known Issues
- Previous Releases
- Overview
- Connect 1.6.1 General Enhancements and Fixes
- Connect 1.6.1 Designer Enhancements and Fixes
- Connect 1.6.1 Output Enhancements and Fixes
- Known Issues
- Overview
- Connect 1.4.2 Enhancements and Fixes
- Connect 1.4.1 New Features and Enhancements
- Connect 1.4.1 Designer Enhancements and Fixes
- Connect 1.4.1 Output Enhancements and Fixes
- Known Issues
- Legal Notices and Acknowledgments

Note
About testing emails
When you send a test email, the Email To Script will not be used; instead, the email
will be sent to the address that you specify in the Send Test Email dialog. If you
have a Litmus account, you can enter your Litmus test address. To make the test
address appear by default, you can set the default test address in the Email
Preferences: select Window > Preferences, click the arrow next to Email, click
General and type the test address next to Email Test address.
For a description of how to test your email for different email clients, see this how-to:
Test your emails with Litmus. For more information on Litmus, please see
http://litmus.com/
Tip
For a detailed description of how to use Mandrill with Connect to send and track emails, see the
following how-to: Using Mandrill.
Using an ESP with PrintShop Mail Connect
An email service provider (ESP) is a company that offers email marketing or bulk email
services.
This topic explains why and how to use an ESP with PrintShop Mail Connect
Reasons to use an ESP
These are a number of reasons why you would need an ESP:
l ESPs ensure a high deliverability, as most ESPs are whitelisted or approved by ISPs
(Internet Service Providers) as legitimate email delivery service. So they help you to avoid
having mail detected as spam.
l ESPs provide comprehensive tracking options to measure open rates and they log which
links were clicked and by who. Typically this information is available via an online
dashboard.
Page 551