
1.7


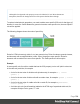


Table Of Contents
- Table of Contents
- Welcome to PrintShop Mail Connect 1.7.1
- Setup And Configuration
- System and Hardware Considerations
- Installation and Activation
- Where to Obtain the Installers
- Installation - important information
- Installation - How to guides
- Activation
- Installation Prerequisites
- User accounts and security
- The Importance of User Credentials on Installing and Running PrintShop Mail C...
- Installing PrintShop Mail Connect on Machines without Internet Access
- Installation Wizard
- Running connect installer in Silent Mode
- Activating a License
- Migrating to a new workstation
- Uninstalling
- The Designer
- Basic Steps
- Content elements
- Snippets
- Styling and formatting
- Personalizing Content
- Writing your own scripts
- Designer User Interface
- Script API
- Designer Scripts API
- Examples
- Examples
- Examples
- Examples
- Examples
- Examples
- Examples
- Examples
- Examples
- Examples
- Examples
- Examples
- Examples
- Example
- Example
- Example
- Example
- Example
- Examples
- Creating a table of contents
- Example
- Examples
- Examples
- Examples
- Examples
- Replace elements with a snippet
- Replace elements with a set of snippets
- Example
- Example
- Control Script API
- Generating output
- Print output
- Email output
- Optimizing a template
- Generating Print output
- Saving Printing options in Printing Presets.
- Connect Printing options that cannot be changed from within the Printer Wizard.
- Print Using Standard Print Output Settings
- Print Using Advanced Printer Wizard
- Adding print output models to the Print Wizard
- Splitting printing into more than one file
- Variables available in the Output
- Generating Tags for Image Output
- Generating Email output
- Print Manager
- General Information
- Release Notes
- Overview
- Connect 1.7.1 General Enhancements and Fixes
- Connect 1.7.1 Designer Enhancements and Fixes
- Connect 1.7.1 Output Enhancements and Fixes
- Known Issues
- Previous Releases
- Overview
- Connect 1.6.1 General Enhancements and Fixes
- Connect 1.6.1 Designer Enhancements and Fixes
- Connect 1.6.1 Output Enhancements and Fixes
- Known Issues
- Overview
- Connect 1.4.2 Enhancements and Fixes
- Connect 1.4.1 New Features and Enhancements
- Connect 1.4.1 Designer Enhancements and Fixes
- Connect 1.4.1 Output Enhancements and Fixes
- Known Issues
- Legal Notices and Acknowledgments

Note
Note: Elements can have multiple classes. Separate the class names with a space
(eg. “red small”).
Alternatively, after selecting an element, you can click the Source tab at the bottom of the
workspace. The selected element will be highlighted in the source. Add the class or classes
and/or the ID to the opening tag of the HTML element, for example: <p class=”intro”>.
How to determine which styles are applied
To see which styles are applied to an element, select the element (see "Selecting an element"
on page121) and take a look at the Styles pane that sits next to the Attributes pane.
The Styles pane shows which CSS style rules apply to the currently selected element.
A link next to a style rule will open the file where that particular style is defined. This can be
either a CSS file or the source file of a section if local formatting was used (see "Styling and
formatting" on page186).
A crossed-out style rule signals that it was overruled by another style rule. This happens when:
l A more specific, and therefore more important rule, is encountered for the same element.
See "Using a more specific CSS rule" below to learn more about the specificity of style
rules.
l A rule with the same importance is read after the first rule. Not only is the order of the rules
in a CSS file important, but also the order in which the style sheets are read. The style
sheets that are included with a section are read in the specified order; see "Determining
the order in which style sheets are read" on page195.
Using a more specific CSS rule
By default, many CSS properties of an HTML element also apply to the elements inside that
element. For example, a CSS rule that specifies a certain font-type for a box is also applied to
paragraphs in that box. In this example the box is the 'parent' element and the paragraphs are
the 'child' elements that inherit the font-type property of the box.
Page 193