
1.6
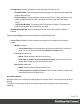
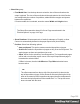
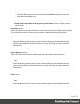
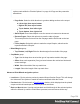
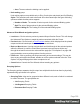
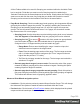
Table Of Contents
- Table of Contents
- Welcome to PrintShop Mail Connect 1.6.1
- Setup And Configuration
- System and Hardware Considerations
- Installation and Activation
- Installation Pre-Requisites
- User accounts and security
- The Importance of User Credentials on Installing and Running PrintShop Mail C...
- Installing PrintShop Mail Connect on Machines without Internet Access
- Installation Wizard
- Running Connect Installer in Silent Mode
- Activating a License
- Migrating to a new computer
- Uninstalling
- The Designer
- Generating output
- Optimizing a template
- Generating Print output
- Saving Printing options in Printing Presets.
- Connect Printing options that cannot be changed from within the Printer Wizard.
- Print Using Standard Print Output Settings
- Print Using Advanced Printer Wizard
- Adding print output models to the Print Wizard
- Splitting printing into more than one file
- Variables available in the Output
- Generating Tags for Image Output
- Generating Email output
- Print Manager
- Release Notes
- Copyright Information
- Legal Notices and Acknowledgments

l
Configuration: Use the drop-down to select the type of binding to use:
l
Saddle Binding: This binding places all the pages in a stack, binds the middle and
folds the stack as one.
l
Perfect Binding: This binding type is often used for books. Pages are folded in the
middle and then set side by side. The pages are then bound along the folded
"spine".
l
1 up Perfect Binding: This binding does not contain any folding. The pages are
lined up side by side and bound along one edge.
l
Booklet Binding Edge: Use the drop-down to select the side on which to bind the
booklet.
Optional Cover Page selections are available to Saddle Binding only.
l
Cover Page checkbox: Check to enable cover pages to be created with the options
below:
l
Media selections:
l
Cover Media Size: Use the drop-down to select the media size for the cover
page, or use a Custom size and select Width and Height values.
l
Front Cover selections:
l
Blank: Select to add no data to the front cover.
l
First page on outside and second page on inside: Select to use the first 2
pages as the inside and outside of the front cover.
l
Back Cover selections:
l
Blank: Select to add no data to the back cover.
l
Last two pages on inside and outside: Select to use the final 2 pages as the
inside and outside of the back cover.
Imposition Options
Imposition refers to the printing of multiple pages on a single sheet. This is also known as N-Up
printing.
The options on this page allow for the setting of imposition repetition, order, margins and
markings.
Page 351