
1.6
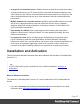
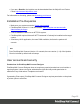
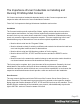
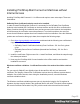
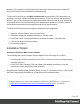
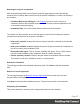
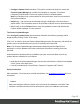
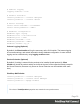
Table Of Contents
- Table of Contents
- Welcome to PrintShop Mail Connect 1.6.1
- Setup And Configuration
- System and Hardware Considerations
- Installation and Activation
- Installation Pre-Requisites
- User accounts and security
- The Importance of User Credentials on Installing and Running PrintShop Mail C...
- Installing PrintShop Mail Connect on Machines without Internet Access
- Installation Wizard
- Running Connect Installer in Silent Mode
- Activating a License
- Migrating to a new computer
- Uninstalling
- The Designer
- Generating output
- Optimizing a template
- Generating Print output
- Saving Printing options in Printing Presets.
- Connect Printing options that cannot be changed from within the Printer Wizard.
- Print Using Standard Print Output Settings
- Print Using Advanced Printer Wizard
- Adding print output models to the Print Wizard
- Splitting printing into more than one file
- Variables available in the Output
- Generating Tags for Image Output
- Generating Email output
- Print Manager
- Release Notes
- Copyright Information
- Legal Notices and Acknowledgments

Selecting the required components
After clicking the Next button, the component selection page appears, where the different
components of PrintShop Mail Connect can be selected for installation. Currently, the following
are available:
l
PrintShop Mail Connect Designer: The Designer module. It may be used as a
standalone with no other installed modules, but it will not have certain capabilities such
as automation and commingling.
l
Installation Path: This is the location where modules are to be installed.
The installer can also calculate how much disk space is required for installing the selected
components as well as how much space is available:
l
Disk space required: Displays the amount of space required on the disk by the selected
components.
l
Disk space available on drive: Displays the amount of space available for installation on
the drive currently in the Installation Path.
l
Recalculate disk space: Click to re-check available disk space. This is useful if space
has been made available for the installation while the installer was open.
l
Source repository location: Displays the path where the installation files are located.
This can be a local drive, installation media, or a network path.
Selection Confirmation
The next page confirms the installation selections made. Click Next to start the installation
itself.
End User License Agreement
The next page displays the End User License Agreement, which needs to be read and
accepted before clicking Next.
Click Next to start the actual installation process. This process can take several minutes.
Completing the installation
This screen describes a summary of the components that have been installed.
Page 27