
1.5
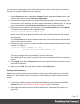
Table Of Contents
- Table of Contents
- Welcome to PrintShop Mail Connect 1.5
- Setup And Configuration
- System and Hardware Considerations
- Installation and Activation
- Installation Pre-Requisites
- User accounts and security
- The Importance of User Credentials on Installing and Running PrintShop Mail C...
- Installing PrintShop Mail Connect on Machines without Internet Access
- Installation Wizard
- How to Run Connect Installer in Silent Mode
- Activating a License
- Migrating to a new computer
- Uninstalling
- The Designer
- Generating output
- Print output
- Email output
- Optimizing a template
- Generating Print output
- Saving Printing options in Printing Presets.
- Connect Printing options that cannot be changed from within the Printer Wizard.
- Print Using Standard Print Output Settings
- Print Using Advanced Printer Wizard
- Adding print output models to the Print Wizard
- Splitting printing into more than one file
- Variables available in the Output
- Generating Tags for Image Output
- Generating Email output
- Print Manager
- Release Notes
- Copyright Information
- Legal Notices and Acknowledgments

you only have to change the name of the Media and the section in the script, and write the
condition on which the Media has to be replaced.
1. On the Resources pane, expand the Contexts folder, expand the Print context, right-
click the print section and click Sheet configuration.
2. Decide which pages should have dynamically switching media: every first page in the
Print section, every last page, one of the pages in between (a 'middle page'), or a single
page. (Uncheck the option Same for all positions, to see all page positions.)
3. In the area for the respective sheet position, click the Edit script button next to Media.
The Script Wizard appears with a standard script:
results.attr("content","Media 1");
Media 1 will have been replaced with the name of the media selected for the chosen
sheet position.
The field Selector in the Script Wizard contains the name of the section and the sheet
position that you have chosen.
4. Change the script so that on a certain condition, another media will be selected for the
content. For instance:
if(record.fields.GENDER === 'M') {
results.attr("content","Media 2");
}
This script changes the media to Media 2 for male customers.
See "Writing your own scripts" on page218 if you are not familiar with how scripts are
written.
5. Click Apply, open the tab Preview and browse through the records to see if the script
functions as expected.
6. When you click OK, the script will be added to the Scripts pane.
Printing virtual stationery
Media are not printed, unless you want them to. Printing the virtual stationery is one of the
settings in a Job Creation Preset. To have the virtual stationery printed as part of the Print
output:
1. Create a job creation preset that indicates that Media has to be printed: select File >
Presets and see "Job Creation Presets" on page396 for more details.
2. Select that job creation preset in the Print Wizard; see "Generating Print output" on
page490.
Page 79