
1.5
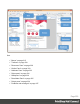
Table Of Contents
- Table of Contents
- Welcome to PrintShop Mail Connect 1.5
- Setup And Configuration
- System and Hardware Considerations
- Installation and Activation
- Installation Pre-Requisites
- User accounts and security
- The Importance of User Credentials on Installing and Running PrintShop Mail C...
- Installing PrintShop Mail Connect on Machines without Internet Access
- Installation Wizard
- How to Run Connect Installer in Silent Mode
- Activating a License
- Migrating to a new computer
- Uninstalling
- The Designer
- Generating output
- Print output
- Email output
- Optimizing a template
- Generating Print output
- Saving Printing options in Printing Presets.
- Connect Printing options that cannot be changed from within the Printer Wizard.
- Print Using Standard Print Output Settings
- Print Using Advanced Printer Wizard
- Adding print output models to the Print Wizard
- Splitting printing into more than one file
- Variables available in the Output
- Generating Tags for Image Output
- Generating Email output
- Print Manager
- Release Notes
- Copyright Information
- Legal Notices and Acknowledgments

Removing a password
Passwords set in the Control Script override the password set through the Email PDF
password script (see "Email PDF password" on page96). This allows you to change or remove
the password from a specific part. Removal is done by setting the password field to null or an
empty string ("").
Example
This scripts splits the Print output into two PDF attachments and sets a password for the
second attachment.
var printSections;
if (channel == Channel.EMAIL) { // only when generating Email
output
if (merge.context.type == ContextType.PRINT) {
printSections = merge.template.contexts.PRINT.sections;
printSections['Section 1'].part = 'PDFAttach1';
printSections['Section 2'].part = 'PDFAttach2'
printSections['Section 2'].password = 'secret';
}
}
Designer User Interface
The Designer's user interface gives you several options to work with.
Page 249