Nokia 5530 XpressMusic User Guide Issue 4.
Contents Contents Safety About your device Network services Magnets and magnetic fields 4 5 5 6 Find help In-device help Support Update phone software using your PC Software updates over the air Access codes 7 7 7 7 8 9 Get started Insert the SIM card Insert the battery Insert the memory card Charge the battery Keys and parts Stylus Switch the device on Lock the keys and touch screen Home screen Access the menu Touch screen actions Media key Change the ringing tone 9 9 11 11 12 13 15 16 16 16 18 18
Contents Create a post Post files from Gallery 48 48 Internet 48 About the web browser 48 Browse the web 48 Add a bookmark 49 Subscribe to a web feed 49 Unreadable characters while browsing the web 50 Positioning Positioning with your device Network positioning About GPS 50 50 50 50 Maps About Maps 51 51 Connectivity Wireless LAN Administrative settings 52 52 54 Settings Phone settings Call settings 54 54 61 Protect the environment Save energy Recycle 62 62 62 Nokia original accessories Practica
Safety Safety Read these simple guidelines. Not following them may be dangerous or illegal. Read the complete user guide for further information. SWITCH ON SAFELY Do not switch the device on when wireless phone use is prohibited or when it may cause interference or danger. ROAD SAFETY COMES FIRST Obey all local laws. Always keep your hands free to operate the vehicle while driving. Your first consideration while driving should be road safety.
Safety 5 About your device The wireless device described in this guide is approved for use on the GSM 850, 900, 1800, and 1900 MHz networks. Contact your service provider for more information about networks. Your device supports several connectivity methods and like computers may be exposed to viruses and other harmful content. Exercise caution with messages, connectivity requests, browsing, and downloads.
Safety transmission of data. Check with your service provider for details about fees in your home network and when roaming on other networks. Your service provider can explain what charges will apply. Some networks may have limitations that affect how you can use some features of this device requiring network support such as support for specific technologies like WAP 2.0 protocols (HTTP and SSL) that run on TCP/IP protocols and language-dependent characters.
Find help 7 Find help In-device help Your device contains instructions to help to use the applications in your device. To open help texts from the main menu, select Menu > Help and the application for which you want to read instructions. When an application is open, to access the help text for the current view, select Options > Help. When you are reading the instructions, to change the size of the help text, select Options > Decrease font size or Increase font size.
Find help To get more information and to download the Nokia Ovi Suite application, go to www.ovi.com/suite. Software updates over the air Select Menu > Applications > SW update. With Software update (network service), you can check if there are updates available for your device software or applications, and download them to your device. Downloading software updates may involve the transmission of large amounts of data (network service).
Get started 9 Access codes PIN or PIN2 code (4-8 digits) These protect your SIM card against unauthorised use or are required to access some features. You can set your device to ask for the PIN code when you switch it on. If not supplied with your SIM card or you forget the codes, contact your service provider. If you enter the code incorrectly three times in a row, you need to unblock the code with the PUK or PUK2 code. PUK or PUK2 code These are required to unblock a PIN or PIN2 code.
Get started not support the use of micro-SIM cards and use of incompatible SIM cards may damage the card or the device, and may corrupt data stored on the card. A SIM card may be already inserted in the device. If not, do the following: 1 Open the cover of the SIM card slot. 2 Insert a SIM card in the SIM card slot. Ensure that the contact area on the card is facing down and the bevelled corner is facing toward the device. Push the card in. 3 Close the cover of the SIM card slot.
Get started 11 Insert the battery Always switch the device off and disconnect the charger before removing the battery. 1 Remove the back cover by lifting it from the top end of the device. 2 Insert the battery. 3 To replace the cover, direct the bottom locking catches toward their slots, and press down until the cover locks into place. After removing and replacing the battery, you need to set the time and date again in your device.
Get started 1 Open the cover of the memory card slot. 2 Insert a compatible memory card in the memory card slot. Ensure that the contact area on the card is facing down. Push the card in. You can hear a click when the card locks into place. 3 Close the cover of the memory card slot. Ensure that the cover is properly closed. Charge the battery Your battery has been partially charged at the factory. If the device indicates a low charge, do the following: 1 2 Connect the charger to a wall outlet.
Get started 3 13 When the device indicates a full charge, disconnect the charger from the device, then from the wall outlet. You do not need to charge the battery for a specific length of time, and you can use the device while it is charging. If the battery is completely discharged, it may take several minutes before the charging indicator appears on the display or before any calls can be made. Tip: Disconnect the charger from the wall outlet when the charger is not in use.
1 2 3 4 5 6 7 8 9 10 11 12 13 Get started Power key Loudspeaker Proximity sensor Volume/Zoom key Media key Lock switch Capture key Microphone End key Menu key Call key Touch screen Earpiece
Get started 14 15 16 17 18 19 20 21 15 Camera flash Camera lens Micro USB connector Loudspeakers Nokia AV Connector (3.5 mm) Charger connector Stylus SIM and memory card slot Do not cover the area above the touch screen, for example, with protective film or tape. Stylus Some functions, such as handwriting recognition, are designed to be used with a stylus. The pen stylus is located in the back cover of the device. Important: Use only a stylus approved by Nokia for use with this device.
Get started Switch the device on 1 2 3 4 Press and hold the power key. If the device asks for a PIN code or lock code, enter it, and select OK. To delete a number, select . The factory setting for the lock code is 12345. Select your location. If you accidentally select the wrong location, select Back. Enter the date and time. When using the 12-hour time format, to switch between a.m. and p.m., select any number.
Get started 17 Interactive display elements To open the clock application, select the clock (1). To open the calendar, or to change the profile, select the date or the profile name (2). To view or modify connectivity settings ( ), to view the available wireless LANs (WLAN) if WLAN scanning is enabled, or to view missed events, select the top right corner (3). To make a phone call, select Telephone or To open the contacts list, select Contacts or (4). (5). To open the main menu, press the menu key (6).
Get started Music keys When music or the radio is playing in the background, music keys (play/pause, skip backward, and skip forward) are displayed in the home screen. Access the menu To access the menu, press the menu key. To open an application or folder in the menu, double-tap it. Touch screen actions Tap and double-tap To open an application or other element on the touch screen, you normally tap it with your finger or the stylus. However, to open the following items, you must tap them twice.
Get started 19 Swipe To swipe, slide your finger quickly left or right on the screen. Example: When viewing an image, to view the next or previous image, swipe the image left or right, respectively. Screen unlocking with swipe Swipe to unlock the touch screen To unlock the touch screen without answering a call, swipe from right to left. The ringing tone is muted automatically. To answer the call, press the call key, or to reject the call, press the end key.
Get started Touch screen backlight The touch screen backlight is turned off after a period of inactivity. To turn the screen backlight on, tap the screen. If the touch screen and keys are locked, tapping the screen does not turn the screen backlight on. To unlock the screen and keys, slide the lock switch. Media key To open applications such as the music player or browser, select the media key ( open the media bar, and select the application.
Your device 21 To start using the contacts bar and add your contacts to the home screen, select Options > New contact, and follow the instructions. > Your device Contacts bar To communicate with your contact, select the contact and from the following: — Make a phone call. — Send a message. — Add a feed. — Refresh feeds. — Modify settings. To view the latest call event and other past communication events with a contact, select a contact. To call the contact, select the call event.
Your device Cellular, Bluetooth, and WLAN antennas Offline profile The offline profile lets you use the device without connecting to the wireless cellular network. When the offline profile is active, you can use your device without a SIM card. Activate the offline profile Press the power key briefly, and select Offline. When you activate the offline profile, the connection to the cellular network is closed. All radio frequency signals to and from the device to the cellular network are prevented.
Your device 23 To start a web connection (network service), in the dialler, tap and hold 0. To access applications available in the media bar, such as the music player and web browser, in any view, press the media key. To change the profile, press the power key, and select a profile. To call your voice mailbox (network service), in the dialler, tap and hold 1. To open a list of last dialled numbers, in the home screen, press the call key.
Your device Warning: When you use the headset, your ability to hear outside sounds may be affected. Do not use the headset where it can endanger your safety. Do not connect products that create an output signal as this may cause damage to the device. Do not connect any voltage source to the Nokia AV Connector. When connecting any external device or any headset, other than those approved by Nokia for use with this device, to the Nokia AV Connector, pay special attention to volume levels.
Your device 3 4 25 Open the cover of the SIM card slot. Place the tip of the stylus in the opening under the battery, and push the SIM card sideways to slide it out of the slot. Pull the SIM card out. Replace the battery and the back cover. After removing and replacing the battery, you need to set the time and date again in your device. Remove the memory card Important: Do not remove the memory card during an operation when the card is being accessed.
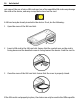
Make calls Attach a wrist strap Thread the wrist strap, and tighten it. Make calls Touch screen during calls Your device has a proximity sensor. To extend battery life and prevent accidental selections, the touch screen is disabled automatically during calls, when you place the device next to your ear. Do not cover the proximity sensor, for example, with protective film or tape. Calls 1 In the home screen, select Telephone to open the dialler, and enter the phone . number, including the area code.
Write text 3 27 To call the contact, press the call key. If you have saved several numbers for a contact, select the desired number from the list. Write text You can enter letters, numbers, and special characters in several different ways. The onscreen keyboard allows you to enter characters by tapping them with your fingers or the stylus. Handwriting recognition allows you to write characters directly onto the screen using the stylus as a pen.
Write text 1 2 Close - Close the on-screen keyboard. Input menu - Open the touch input options menu to access commands such as Writing language. 3 On-screen keyboard 4 Shift and caps lock - To enter an uppercase character when writing in lowercase, or vice versa, select the key before entering the character. To activate the caps lock, select the key twice. A line under the key indicates that the caps lock is activated. 5 Letters - Enter letters.
Write text To enter special characters, write them as you would normally, or select desired character. and the To delete characters or move the cursor back, swipe backwards (see Figure 1). To insert a space, swipe forwards (see Figure 2). Alphanumeric keypad Virtual keypad With the virtual keypad (Alphanumeric keypad), you can enter characters like you would with a traditional physical keypad with numbers on the keys.
1 2 3 4 5 6 7 8 9 Write text Close - Closes the virtual keypad (Alphanumeric keypad). Input menu - Opens the touch input menu, which includes commands such as Activate predictive text and Writing language. Text input indicator - Opens a pop-up window, in which you can activate or deactivate predictive text input modes, change the character case, and switch between letter and number modes. Input mode - Opens a pop-up window, in which you can select the input mode.
Messaging 4 31 If the ? character is displayed after the word, the word is not in the dictionary. To add a word to the dictionary, select the underlined word, enter the word using traditional text input, and select OK. The word is added to the dictionary. When the dictionary is full, a new word replaces the oldest added word. Start writing the next word.
Messaging Tip: To avoid rewriting messages that you send often, use texts in the Templates folder in My folders. You can also create and save your own templates. Messaging contains the following folders: Inbox — Received messages, except e-mail and cell broadcast messages, are stored here. My folders — Organise your messages into folders. Mailbox — Connect to your remote mailbox to retrieve your new e-mail messages, or view your previously retrieved e-mail messages offline.
Messaging 33 Messaging requires network services. Send a text or multimedia message Select New message. Send an audio or mail message Select Options > Create message, and the relevant option. Select recipients or groups from the contacts list Select from the toolbar. Enter the number or mail address manually Tap the To field. Enter the subject of the mail or multimedia message Enter it in the Subject field.
Music player Mail for Exchange With Mail for Exchange, you can receive your work e-mail to your device. You can read and reply to your e-mails, view and edit compatible attachments, view calendar information, receive and reply to meeting requests, schedule meetings, and view, add, and edit contact information. ActiveSync Use of the Mail for Exchange application is limited to over-the-air synchronisation of PIM information between the Nokia device and the authorised Microsoft Exchange server.
Music player 35 Play a song or a podcast To open Music player, select Menu > Music > Music player. You may have to refresh the music and podcast libraries after you have updated the song or podcast selection in your device. To add all available items to the library, select Options > Refresh library. To play a song or a podcast: 1 2 Select categories to navigate to the song or podcasts you want to hear. To play an item, select the item from the list.
Music player To adjust the volume, press the volume key. To modify the tone of the music playback, select Options > Equaliser. To modify the balance and stereo image or to enhance the bass, select Options > Settings. To return to the home screen and leave the player playing in the background, press the end key. To close the player, select Options > Exit. Playlists Select Menu > Music > Music player and Playlists. To view details of the playlist, select Options > Playlist details.
Nokia Video Centre 37 To grab a song and drop it to a new position, select the song in the desired position and Drop. To finish reordering the playlist, select Done. Transfer music from a computer You can use the following methods to transfer music: • • To view your device on a computer as a mass memory device where you can transfer any data files, make the connection with a compatible USB data cable or Bluetooth connectivity.
Nokia Video Centre View a video clip To browse the content of installed video services, select Video feeds. The content of some video services is divided into categories. To browse video clips, select a category. To search for a video clip in the service, select Video search. Search may not be available in all services. Some video clips can be streamed over the air, but others must be first downloaded to your device. To download a video clip, select Options > Download.
Nokia Video Centre 39 Video centre automatically downloads new video clips daily at the time you define. To cancel scheduled downloads, select Manual download as the download method. Video feeds Select Menu > Applications > Video centre. The content of the installed video services is distributed using RSS feeds. To view and manage your feeds, select Video feeds. Select Options and from the following: Feed subscriptions — Check your current feed subscriptions. Feed details — View information about a video.
Camera Transfer videos from your PC Transfer your own video clips to Video centre from compatible devices using a compatible USB data cable. Video centre displays only the video clips which are in a format supported by your device. 1 2 3 4 To view your device on a PC as a mass memory device where you can transfer any data files, make the connection with a USB data cable. Select Mass storage as the connection mode. A compatible memory card needs to be inserted in the device.
Camera 41 Image capture On-screen controls and indicators for still image capture The still image viewfinder displays the following: 1 2 3 4 5 6 7 8 Capture mode indicator Zoom slider. To turn the zoom slider on and off, tap the screen. Capture icon. Tap to capture an image. Flash mode. Tap to change settings. Capture settings. Tap to change settings.
Camera Open Gallery. Image settings: Select a colour effect. Adjust the white balance. Select the current lighting conditions. This allows the camera to reproduce colours more accurately. Adjust the exposure compensation (images only). If you are shooting a dark subject against a very light background, such as snow, adjust the exposure to +1 or +2 to compensate for the background brightness. For light subjects against a dark background, use -1 or -2. Adjust light sensitivity (images only).
Camera 2 43 Press the capture key. Do not move the device before the image is saved and the final image displayed. Zoom in or out when capturing an image Use the zoom slider. Leave the camera open in the background and use other applications Press the menu key. To return to the camera, press and hold the capture key.
Camera Increase light levels when recording video in low light Select . Location information Your device does not have an internal GPS antenna. To use this feature, use a compatible GPS receiver (accessory sold separately). You can automatically add capture location information to the file details of the captured material. The location coordinate values may not be displayed due to local authorities’ requirements. Select Menu > Applications > Camera.
Gallery 45 Video recording on-screen controls and indicators The video viewfinder displays the following: 1 2 3 4 5 6 7 Capture mode indicator Audio mute on indicator Capture icon. Select to record video clips. Video light indicator Recording settings. Select to change settings. Battery charge level indicator Video quality indicator. To change this setting, select Options > Settings > Video quality. 8 Video clip file type 9 Available recording time.
Gallery View and organise files Select Menu > Gallery and from the following: Images & videos — View images in the image viewer and videos in Video centre. Songs — Open Music player. Sound clips — Listen to sound clips. Other media — View presentations. You can browse, open, and create folders; and mark, copy, move, and add items to folders. Files stored on your compatible memory card (if inserted) are indicated with . To open a file, select a file from the list. Video clips and files with the .
Share online 47 Share online About Share online Select Menu > Share online. With Share online (network service), you can post your images, video clips, and sound clips from your device to compatible online sharing services, such as albums and blogs. You can also view and send comments to the posts in these services, and download content to your compatible Nokia device. The supported content types and the availability of the Share online service may vary.
Internet Create a post Select Menu > Share online. To post your images or video clips to a service, select and hold the service, and from the pop-up menu, select New upload. If the online sharing service provides channels for posting files, select the desired channel. To add your image, video clip, or sound clip to the post, select Options > Add. Enter a title or description for the post, if available. To add tags to the post, select Tags:.
Internet 49 Tip: If you do not have a flat-rate data plan from your service provider, to save data costs in your phone bill, you can use a WLAN to connect to the internet. Go to a website Select the web address bar, enter a web address, and select . Tip: To search the internet, select the web address bar, enter the search word, and select the link below the web address bar. Zoom in or out A cache is a memory location that is used to store data temporarily.
Positioning Update a feed In the Web feeds view, select and hold the feed, and from the pop-up menu, select Refresh. Set a feed to automatically update In the Web feeds view, select and hold the feed, and from the pop-up menu, select Edit > Automatic updates. Unreadable characters while browsing the web > > Page > If unreadable characters are displayed, select Menu > Web and Default encoding and the correct encoding for the character set of the language.
Maps 51 available inside buildings or underground and may be impaired by materials such as concrete and metal. GPS should not be used for precise location measurement, and you should never rely solely on location data from the GPS receiver and cellular radio networks for positioning or navigation. The trip meter has limited accuracy, and rounding errors may occur. Accuracy can also be affected by availability and quality of GPS signals.
Connectivity Tip: You can also use Maps without an internet connection, and browse the maps that are saved in your device or memory card, if available in your device. Note: Downloading content such as maps, satellite images, voice files, guides or traffic information may involve transmission of large amounts of data (network service). Almost all digital cartography is inaccurate and incomplete to some extent. Never rely solely on the cartography that you download for use in this device.
Connectivity 53 About WLAN To use a wireless LAN (WLAN) connection, it must be available in the location, and your device must be connected to the WLAN. Some WLANs are protected, and you need an access key from the service provider to connect to them. Note: Using WLAN may be restricted in some countries. For example, in France, you are only allowed to use WLAN indoors. For more information, contact your local authorities.
Settings Security settings for WAPI 1 Select Menu > Settings and Connectivity > Destinations. 2 Open the access point group that has the desired WLAN access point, and select the WLAN access point. For more information, contact your service provider. Administrative settings Select Menu > Settings and Connectivity > Admin. settings. Packet data settings Select Menu > Settings and Connectivity > Admin. settings > Packet data.
Settings 55 Time — Enter the current time. Time zone — Select your location. Date — Enter the date. Date format — Select the date format. Date separator — Select the symbol that separates days, months, and years. Time format — Select the time format. Time separator — Select the symbol that separates hours and minutes. Clock type — Select the clock type. Clock alarm tone — Select the tone for the alarm clock. Alarm snooze time — Adjust the snooze time. Workdays — Select your working days.
Settings To control your device with enhanced voice commands, press and hold the call key in the home screen, and say a voice command. The voice command is the name of the application or profile displayed in the list. Select Menu > Settings and Phone > Voice commands. Select Options and from the following: Change command — Edit the voice commands. Playback — Listen to the synthesised voice tag. Remove voice command — Remove a voice command that you added manually. Settings — Adjust the settings.
Settings 57 If software updates over the air are supported by your network, you may also be able to request updates through the device. You may receive server profiles and different configuration settings from your service providers and company information management department. These configuration settings may include connection and other settings used by different applications in your device. Receive configuration settings 1 Select Options > Server profiles.
Settings Remote phone locking — Enable or disable remote lock. Closed user group — Specify a group of people to whom you can call and who can call you (network service). Confirm SIM services — Set the device to display confirmation messages when you are using a SIM card service (network service). Certificate management Select Menu > Settings and Phone > Phone mgmt. > Security > Certificate management.
Settings 59 Certificate not trusted — You have not set any application to use the certificate. Expired certificate — The certificate validity period has ended. Certificate not valid yet — The certificate validity period has not yet begun. Certificate corrupted — The certificate cannot be used. Contact the certificate issuer.
Settings Digital rights management Content owners may use different types of digital rights management (DRM) technologies to protect their intellectual property, including copyrights. This device uses various types of DRM software to access DRM-protected content. With this device you can access content protected with WMDRM 10, OMA DRM 1.0, and OMA DRM 2.0.
Settings 61 Call settings Call settings With call settings, you can define call specific settings in your device. Select Menu > Settings and Calling > Call. Select from the following: Send my caller ID — Select Yes to show your phone number to the person you are calling. To use the setting agreed upon with your service provider, select Set by network (network service).
Protect the environment Call barring With call barring (network service), you can restrict the calls that you make or receive with the device. For example, you can restrict all outgoing international calls or incoming calls when you are abroad. To modify the settings, you need the barring password from your service provider. Select Menu > Settings and Calling > Call barring.
Nokia original accessories 63 Nokia original accessories For availability of approved accessories, check with your dealer. An extensive range of accessories is available for your device. For more details, see www.nokia.com.hk/accessories. Practical rules about accessories • Keep all accessories out of the reach of small children. • When you disconnect the power cord of any accessory, grasp and pull the plug, not the cord.
Product and safety information Product and safety information Battery Battery and charger information This device is intended for use when supplied with power from the following chargers: AC-8. The exact charger model number may vary depending on the type of plug. The plug variant is identified by one of the following: E, X, AR, U, A, C, K, or B. For example, the model numbers for the charger can be, among others, AC-8 etc. Take care of your device • Keep the device dry.
Product and safety information 65 Hearing aids Some digital wireless devices may interfere with some hearing aids. Vehicles RF signals may affect improperly installed or inadequately shielded electronic systems in motor vehicles such as electronic fuel injection, electronic antilock braking, electronic speed control, and air bag systems. For more information, check with the manufacturer of your vehicle or its equipment. Only qualified personnel should service the device or install the device in a vehicle.
Product and safety information Certification information (SAR) This mobile device meets guidelines for exposure to radio waves. Your mobile device is a radio transmitter and receiver. It is designed not to exceed the limits for exposure to radio waves recommended by international guidelines. These guidelines were developed by the independent scientific organisation ICNIRP and include safety margins designed to assure the protection of all persons, regardless of age and health.
Product and safety information 67 Except as set forth in Privacy Policy, Nokia shall not be responsible for any removal or loss of the information or content you have submitted to the Service. When information or content is removed from the Service by either you or Nokia, traces or copies may still remain elsewhere. 4.
• • • Product and safety information Monitor or moderate any Material; Remove any Material from the Service; and Restrict access to any part of the Service at any time in its sole discretion. 6. Content Before downloading or accessing any Content, please check whether the Content which you wish to access is restricted by age or marked as potentially ‘offensive’ or ‘explicit’. Nokia shall not be responsible for any claims or offence caused or suffered by you accessing such Content.
Product and safety information 69 8. Notices Nokia may post notices within the Service. Nokia may also send you notices about products and Services to the email address or telephone number you have provided to us. You are deemed to have received such notices at the latest within seven (7) days from Nokia sending or posting those. Your continued use of the Services constitutes your receipt of all notices regardless of delivery method. 9. Fees Your use of the Service may be or may become subject to charges.
Product and safety information Please note that Nokia may not be able to process your customer support request if you are unable to provide your transaction ID, which is provided to you by Nokia following your purchase from the Service; provided you have supplied Nokia with a valid e-mail address at the time of purchase. Nokia may only process refunds for Content where the total price is above the monetary limit stipulated in applicable local legislation. 12.
Product and safety information 71 Nokia may include access to sites and services on the Internet or preloaded clients that enable you to interact with sites and services that are owned or operated by third parties and that are not part of the Service. You must review and agree to the terms and conditions of such sites or services before using such sites or services.
Product and safety information Nokia may modify the Terms at any time without prior notice. If the Terms are changed in a material, adverse way, Nokia will provide a separate notice advising of such change. You are responsible for regularly reviewing the Terms. Your continued use of the Service shall constitute your consent to any changes and modifications. 22.
Product and safety information • • 73 Your transactions with us We collect information relating to your purchase and use of our products and services and your other interactions with us.
Product and safety information messages, through available profile management tools or contacting Nokia customer care. The collected information may also be used to display personalized content as well as to improve Nokia’s products and services. The above information may also apply in case you update the software of your device. Do We Share Personal Data? We do not sell, lease, rent or otherwise disclose your personal data to third parties unless otherwise stated below.
Product and safety information 75 Privacy and security are key considerations in the creation and delivery of our products and services. We have assigned specific responsibilities to address privacy and security related matters. We enforce our internal policies and guidelines through an appropriate selection of activities, including proactive and reactive risk management, security engineering, training and assessments.
Copyright and other notices Nokia Corporation of Keilalahdentie 4, 02150 Espoo, Finland is the controller of your personal data. In addition, the Nokia affiliate providing the product or service may be a controller of your personal data. You may find the identity of the controller and its contact details by reviewing the terms and conditions of such a product or service or by using contact information provided in the applicable Nokia websites.
Copyright and other notices 77 © 2011 Nokia. All rights reserved. Nokia, Nokia Connecting People, Nokia Care, Nokia Original Accessories, logos, Ovi, and XpressMusic are trademarks or registered trademarks of Nokia Corporation. Nokia tune is a sound mark of Nokia Corporation. Other product and company names mentioned herein may be trademarks or tradenames of their respective owners.
Copyright and other notices following two conditions: (1) This device may not cause harmful interference, and (2) this device must accept any interference received, including interference that may cause undesired operation. Any changes or modifications not expressly approved by Nokia could void the user's authority to operate this equipment. Model number: 5530 Issue 4.
Index Index A access codes accessories antennas application settings audio messages B barring calls battery — inserting blogs bookmarks browser See web browser 9 56 21 56 32 62 11 49 49 C cache memory calls — redialling — settings camera — assigning images to contacts — capturing images — flash — image mode — indicators — location information — recording — sending images — settings — video mode certificates contacts copyright protection 43 42 43 42 41 44 45 43 41 44 58 21 59 D date and time settings 5
Index L language settings licences location information lock code lock switch locking the keys M Mail for Exchange maps media — music player media bar media key menu messages — folders for MMS (multimedia message service) multimedia messages music player — playlists 55 59 50 9 16 16 34 51 34 20 20 18 31 32 32 34 36 N navigation tools network positioning news feeds Nokia original accessories Nokia support information notification light 50 50 49 63 7 60 O offline profile outbox, message 22 32 P pac
Index — removing SIM card security SIP SMS (short message service) software — updating software updates songs stylus support T text input text messages — sending touch screen transferring music troubleshooting U updates — device — phone software uploading media files useful information V video — viewing Video Centre video centre — downloading — my videos — transferring videos — video feeds — viewing virtual keypad voice calls See calls voice commands voice control 24 57 54 32 8 7 34 15 7 28, 30, 31 32 18,