
User Manual


User's guide O&O DiskImage Mount drive
Mount drive
You can have your created image file displayed in Windows Explorer as a virtual drive. This allows
you to copy files or directories from the image file onto existing hard disks.It is, however, not
possible to make changes (such as deleting or adding files) to the virtual hard disk mounted from
the image file.
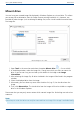
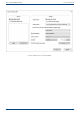
Mount image file as a drive
1. Open Tools in the menu bar and select the option Mount drive . Or use ctrl+M.
2. In the dialog window, select the image file (*.omg) from which you want to mount the
drive. If you are not sure, you can look up the details of the image under Image
information.
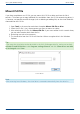
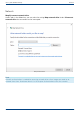
3. After selecting the image file, all drives included in the image will be listed in the program
window.
4. Select the displayed drive from the image.
5. Afterwards, you can select any name from the drive list (e.g. G:) for the drive from the
image.
6. Then, click Mount drive. The virtual drive from the image will then be visible as a regular
drive in the Windows Explorer.
Please note that you may only access sectors which contain image files. Refreshing can take a few
moments.
Note:
Please keep in mind that drives can only be mounted from an image if the image is available locally.
91 / 235