
User Manual

User's guide O&O DiskImage Installation, licensing and uninstall
Installation, licensing and uninstall
Installation
Installing O&O DiskImage is very straight forward. Please follow the steps below:
1. Start the computer on which you would like to install O&O DiskImage.
2. Login as local administrator or as a user possessing comparable permissions.
3. Start the installation file for O&O DiskImage, which you have either downloaded from our
Server or have on your personal CD ROM.
4. After the setup program has been successfully initialized, please follow the installation
dialog.
5. When prompted, restart your computer.
Note: Please make sure that no other backup or imaging software is installed on your computer
when installing or working with O&O DiskImage. This can lead to complications with the filter
driver, especially when different software is working simultaneously on multiple drives.
Enter license
Note:
In order to activate the product after installation or to gain access to the Full Version at a later time,
you must possess a valid license key. This license key is also called a registration code, serial
number, or product ID.
The dialog for registration always appears automatically at the start to guide you if you are using an
unregistered version or have entered the registration code incorrectly.
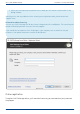
The registration wizard allows for a simple registration process.
When you select the option I want to enter my license, a dialog box will appear where you can
enter the registration code you received when purchasing the software.
If you have purchased the download version of the software, please enter the license
information ("Name", "Company" and License key), just as they are written in the
confirmation E-Mail you received.
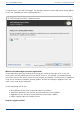
If you have purchased the box version of the software, please enter the license key as it is
written on the license card included. In addition, please enter your name and if needed
your company.
1. Please make sure that you do not confuse the digit “1” with “I” or enter any empty spaces
where they don’t belong.
2. Press Next to save the registration data or Cancel to leave the dialog window without
saving the data.
6 / 235