
User Manual


User's guide O&O DiskImage Lock a drive
Lock a drive
You can lock the drive you wish to image during the imaging process. This prevents any changes
being made to the drive while the image is being created. The drive will no longer be displayed in
Explorer and all applications will be closed. The drive is not locked by default.
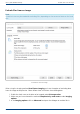
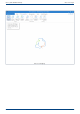
Snapshot cache view(here an empty cache)
To lock a drive, under Drive operation/Imaging options/Advanced select Imaging
procedure/Lock drive during imaging.
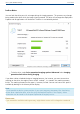
If you leave a drive unlocked during an imaging because, for instance, you want to continue
working on the drive, the original status will be “cached”, i.e. stored in the working memory
buffer. The working memory buffer space is, however, limited. You can see how much space is
available by looking at the memory buffer display.
Note:
It is not possible to lock a system partition. If you want to prevent temporary files from being
written onto a particular drive, enter the entry NoSnapshotTmpFiles in the Registry. More
information can be found in the chapter Explanation of registry entries.
Please note:
If you exceed the available working memory, original data sectors will no longer be saved and
44 / 235