
User Manual


User's guide O&O DiskImage Security - Network authentication
Explanation: Password management
Managing the password is a program feature which allows you to store authentication data and to
manage it. These data is compresses in the password file, using the Advanced Encryption Standard-
Algorithm (AES) and then stored. In addition, the order of the data sets is chosen at random.
A public and a private key are used to encrypt the password. The public key is set by default and
can be changed in the registry under HKEY_LOCAL_MACHINESoftwareO&OO&O DiskImage. Please
bear in mind that the key has to hold a value. An empty key will not be accepted. The private key is
preset to a size of 64 Byte.
Important!
Changes in the Registry may cause severe problems affecting the entire system and may cause the
need to reinstall the complete operating system. Before making changes in the Windows Registry
database, you should create an image of all the important data on your computer using
O&O DiskImage.
Note:
If you make changes in the Registry, it will require loading the database again. In the following
chapter you’ll find brief explanations of the registry entries.
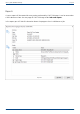
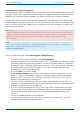
Network authentication
Enter the following settings under Start/Program settings/Security:
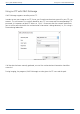
1. If you have not yet created a database, click Create database.
2. Enter any password you’d like and confirm your entry. This password will then be encrypted
and filed. In order to encrypt the password, a new one will be generated that is composed
of two parts: public (Public Key) and private (Private Key). This ensures that you are the only
one who can open and read the password file. The O&O DiskImage Service will have
automatic access to this password as well.
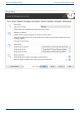
3. Then click Add in the security dialog.
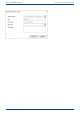
4. Under Computer/Folder enter the path under which the image is to be saved, or from
where it is supposed to be loaded: Computer nameFolder name or Domain nameFolder
nameUser name. Alternatively, you can enter the computer name only if all the sharing
options can be opened by the selected user.
5. You have to enter a qualified name of a user account when entering the user name. For
example, the corresponding domain for the specific domain account has to be entered and
covered, e.g. domainuser1 or User1@domain.
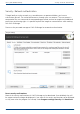
6. Enter the network password of the user, or of his user account. Please keep in mind that
the user under which you login has to hold access rights for the target or original folder.
You can check for them under Properties in the corresponding target directory under
Security.
7. You can also add descriptions to the credentials.
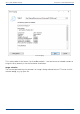
8. After the authentication, you can, for instance, enter a new "network path" as saving
location and also restore an image from there.
136 / 235