
Installation guide
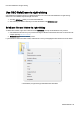
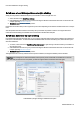
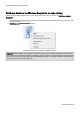
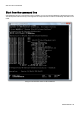
Table Of Contents
- About O&O SafeErase 5
- Features at a glance
- New and enhanced functions
- SafeErase files and folders
- SafeErase hard disks and partitions
- SafeErase free disk space
- SafeErasing the entire computer
- SafeErase system drives
- Use O&O SafeErase via right-clicking
- Method of deletion
- Securely move files and folders
- SafeErase data from the Windows Recycle bin
- Start from the command line
- Manage individual deletion lists
- SafeErase temporary Windows and program files
- SafeErase temporary Internet files
- Reports
- Supports multi core processors
- Important note before program use
- Basics on data deletion
- The differences between the Editions
- Terminology
- Features at a glance
- System requirements
- Installation and licensing
- Getting started
- Start O&O SafeErase (user interface)
- Start the analysis of your drives
- Clean computer
- SafeErase files and folders
- SafeErase hard disks and partitions
- SafeErase free disk space
- SafeErase temporary Windows and program files
- SafeErase data from the Windows Recycle bin
- SafeErase temporary Internet files
- Cancel deletion
- Securely move files and folders
- SafeErase data from Solid State Drives (SSDs)
- Reports
- Method of deletion
- Manage individual deletion lists
- Settings
- SafeErasing the entire computer
- Use O&O SafeErase via right-clicking
- Start from the command line
- Frequently asked questions
- Support and Contact
- End user license agreement 3.2 (EULA)
- Bookmarks
Use O&O SafeErase via right-clicking
O&O SafeErase - 37
SafeErase a hard disks/partitions via right-clicking
Simply find the partition in Windows Explorer you would like to erase and right click on it.
1. Select the menu entry SafeErase volume.
2. O&O SafeErase will then ask you to proceed selecting the deletion method. More about this can be found in the
chapter regarding Deletion methods.
3. SafeErase now starts the deletion process.
Please bear in mind that this process might take up some time depending on the deletion method and the size of the par-
tition.
After the partition has been erased it is necessary that you reformat the partition in order to use it again. More infor-
mation about the formatting of a hard disk drive can be found in the Window's Help file.
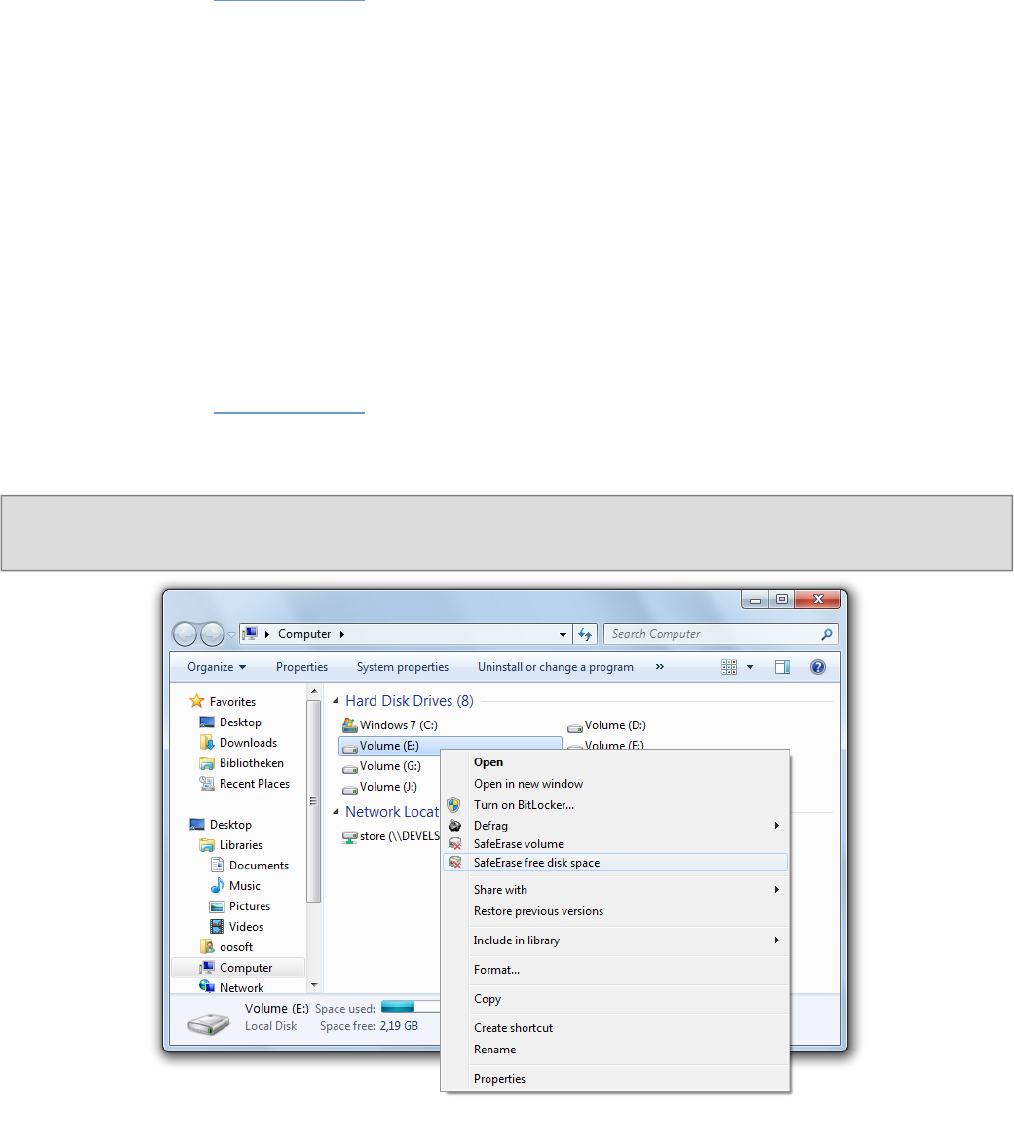
SafeErase data later by right-clicking
Data deleted with Windows does still exist on your computer. Windows makes these areas available to be rewritten as
free space on the hard disks. To make sure that all old deleted data cannot be restored anymore, delete the free space
with O&O SafeErase.
1. To do this, select the function SafeErase free disk space by right-clicking on the drive where you would like to
wipe the free space.
2. O&O SafeErase will then ask you to proceed selecting the deletion method. More about this can be found in the
chapter regarding Deletion methods.
3. SafeErase now starts the deletion process.
The higher the level of security and the more free space for deletion, the longer the deletion process will take.
Important: No existing files or data will be deleted, rather specific pieces of data that are marked free on the hard
disk. After this process has been completed, you will not longer be able to restore this data ever again.
Context Menu (via right-clicking) to SafeErase free space