
Technical information


Getting started
O&O Defrag - 17
Start the analysis of your drives
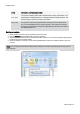
Defragmenting your Drives
O&O Defrag allows you to defragment individual drives or entire computers with just a few mouse clicks.
Start defragmentation
Recommendations for your first defragmentation
The first defragmentation usually requires the most time because O&O Defrag has to check your entire system and
move all files into their optimal position. This is especially the case with systems that have been in use for a long time
and have rarely or never been defragmented.
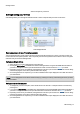
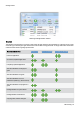
Defragment Single Drives
1. Select the drive you wish to defragment from the drive list.
2. Clicking the Start button in the Ribbon Bar will start defragmentation using the OPTIMIZE default method. If
you want to change this method, open the Start button's lower menu and select the Method you desire.
3. Depending on the size of your database, defragmentation can take up to several hours. You can see the defrag-
mentation in progress on the drive symbol and the status display.
4. Once defragmentation is completed, you can have a detailed status report displayed as an HTML document in
your web browser.
Note: You can defragment several drives simultaneously by pressing the Ctrl key and selecting the drives you want
to have included.
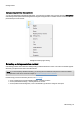
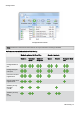
Defragment an entire computer
1. To defragment your entire computer, select all the drives in the drive list. A multiple selection can be done by
pressing Ctrl.
2. If you click the Start button in the Ribbon bar, defragmentation with the OPTIMIZE default method will begin. If
you want to change this method, first open the Start button's lower menu and select the Method you desire.
3. Depending on the size of your database, defragmentation can take up to several hours. You can see the defrag-
mentation in progress on the drive symbol and the status display.
4. Once defragmentation is completed, you can have a detailed status report displayed as an HTML document in
your web browser.