FIRST AUDIO MANUFACTURING LTD. tA EME hE HEAR ARTWORK APPROVAL FORM / AMA Part No./ #5: Job Nos TiS: FA-11-0302 Part Name / 4%: Instruction Book = Model Ne. 2: NH-6000 Brand Name / ZR: _NINE Date! BX: 2012-03-15 Content! 198: 1. ASHE HERE 3.
IMPORTANT NS N CAUTION: To reduce the risk of electric shock,do not CAUTION remove cover (or back). No user-serviceable parts RISK OF ELECTRIC SHOCK Fled person Inside. Refer servicing to qualified personnel ADVERTISEMENT: Pour require le risque de choc 2 electric, ne pajamas expose cet apparel sous la Precaution plume ou sand un environment humid. Juneau A Risque du choc electrifier A piece concealment Litterateur n'est intercultural.
IMPORTANT NS N 11. Only use attachments/accessories specified by the manufacturer. 12. Use only with the cart, stand, tripod, bracket, or table specified by the manufacturer, or sold with the apparatus. When a cart is used, use caution when moving the cart/apparatus [v) combination to avoid injury from tip-over. 13. Unplug this apparatus during lightning storms or when unused for (PAPERER Sng time. 14. Refer all servicing to qualified service personal.
4 iPod/iPad/iPhone compatible. 4 Bluetooth 4 AUX input to connect to external devices. # Video out for iPod. 4 LED display and light switch. # Integrative cabinet design. # Easy to use Remote Control. 4 Touch screen control. 4 Alarm clock.
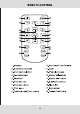
® J Tie 7.9 lollop © ole) 00 © 0 1.iPod input 3.Bluetooth 8.Set 2.IR receiver 4 .Volcano indicator 5.iPod indicator 10.Input selection 6.Vol+ 11.Alarm indicator 7. LED display iPod composite video out Deo OUT 00 min 13.iPod S-Video out —® AUX input 15.
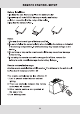
© © ee ees ® 1. Standby 2. Mute/VOL decrease 3. iPod input selection 4. Aux Audio input 5. Bluetooth 8. iPod menu up 7. iPod menu down 8. iPod menu 9. Previous track/ Fast rewind 10. Next track/ Fast forward 11. Enter 12. iPod play/ pause 13. Master Vol adjust 14. Master Vol+ adjust 15. Display Functions 16. Alarm Set 17. Bass adjust 18.
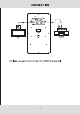
Battery Installation 1.Release the side latch and pull out the battery holder 2.Install only a 3 volts Cr2025 battery cell and place battery polarity + respectively to the + sign of the holder. 3 Replace the battery holder. ’ Notes: 1.Use only the size and type of battery specified. 2.Be sure to follow the correct polarity when installing the battery as indicated in the battery compartment. A reversed battery may cause damage to the device. 3.
START ( 3 Flick the toggle switch on the rear of the unit to the ON position. 31 The display window will reveal a clock. LED Press the red standby button on the remote control. The buttons on the display window will illuminate. STANDBY LED MUTE To tum the unit back into Standby mode, press the red Standby button on the remote. Display back light will dispensary. Press STANDBY button once again, the unit rectums to the normal operation mode, and LED displays the current input source.
A VOLUME Touch the VOL+button on front panel or press VOL button on remote control to adjust the master volume. vee Press VOL+ to increase or press Volt decrease the volume. LED LED displays the volume level accordingly. The maximum volume is 40dB, the minimum value is 0dB. TREBLE Press the TREBLE on remote control to adjust the treble. T36| The adjusting range is + 14dB. Lm BASS — Press the BASS+on the remote control to adjust the BASS of BOO the sub woofer. The adjusting range is +14dB.
SLEEP ) Press the ALARM.S key twice. The Sleep indicator icon will flash. SLEWS Press ENTER to confirm. Press the increase and “= decrease sleep intervals as shown below. ALARM (an | 1 Press the ALARM SET button on the remote control THRICE. ALM icon will flicker. Press the ENTER button to confirm LED ALA 2. ON will flicker on the display window. Press the ENTER button on to confirm. LED 3. To tum the alarm settings off, follow the steps above and press OFF the wi button to switch from ON to OFF. 1m 4.
A 7. During the operation of alarm settings, if the interval time exceeds 6 seconds, the current setting will be canceled. 8. To halt the alarm when alarm rings a. Press standby button on the remote control to cancel the alarm directly. b. Touch any button on the front pane! or remote control twice to cancel alarm. * Press the standby key once to tum the unit on, once alarm has been silenced. 9.
A 2 Video output selection(for iPod/iPhone/iPad only) When playing video content from iPod, press the "iPod" on the remote-control for three seconds,you can toggle the video output mode-video display on local screen of radiotelephone which connected to this unit{ V IP) 3. iPod/iPhone/iPad control iPod control button on the remote control works a= simultaneously as the iPod's click whe, for more | © 3 details, please refer to iPod instruction. BLUETOOTH FUNCTION Control by remote control: 1.
VOLTAGE RATING: AC110/115/120V 60Hz; AC220/230/240V 50Hz {Depends on distribution pleasures refer to back panel of this unit} POWER CONSUMPTION: POWER CONSUMPTION STANDBY: OUTPUT POWER : L/R CH(Nominal): FREQUENCY RESPONSE SENSITIVITY OVERLOAD SOURCE em f.