Owner’s Manual Model NX-PROSUB125 Model NX-PROSUB300 10˝ 125 watt Powered Subwoofer 12˝ 300 watt Powered Subwoofer
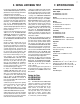
SAFETY INSTRUCTIONS 1. Read Instructions – Read all the safety and operation instructions before operating the NXPROSUB125/NX-PROSUB300 (subwoofer). 2. Retain Instructions – Keep the safety and operating instructions for future reference. 3. Heed Warnings – Follow all warnings on the subwoofer and in these operating instructions. 4. Follow Instructions – Follow all operating and other instructions. 5.
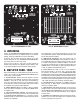
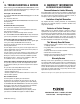
1 2 3 4 5 6 1 2 3 4 6 5 7 7 8 FIG. 1A - NX-PROSUB125 rear panel 8 FIG. 1B - NX-PROSUB300 rear panel A. UNPACKING Remove the NX-PROSUB125/NX-PROSUB300 from its packing carefully and inspect it for any shipping damage. If you discover damage, contact your NXG dealer or installer immediately. As a starting point, set the control around 80 Hz. if you are using left and right tower speakers, 100 Hz. with bookshelf speakers, and 120 Hz. with small mini-speakers.
C. PLACEMENT Connecting to a wall plug Where to position your NX-PROSUB125/NX-PROSUB300 The NX-PROSUB125/NX-PROSUB300 operates at low bass frequencies which are essentially omni-directional. That means you can place the NX-PROSUB125/NX-PROSUB300 almost anywhere in a room without compromising the effectiveness of your main stereo speakers.
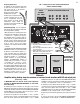
Preparing speaker wire 1. Separate the two conductors that make up each wire for a distance of about one inch. Then strip off 1/2˝ of insulation from both ends of each conductor using a wire stripper, diagonal pliers or knife. FIG. 3 - Hookup for Receivers and Integrated Amplifiers without a Subwoofer Output FRONT SPEAKERS LEFT RIGHT RECEIVER OR INTEGRATED AMPLIFIER 2. Twist each set of thin wires into a tightly bunched spiral.
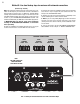
Method B: Line level hookup steps for receivers with subwoofer connections (Refer to Fig. 4 below) Note: This connection method is only for receivers that have a subwoofer or LFE output. If your receiver does not have a subwoofer or LFE connection as shown in Fig. 4, use Method A – Amplifier Wiring Hookup Steps for Most Receivers on page 5. You will need one line level RCA to RCA connector cable long enough to reach from your receiver to your NX-PROSUB125/NX-PROSUB300 location.
E. INITIAL LISTENING TEST It’s now time to introduce the NX-PROSUB125/ NX-PROSUB300 amplifier’s potent and plentiful bass into your listening environment. 1. Double-check all connections. 2. Make sure that the volume controls on both the NX-PROSUB125/NX-PROSUB300 and your receiver/integrated amp/preamp are turned all the way down (fully counterclockwise). Set the PHASE switch to normal.
G. TROUBLESHOOTING & SERVICE H. WARRANTY INFORMATION Before returning your NX-PROSUB125/NX-PROSUB300 for service, you can save time (and often embarrassment) by checking for a few problems that are most often encountered. NX-PROSUB125/NX-PROSUB300 Powered Subwoofer Limited Warranty Power light is not lit. No sound. 1. Is your NX-PROSUB125/NX-PROSUB300 plugged in to a live AC wall socket? 2. Is the power switch on? 3. Has the NX-PROSUB125/NX-PROSUB300 overheated and shut off temporarily? 4.