
Instruction Manual

nVent.com/RAYCHEM | 3
3 4
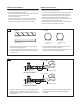
Thermal insulation
• Before installing the thermal insulation, check to see that
the heating cable is free from mechanical damage (such
as from cuts or clamps) and thermal damage (such as
from solder or overheating).
• Using a megohmmeter, test each circuit according to the
“Cable testing and maintenance" instructions below, both
prior to and after installing the thermal insulation.
Note: A reliable FrostGuard system depends on properly
installed and dry, weatherproofed thermal insulation.
• Ensure that at least 1/2 inch of fiberglass or equivalent
thermal insulation is used and that all pipework, including
valves, joints, and wall penetrations, has been fully
insulated. To minimize the potential for mechanical
damage after installation, install the insulation on the
pipework as soon as possible.
• Be sure the FrostGuard 240 V label is visible on the
outside of the thermal insulation.
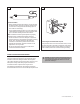
Connecting the FrostGuard cable to power
Using the three wire connectors included in the kit, connect
the black and white cold leads to both phase wires and the
green cold lead to ground. Provide suitable UL Listed and
CSA Certified junction box and outlet bushing and fitting.
CABLE TESTING AND MAINTENANCE
Using a 2500-Vdc megohmmeter, check the insulation
resistance between the lead wires and ground wire during
installation. Minimum reading should be 1000 megohms.
The installer should record the original values for each circuit.
Subsequent readings taken during regular maintenance
schedules should be compared to the original value.
If the readings should fall below 1000 megohms, replace the
FrostGuard cable with a new unit. Do not attempt to repair the unit.
WARNING: Fire and Shock Hazard. Damaged heating cable can
cause electrical shock, arcing, or fire. Do not attempt to repair
or energize damaged heating cable. Remove it at once and
replace with a new length.