
Instruction Manual

2 | nVent.com
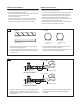
1a Spiral traced
1b Straight traced
Side View
1c Two cables in
4 and 8 o’clock
positions
End View
1d Three cables in
4, 8, and 10 o’clock
positions
1
Tape or cable ties
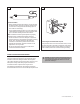
Straight-traced Installation
Spiral-traced Installation
240 V heating cable
Waterproof covering
1/2 in. insulation
12 inches
Tape or cable ties
240 V heating cable
Waterproof covering
1/2 in. insulation
12 inches
2
• If your FrostGuard cable is longer than the pipe, spiral it
evenly along the pipe (Figure 1a).
• If your FrostGuard cable is the same length as the pipe, run
it straight along the pipe (Figure 1b) in the 4 o’clock or 8
o’clock position.
• If two FrostGuard cables are used, position them in the 4
o’clock and 8 o’clock positions (Figure 1c).
• If three FrostGuard cables are used, position them in the 4,
8, and 10 (or 2) o’clock positions (Figure 1d).
• Fasten the cable to the pipe at 12-inch intervals with glass
cloth tape or plastic cable ties. If excess cable remains at
the end of the pipe, double it back along the pipe and cover it
with insulation.
• Provide extra heat at valves and spigots by wrapping each
with an additional foot of heating cable, overlapping
as required.
GENERAL REQUIREMENTS:
• FrostGuard heating cables are not intended for use inside any
pipes, for freeze protection of liquids other than water, or for
use in classified hazardous locations.
• FrostGuard heating cables may be used on metal and plastic
water pipes but not on flexible vinyl tubing
(such as garden hoses).
• Install with a minimum of 1/2 inch fire-resistant thermal
insulation. Weatherproof the insulation if it might get wet.
• Never use on any pipes that may exceed 150°F (65°C).
GENERAL INSTRUCTIONS:
• Install only in accessible locations; do not install behind walls
or where the cable would be hidden.
• Do not run the heating cable through walls, ceilings, or floors.
• Connect only to junction boxes that have been installed in
accordance with all prevailing national and local codes and
standards and are protected from rain and other water.
• Prior to installing the cable, remove any sharp surfaces on the
pipe that might damage the heating cable.
• Follow the specific installation instructions that begin below.
• Follow the maintenance guidelines on page 3.