Nuheat Cable FLOOR HEATING SYSTEM Installation Guide TILE, STONE & MARBLE LAMINATE & ENGINEERED WOOD
Nuheat Industries Limited © 2011 Nuheat Industries Limited. All rights reserved. The entire contents of this manual, including but not limited to text, images, and the selection and arrangement of information (collectively the “Materials”), are protected by copyright and other intellectual property laws under the laws of Canada and other countries.
Table of contents Section 1: Installation Preparation 1.1 Installation Guidelines .............................................................................. 4 1.2 Before You Start ...................................................................................... 5 1.3 Insulation & Resistance Tests .................................................................. 6 1.4 Insulation & Resistance Table .................................................................. 7 Section 2: Installation 2.
INSTALLATION GUIDELINES Nuheat Cable FLOOR HEATING SYSTEM • The installation of this heating product shall be in accordance with the manufacturer’s instructions and in accordance with the Canadian Electrical Code Part 1 or the National Electrical Code ( US ) whichever is applicable. • This equipment shall be installed only by qualified personnel who are familiar with the construction and operation of the apparatus and risks involved.
Before you start 1.21 Heating Cable Components Nuheat Cable is comprised of: Heating Cable (red) The longest portion of Nuheat Cable, this segment of Nuheat Cable is strung onto the subfloor and generates the heat underneath your surface covering. Cold Lead (black) The non-heating segment of Nuheat Cable that will run inside the wall cavity to connect to the thermostat. The cold lead is 11’ long. Mechanical Joint (black) The connection joint between the heating cable and the cold lead.
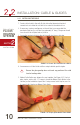
Insulation & Resistance Tests If insulation or resistance tests do not pass the requirements at any point of the installation, halt installation immediately and contact Nuheat Technical Services at 1.800.778.WARM ( 9276 ) . Nuheat Cable FLOOR HEATING SYSTEM SECTION INSTALLATION PREPARATION 1.31 INSULATION TEST To ensure cable is fully insulated: • Acquire a digital ohmmeter (or multimeter ) with alligator clips or equivalent testing device. Set the ohmmeter to the appropriate setting.
Insulation & Resistance Table 1.41 Resistance table Record the resistance readings in the table below. For warranty purposes, the resistance table must remain with the end user.
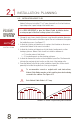
Installation: Planning 2.11 Installation Layout Plan Nuheat Cable may be installed 1” to 6” away from walls and / or fixed furniture, depending on the square footage of the heated area. Nuheat Cable FLOOR HEATING SYSTEM SECTION INSTALLATION It is VERY IMPORTANT to plan the Nuheat Cable installation before securing any part of the floor heating system to the subfloor. 1. Using grid paper, draw a sketch of the room, complete with perimeter dimensions.
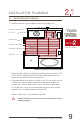
Installation: Planning 2.11 Installation Layout Plan CONT... 6. Draw the cable runs on the Installation Layout Plan. See Figure 2.16. Thermostat Nuheat Cable FLOOR HEATING SYSTEM Cold Lead Heating Cable Perimeter Cable Guides SECTION Stabilizing Cable Guides INSTALLATION Buffer Zone FIGURE 2.16: Installation Layout Plan Example 7. During installation, additional “Stabilizing Cable Guides” must be inserted at 3’ ( ft ) to 4’ ( ft ) intervals.
Installation: Cable & Guides 2.21 Installing the cable Nuheat Cable FLOOR HEATING SYSTEM 1. Create a hole / notch in the wall sill plate below the thermostat electrical connection box to allow the cold lead to be routed to the electrical box. 2. If necessary, create a small groove on the subfloor to accommodate the mechanical joint and / or cold lead (approximately ¼” deep ). The groove should be as close to the sill plate hole as possible. 3.
Installation: Cable & Guides 2.21 installing the cable CONT... 6. Install Nuheat Cable according to the Installation Layout Plan. ! Individual runs of Nuheat Cable should be spaced 3” apart. Nuheat Cable Guide anvils are 1” wide. Ensure there are three ( 3 ) anvils between each cable run. See Figure 2.26. Nuheat Cable FLOOR HEATING SYSTEM SECTION INSTALLATION FIGURE 2.26: Install the heating cable 7. Ensure individual cable runs maintains moderate tension.
Installation: Cable & Guides 2.21 installing the cable CONT... 8. Use duct tape, hot glue or a Nuheat Cable Guide to secure the end seal of the heating cable to the subfloor. Nuheat Cable FLOOR HEATING SYSTEM SECTION INSTALLATION FIGURE 2.28: Secure the end seal 9. Install “Stabilizing Cable Guides” per the Installation Layout Plan. These additional “Stabilizing Cable Guides” will ensure the heating cables does not float during the self-levelling process.
Installation: Thermostat Probe 2.31 Installing the floor-sensing probe Thermostat installation instructions are included with each Nuheat floor-sensing thermostat. To ensure full functionality of the floor-sensing thermostat, it is vital to install the floor-sensing probe at this point in the installation. 1. Secure the tip of the floor-sensing probe to the subfloor using duct tape. When choosing where to install the probe, ensure: • The probe is away from excess temperature swings ( i.e.
Installation: Self-Leveler 2.41 Floor preparation: Self-leveling method Nuheat Cable FLOOR HEATING SYSTEM 1. Prepare the subfloor and self-levelling compound as per manufacturer’s instructions. 2. Pour the self-leveling compound over the heating cable and guides. Use a scraper or flat trowel to spread the self-leveling compound. The heating cable should be completely covered with only the top of the guides showing. SECTION INSTALLATION FIGURE 2.42: Self-leveling compound method 3.
Installation: Thinset Mortar 2.51 Floor preparation: Thinset mortar method 1. Prepare the thinset mortar as per manufacturer’s instructions. 2. Use a flat trowel at a 45˚ angle ( following the same direction as the cable ) to spread a thin layer of thinset mortar over the cable and guides. The heating cable should be completely covered with only the top of the guides showing. Nuheat Cable FLOOR HEATING SYSTEM SECTION INSTALLATION FIGURE 2.52: Thinset mortar method 3.
Installation: Direct Method 2.61 Floor preparation: Direct Method ! Tile/Stone installations only. Nuheat Cable FLOOR HEATING SYSTEM 1. Prepare the thinset mortar as per manufacturer’s instructions. 2. Use a minimum 3/ 8” x 3/ 8” square-notched trowel to spread a thin layer of thinset mortar over the Cable ( following the same direction as the cable ). SECTION INSTALLATION FIGURE 2.62: Direct method ! Conduct insulation and resistance tests and record the resistance reading on page 7. 3.
Electrical connections Nuheat Cable FLOOR HEATING SYSTEM SECTION ELECTRICAL CONNECTIONS Nuheat Cable Installation Guide 17
Warranty information 3.11 Electrical connections ELECTRICAL CONNECTIONS MUST BE MADE BY A CERTIFIED ELECTRICIAN TO VALIDATE THE WARRANTY. Nuheat Cable FLOOR HEATING SYSTEM SECTION ELECTRICAL CONNECTIONS All wiring must follow specifications set out in the Canadian Electrical Code Part 1 or the National Electrical Code ( US ) whichever is applicable and local electrical inspection regulations and authorities.
Warranty information 4.41 How to Claim this Warranty Contact Nuheat ( referred to hereafter as the Company ) to provide details relating to the nature of the defect, the installation and operation of the product and the date of purchase. After examination of the information provided, the Company may advise the owner to proceed as follows: • Deliver or ship the product covered under the warranty to the dealer from whom it was originally purchased, the Company’s local representative or, direct to Nuheat.