
Installation Guide

Please ensure that all components have been shipped with the IRON-LATTICE ™ kit. Your kit should include the following:
ONE (1) IRON-LATTICE ™ SECTION 95 ½” LONG
FOUR (4) INSTALLATION BRACKETS
EIGHT (8) #10 WOOD SCR
EWS
If any components have not been shipped with the IRON-LATTICE ™ kit, please contact Nuvo Iron™ at 1-866-955-0355.
Please contact your local retailer if you require any extra components (i.e..extra brackets).
It is recommended that Local, Municipal, Provincial, State and Federal building code departments be contacted prior to installing this IRON-LATTICE ™ kit.
NU
VO IRON ™ is not responsible for any installations that violate the building code.
IRON-LATTICE ™ INSTALLATION INSTRUCTIONS
TOOLS REQUIRED FOR INSTALLATION:
MEASURING TAPE
***A DRILL IS RECOMMENDED FOR PILOT HOLES
TO REDUCE THE CHANCE OF CRACKING
THE WOOD POS
TS WITH THE SCREWS***
MARKING DEVICE (PENCIL)
LEVEL
SCREWDRIVER
HACKSAW
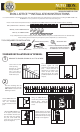
STANDARD INSTALLATION IN 96” OPENING:
1
MEASURE TO ENSURE OPENING IS 95 ¾”TO 96” WIDE
95 ¾”TO 96”
Place one of the installation
brackets against the post,
centered on the width of the
post. Ensure that the 2”
marked line is visible in the
center of both screw holes.
Using two (2) of the screws
provided, install the bracket to
the post.
Top Rail
2‘’
Start on the one side
of the opening.
Measure up 2” from
the top rail of the
fence and mark a
pencil line across the
width of the post.
2
Slide the remaining three (3)
installation brackets onto the
IRON-LATTICE ™ section in the
following locations.
1
2
3
Lift the IRON-LATTICE ™
section up and slide it
into the installation
bracket mounted to the
post.
Once the IRON-LATTICE ™ is
in the proper position, slide
the installation brackets (on
the other end) over against
the post, center them and
screw into place using four
(4) screws supplied.
Swing the IRON-LATTICE ™
section into position parallel
with the fence. Using the
level, ensure that the section
is level.
(required for custom widths only)
Finally, slide the last instal-
lation bracket (on the other
end) over against the post
and screw into place using
two (2) screws supplied
www.nuvoiron.com
Anti-rust paint should be applied to the exposed metal on
the cut ends
to prevent the bare metal from
NOTE FOR CUSTOM INSTALLATION
corrosion.
PHILIPS