
Installation Guide


RESIDENTIAL INSTALLATION INSTRUCTIONS
FLOATING * STAPLE-DOWN * GLUE-DOWN
V.070417
FLOATING
SUB-FLOOR MUST BE LEVEL or floor could flex, causing creaking. Level subfloor to 3/16″ in 8′ radius.
A FLOATING FLOOR EXPANDS AND CONTRACTS WITH SEASONAL CHANGES. Do not put fasteners (nails, screws, etc.) through the
floor or “pinch” the floor under doorways, etc. This could cause the floor to pull apart or buckle because it is not allowed to “float”
freely.
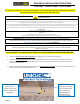
INSTALL OVER A PREMIUM UNDERALYMENT WITH A MOISTURE BARRIER (i.e. FloorMuffler). Excessive squeaks and gapping can
result from too soft an underlayment.
MOLDINGS –Properly installed transitions (T-moldings) are required in doorways, hallways, between adjoining rooms and, between
rooms to allow individual floor sections to expand and contract independently. If the room is wider than 22’ in any direction, split
the installation into two, expansion gaps can be hidden with transition pieces.
BASIC TOOLS REQUIRED
1. Premium Underlayment (i.e. FloorMuffler)
2. Flat bar or pull bar
3. Tapping block
4. Tape measure
5. Wood or plastic spacers (5/8”)
6. Miter saw (chop-saw)
7. Undercut or jamb saw
8. Earplugs & safety glasses
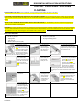
1: First board, first row.
Leave an expansion gap of
5/8” width to the left, and
position the plank against
the starter wall. (Helpful
Hint: Skip to review step
10 notes below regarding
the last row, then come back to continue.)
2. Second board,
first row. Place
this board tight to
the short end of
the first board.
3: Lower the board with a
single action movement and
repeat until you have reached
the end of the row.
4: At the end of the first
row, measure the
length of the last board
to fit. Be sure leave the
expansion space of
5/8” at the end of the
row.
5: Once you have
determined your
measurement,
make your cut.
6. Second row. The first
board (in any row) should be
at least 8” in length. Again,
be sure to leave an
expansion gap of 5/8”
against the wall as you start
the second row. (Helpful
Hint: You can mimimize
waste by using the balance of the last cut board
from the prior row as the first board of the second
row..
7. Second board,
second row.
8. Place the
board tight to the
short end of the
previous board
and fold down in
a single action
movement.
9. After 3 rows are installed,
slightly pull the entire 3 rows
away from the long wall to for
your 5/8” expansion. Then
continue installing each
additional row as instructed
above.
10. For the last row,
you will need to cut
the board lenghtways
to fit against the far
wall. Do not forget to
leave the 5/8”
expansion, and it is not
reccomended for the
last board to be less than 1 ¼” in width (which
may mean adjustments to the first row.