
User's Manual


bottom pin entirely by pulling the pin downward. Then pull the device and the back plate apart from one
another, removing them from the strap. Set the device aside.
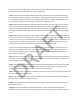
Step 2: Hold the back plate against the side of either leg, just above the ankle, with the inside of the
back plate facing away from the body. If installing on a left leg, the end of the back plate that contains
the locking posts should point toward the heel of the foot and the end with the locking guides should
point toward the foot’s toes. If installing on a right foot, the opposite is true.
Step 3: While holding the back plate against the leg with one hand, place the strap on top of the back
plate so that the strap retaining bracket points toward the heel, and the strap retaining brackets jut
outward, facing away from the body. The side of the strap with the words “Facing Inside” should be
touching the back plate. Make sure to place one of the sets of strap holes over the back plate’s locking
posts.
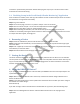
Step 4: While holding the back plate and strap against the leg with one hand, bend the blunt end of the
strap—the end without retaining brackets—around the leg, holding it tightly against the leg. Then bend
the other end of the strap—the end with retaining brackets—the opposite direction around the leg. The
strap should fully encircle the leg so that the strap’s retaining brackets reach the back plate’s strap
retaining pins, and the pins fit inside the larger end of the retaining bracket holes.
If the strap’s retaining brackets don’t reach the back plate’s strap retaining pins, repeat the previous
step, choosing a different set of strap holes to place over the back plate’s locking posts. Repeat as
necessary, choosing different sets of strap holes, until the strap’s retaining brackets reach the back
plate’s strap retaining pins.
Step 5: Once the strap’s retaining pins are inside the larger end of the retaining bracket holes, slide the
pins posts into the narrow ends of the retaining bracket holes. The back plate and strap should now be
‘locked’ together, around the leg.
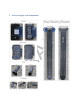
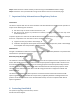
Step 6: Take the device and place it, Omnilink® label facing outward, down on the strap and back plate
at an angle, so that the device’s locking tabs hook underneath the back plate’s locking guides. Once
locked, roll the device closed until the device is flush with the back plate.
Step 7: Insert the top pin in the device so that the head of the pin fits into the corresponding contours of
the device and is flush with the device.
Step 8: Align the raised bump on the top of the bottom pin with the similar notch on the device. Insert
the bottom pin until it sits flush with the device.
Step 9: Press both the top pin and bottom pin into the device simultaneously, ensuring that they are
both ‘locked’ in place.
Step 10: Ensure that the device is securely attached to the ankle, ensuring the Omnilink label is
readable. The device should be placed low and tight on the outer side of the leg. The device cannot be