User Guide English ( 2 – 5 ) Guía del usuario Español ( 6 – 9 ) Guide d’utilisation Français ( 10 – 13 ) Guida per l’uso Italiano ( 14 – 17 ) Benutzerhandbuch Deutsch ( 18 – 21 ) Appendix English ( 22 )
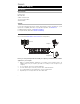
User Guide (English) Introduction Box Contents DJ2GO2 Touch Mini-USB Cable Software Download Card 1/8”-to-stereo-RCA Cable Quickstart Guide Support For the latest information about this product (documentation, technical specifications, system requirements, compatibility information, etc.) and product registration, visit numark.com. For additional product support, visit numark.com/support. For complete warranty information: numark.com/warranty.
Features Top Panel 1. Mini-USB Port: Plug the included mini-USB cable into this port and into the USB port of your computer to power DJ2GO2 Touch. DJ2GO2 Touch is class-compliant, so it is "plug-and-play" – no separate driver installation is necessary. 2. PFL / Cue: Sends pre-fader audio to the Cue channel for monitoring. 3. Cue Gain: Adjusts the audio level of the Cue channel. 4. Master Gain: Adjusts the output volume of the Program mix. 5.
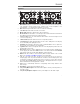
Operation Pad Mode Controls 1. Cues: This Pad Mode button switches Buttons 1-4 to Hot Cue Mode. 2. Auto Loop: This Pad Mode button switches Buttons 1-4 to trigger loops (loop bar value is set in your software). Pad 1 - 1 beat Pad 2 - 2 beats Pad 3 - 4 beats Pad 4 - 8 beats 3. Manual Loop: This Pad Mode button switches Buttons 1-4 to manually control looping. In Manual Loop mode: Pad 1 - Loop In Set Point Pad 2 - Loop Out Set Point Pad 3 - Loop On/Off Pad 4 - Retrigger Loop 4.
Beat-Matching and Mixing with DJ2GO2 Touch Below is an example of how to mix tracks using DJ2GO2 Touch: 1. Turn the Browse knob to scroll through your music library. 2. Load tracks with similar BPM onto Decks 1 and 2 by pressing the Load 1 and Load 2 buttons on DJ2GO2 Touch. 3. Start with the Gain knobs at the 12 o’clock position. You can adjust these for more or less signal gain after the tracks are loaded. 4.