Quick Start Owner’s Manual BOX CONTENTS • CD MIXING STATION • POWER ADAPTER Manual de inicio rápido del usuario(ESPAÑOL) CONTENIDO DE LA CAJA • ESTACIÓN DE MEZCLAS DE CD • ADAPTADOR DE CORRIENTE Schnellbedienungsanleitung(DEUTSCH) BOX CONTENTS • CD MIXING STATION • POWER ADAPTER Manuale Rapido di Utilizzazione(ITALIANO) CONTENUTO DELLA CONFEZIONE • CD MIXING STATION CDMIX2 • ADATTATORE Guide d’utilisation simplifié (FRANÇAIS) CONTENU DE LA BOÎTE • STATION DE MIXAGE CDMIX2 • ADAPTATEUR DE COURANT
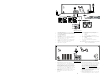
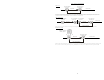
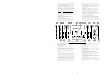
CDMIX2 QUICK SETUP 1. 2. 3. 4. 5. 6. 7. 8. Make sure all items listed on the front of this guide are included in the box. READ SAFETY INSTRUCTION BOOKLET BEFORE USING THE PRODUCT. Study this setup diagram. Place CDMIX2 station in an appropriate position for operation. Make sure all devices are turned off and all faders and gain knobs are set to “zero” Connect all stereo input sources as indicated in the diagram. Connect the stereo outputs to power amplifier(s), tape decks, and/or other audio sources.
6. 7. 8. powered monitors, or a home stereo. The level of the master stereo output signal is controlled by the master fader. Stereo Balanced Master Outputs (XLR): lowimpedance XLR type connectors controlled by the Master fader. Mic Input: Plug your 1/4” Microphone plug in here. AC In: This mix station is designed to work with the power supply cord that comes with the unit. While the 9. power is switched off, plug the power supply into the mix station first, then plug it into the outlet.
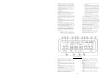
2. 3. 4. 5. 6. 7. 8. 9. 10. 11. TIME (Time Button) - Switches the time display between elapsed playing time and remaining time on the track and remaining time on the entire CD. CONT/SING - Will cause just a single track to play or all tracks in order by pressing once or twice. LCD DISPLAY - Indicates all the functions, as they are occurring, with the CD. These functions are explained in the next section. TRACK (Track Buttons) - Used to select the track to be played.
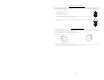
PLAY / PAUSE & CUE OPERATIONS PLAY & CUE Press "PLAY/PAUSE" to start music Press "CUE" return to last starting point Play Interval Position on Disc Back Cue Operation Pressing the “PLAY/PAUSE” button starts the disc. Pressing the “CUE” button will reset the disc to the last place where the disc was started. This is called the cue point. By alternately pressing the “PLAY/PAUSE” button and the “CUE” button, the disc may be returned and played from the cue point any number of times.
MATCHING THE BEATS PER MINUTE (BPM) Match the tempo by monitoring the music of both PLAYER 1 and PLAYER 2 by ear and adjusting the pitch. When the tempo of the music of the selected CD player is slow compared to the tempo of the other player, move the slider to the ( + ) side and match the tempo. When faster, move the pitch slider to the ( - ) side. The following illustration shows the case of matching the pitch of PLAYER 2 to the pitch of the music being played on PLAYER 1. 1.
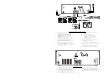
EXAMPLE OF MIXING USING BOTH PLAYERS OF YOUR CD PLAYER While playing a disc on PLAYER 1, load a disc into PLAYER 2 and select your next track, match its pitch to the track playing on PLAYER1 and when you are ready use the crossfader on your mixer to fade from PLAYER 1 to PLAYER 2. P LAYER 1 P LAYER 1 P LAYER 1 Load a disc in PLAYER 1 and select the track and press PLAY. Loa d a dis c a nd pre s s the OPEN/CLOS E button. S e le ct the tra ck to be pla yed.
INSTALACIÓN RÁPIDA DEL CDMIX2 (ESPAÑOL) 1. 2. 3. 4. 5. 6. 7. Asegúrese de que todos los artículos incluidos al inicio de este manual están incluidos en la caja. LEA EL FOLLETO DE INSTRUCCIONES DE SEGURIDAD ANTES DE UTILIZAR EL PRODUCTO. Estudie este diagrama de instalación. Coloque la estación de mezclas en una posición adecuada para su funcionamiento. Asegúrese de que todos los dispositivos están apagados y de que todos los faders y potenciómetros de ganancia están en posición “cero”.
2. 3. 4. 5. GND: Este conector de tornillo debe ser usado para conectar cualquier giradiscos u otro dispositivo que tiene que ser conectado a tierra. Interruptor de entrada de línea/fonográfica: Haga uso de este interruptor para dejar que el equipo de nivel de línea o nivel de phono pueda ser enchufado en sus entradas de canal. Cuando se seleccione la entrada de phono, su señal introducida directamente a los pre-amplificadores phono RIAA de alta calidad. Utilice esta posición solo para giradiscos.
Características del reproductor de CD 1. 2. 3. 4. 5. 6. 7. 8. 9. 10. 11. ABRIR/CERRAR (Bandeja de disco Abrir/Cerrar) – Púlselo para introducir o expulsar el disco. Cada vez que lo pulse se abrirá o cerrará la bandeja del disco en la unidad. NOTA: La bandeja no se abrirá a menos que el disco haya sido detenido. La bandeja se cerrará automáticamente a los 30 segundos.
Características de la pantalla LCD Características de la pantalla LCD 1. 2. 3. 4. 5. 6. PLAY: Está activo si la unidad está reproduciendo un CD en ese momento. PAUSE: Está activo si la unidad está en pausa. CUE: Parpadea si la unidad está determinando un punto cue. Se ilumina de forma continua si la unidad está detenida en un punto cue. PROGRAMA: Se utiliza para programar con antelación el orden de las pistas que van a ser reproducidas automáticamente por la unidad.
Ajuste el punto "CUE" con la rueda de avance lento (jog wheel). Pulse "PLAY/PLAUSE" para que comience la m úsica Pulse "CUE" para volver al último punto de partida Posición en el disco Reproduzca la m úsica durante cierto tiempo Operación de back cue Si la rueda interna se gira cuando se establece un punto cue, podrá hallarse un nuevo punto cue. El reproductor de CD reproducirá repetidamente fragmentos cortos del CD a medida que lo mueve a la posición deseada.
CDMIX2 SCHNELLAUFBAU (DEUTSCH) 1. 2. 3. 4. 5. 6. 7. 8. Versichern Sie sich, dass alle auf der Vorderseite dieser Anleitung aufgeführten Gegenstände in der Schachtel enthalten sind. LESEN SIE DIE SICHERHEITSHINWEISE, BEVOR SIE DAS PRODUKT IN BETRIEB NEHMEN. Sehen Sie sich dieses Aufbaudiagramm genau an. Stellen Sie das CDMIX-Bedienpult an eine für den Betrieb geeignete Stelle.
3. 4. 5. Geräte, welche geerdet werden müssen, verwendet werden. Line/Phono Schalter: Verwenden Sie diesen Umschalter, um zwischen Geräten mit Line- oder Phonopegel umzuschalten. Wenn die Phonoeingänge ausgewählt sind, wird Ihr Signal direkt durch die professionellen RIAA Phono-Vorverstärker geleitet. Verwenden Sie diese Einstellung nur für Plattenspieler. Geräte mit Linepegel überlasten die sensiblen Phonovorverstärker. Dadurch kommt es zu Übersteuerungen und Verzerrungen im Klang.
BEDIENELEMENTE DER CD PLAYERS 1. 2. 3. 4. 5. 6. 7. 8. 9. 10. 11. OPEN/CLOSE – Drücken Sie hier, um die Disc einzulegen oder herauszunehmen. Jedes Betätigen wird die CD-Schublade auf der Schiene öffnen oder schließen. HINWEIS: Die Schublade öffnet sich nur dann, wenn die CD pausiert. Die Schublade schließt nach 30 Sekunden automatisch. TIME (Zeittaste) – Schaltet die Zeitanzeige zwischen vergangener Abspielzeit, verbleibender Abspielzeit des Titels und verbleibender Abspielzeit der gesamten CD.
BESCHREIBUNG DER LCD-ANZEIGE LCD-Anzeigeelemente 1. 2. 3. 4. 5. 6. 7. PLAY: Aktiviert, während das Gerät eine CD abspielt. PAUSE: Aktiviert, wenn das Gerät pausiert. CUE: Blinkt, wenn das Gerät einen Cue-Punkt setzt. Leuchtet ununterbrochen, wenn das Gerät an einem Cue-Punkt pausiert. PROGRAM: Wird verwendet, um die Titelfolge, welches das Gerät automatisch abspielen soll, vorzuprogrammieren. Dies ist eine hervorragende Funktion für den Fall, daß Sie den CD-Spieler sich selbst überlassen müssen.
EDITING CUE POINT Stellen Sie den "CUE"Punkt mit dem Jog-Rad ein. Drücken Sie "PLAY/PAUSE", um Musik abzuspielen. Drücken Sie "CUE", um zum letzten Anfangspunkt zurückzukehren Position auf Disc Abspielintervall Rück-Cue-Funktion Wird das innere Rad während des Festlegens eines Cue-Punkts gedreht, kann ein neuer Cue-Punkt gefunden werden. Der CD-Spieler wird wiederholt kleine Teile der CD abspielen während Sie die gewünschte Position anwählen.
MONTAGGIO RAPIDO CDMIX2 (ITALIANO) 1. 2. 3. 4. 5. 6. 7. Verificare che tutti gli elementi elencati sul frontespizio di questo manuale siano inclusi nella confezione. PRIMA DI UTILIZZARE IL PRODOTTO LEGGERE IL LIBRETTO DELLE ISTRUZIONI DI SICUREZZA. Esaminare attentamente lo schema di montaggio. Posizionare la console CDMIX in modo adeguato all’operazione. Assicurarsi che tutti i dispositivi siano spenti e che tutti i fader e le manopole di guadagno siano a “zero”.
4. 5. linea o phono negli ingressi di canale. Quando viene selezionato l’ingresso Phono, il segnale è alimentato direttamente dai pre-amplificatori RIAA phono di alta qualità. Utilizzare questa posizione unicamente per le piastre. Le sorgenti a livello di linea sovraccaricheranno i phono pre-amp, sensibili, e suoneranno molto male, quindi bisogna sempre ricordarsi di commutare l’interruttore linea/phono su linea prima di collegare sorgenti di linea.
CARATTERISTICHE LETTORE CD 1. 2. 3. 4. 5. 6. 7. 8. 9. 10. 11. OPEN/CLOSE (Apertura/Chiusura del Vassoio del Disco) – Va premuto per caricare o estrarre il disco. Ciascuna pressione aprirà o chiuderà il vassoio. NOTA: Se il disco non è stato messo in pausa il vassoio non si aprirà. Il vassoio si chiuderà automaticamente dopo 30 secondi.
CARATTERISITCHE DISPLAY LCD 1. 2. 3. 4. 5. 6. PLAY: Ativo quando l’apparecchio riproduce un CD. PAUSE: Attivo quando l’apparecchio è in pausa. CUE: Lampeggia quando l’apparecchio sta impostando un punto cue. È acceso in maniera fissa in pausa e al punto cue. PROGRAM: Usato per pre-programmare l’ordine di riproduzione automatica delle tracce. Questa è un’ottima funzione nel caso in cui si debba lasciare il lettore CD da solo. TIME MODE: (Elapsed) mostra il tempo trascorso in via di riproduzione.
Regolare il punto "CUE" con la rotella jog wheel. Premere "CUE" per tornare all'ultimo punto di avvio Intervallo di Riproduzione Posizione sul disco Operare il Back Cue Quando il selettore interno viene ruotato quando è già stato impostato un punto cue, è possibile localizzare un nuovo punto cue. Il lettore CD riprodurrà ripetutamente piccole parti del CD man mano che vi spostate verso la posizione desiderata. Premendo “PLAY/PAUSE” e quindi “CUE” viene confermato che il nuovo punto cue è accettabile.
ESEMPIO DI MISSAGGIO EFFETTUATO UTILIZZANDO ENTRAMBI I LETTORI DEL LETTORE CD Durante la riproduzione di un disco sul PLAYER 1, caricare un disco nel PLAYER 2 e selezionare la traccia successiva, regolare il pitch accordandolo a quello della traccia in riproduzione sul PLAYER1 e una volta pronti, utilizzare il crossfader del mixer per sfumare dal PLAYER 1 al PLAYER 2.
GUIDE D’INSTALLATION SIMPLIFIÉE (FRANÇAIS) 1. 2. 3. 4. 5. 6. 7. 8. Assurez-vous que tous les articles énumérés sur la page couverture de ce guide sont inclus dans la boîte. LIRE LE LIVRET DES CONSIGNES DE SÉCURITÉ AVANT D’UTILISER LE PRODUIT. Examinez bien le schéma d’installation. Placer la station de mixage CDMIX dans une position appropriée pour l’utilisation. Assurez-vous que tous les appareils sont hors tension et que tous les atténuateurs et le gain sont réglés à « zéro ».
2. 3. 4. 5. dans les entrées gauches et droites en utilisant un connecteur de câble en Y. GND : Ce raccord à vis doit être utilisé pour brancher toutes platines et autres dispositifs qui ont besoin d’une mise à terre. Sélecteur LINE/PHONO : Permet de brancher des appareils à niveau de ligne ou phono aux entrées canaux. Lorsque Phono est sélectionné, le signal est acheminé directement aux préamplificateurs RIAA de qualité supérieure. Utilisez cette position uniquement pour les tourne-disques.
CD PLAYER 1. 2. 3. 4. 5. 6. 7. 8. 9. 10. OPEN/CLOSE (Ouvrir/fermer compartiment à disque) - Appuyez pour insérer ou éjecter un disque. Chaque fois que vous appuyez sur cette touche, le plateau s’ouvre ou se ferme. NOTE : Le plateau ne s’ouvre que si le disque est en mode pause. Le plateau se ferme automatiquement après 30 secondes. TIME (Durée) - Modifie le mode d’affichage de la durée entre le temps écoulé, le temps restant de la piste et le temps restant sur le disque.
LES CHARACTERISTIQUES DE L’AFFICHEUR LCD 1. 2. 3. 4. 5. 6. PLAY : Activé lorsque le lecteur est en mode lecture. PAUSE : Activé lorsque le lecteur est en mode pausé. CUE : Clignote lorsque le lecteur programme un point de référence. Allumé lorsque le lecteur est en mode pause au point de référence. PROGRAM : Activé lorsque le lecteur est programmé pour faire la lecture automatique des pistes dans un ordre prédéterminé. Grâce à ette fonction vous n’êtes pas confiné à surveiller l’appareil.
MODIFICATION DU POINT DE RÉFÉRENCE Réglez le point de référence avec la roue JOG. Appuyez sur la touche PLAY/PAUSE pour commencer la lecture du disque. Appuyez sur la touche CUE pour retourner au dernier point de départ. Position sur le disque Jouez l'intervalle Fonction lecture de recherche inversée Lorsque vous tournez le cadran intérieur et qu’un point de référence est déjà programmé, vous pouvez en programmer un nouveau.
LECTEUR 1 LECTEUR 1 LECTEUR 1 LECTEUR 2 LECTEUR 2 LECTEUR 2 LECTEUR 2 LECTEUR 2 LECTEUR 2 LECTEUR 2 LECTEUR 2 LECTEUR 2 LECTEUR 2 31 LECTEUR 2
SPECIFICATIONS 1. POWER SOURCE DC 12V, 3A 2. DIMENSIONS 445(W) x258(D) x156(H) 3. WEIGHT 5.4Kgs 4. AUDIO CHARACTERISTICS (LOAD=47K OHM FOR MASTER OUTPUT) 4-1 INPUT TERMINAL (INPUT LEVEL/IMPEDANCE): CD -14dBV/5K OHM +/-2dB TCD-782 (Track 16) LINE1 -14dBV/10K OHM +/-2dB LINE2,3 -14dBV/47K OHM +/-2dB PHONO -50dBV/47K OHM +/-2dB MIC -53dBV/2.2K OHM +/-2dB NOTE: 0dBV=1Vrms. Master is set to 0dBV output. 4-2 OUTPUT TERMINAL (OUTPUT LEVEL/IMPEDANCE): MASTER OUT (RCA) 0dBV(1.