Professional Karaoke Mixing Station Quick Start Owner’s Manual BOX CONTENTS • KMX01 CD MIXING STATION • POWER ADAPTER Manual de inicio rápido del usuario (ESPAÑOL) CONTENIDO DE LA CAJA • ESTACIÓN DE MEZCLAS DE CD KMX01 • ADAPTADOR DE CORRIENTE Schnellbedienungsanleitung (DEUTSCH) BOX CONTENTS • KMX01 CD MIXING STATION • POWER ADAPTER Manuale Rapido di Utilizzazione (ITALIANO) CONTENUTO DELLA CONFEZIONE • CD MIXING STATION KMX01 • ADATTATORE Guide d’utilisation simplifié (FRANÇAIS) CONTENU DE LA BOÎTE •
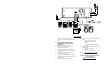
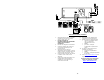
QUICK SETUP 1. 2. 3. 4. 5. 6. 7. 8. 9. Make sure all items listed on the front of this guide are included in the box. READ SAFETY INSTRUCTION BOOKLET BEFORE USING THE PRODUCT. Study this setup diagram. Place mix station in an appropriate position for operation. Make sure all devices are turned off and all faders and gain knobs are set to “zero” Connect all stereo input sources as indicated in the diagram. Connect the stereo outputs to power amplifier(s), tape decks, and/or other audio sources.
REAR CONNECTIONS 1. Channel Inputs: Unbalanced RCA jacks 2. 3. 4. 5. 6. Stereo Balanced Master Outputs for connecting external sources. The Phono/Line input is selected using the toggle switch on the front panel. Turntables, HiFi VCRs, cassette and reelto-reel tape decks, DAT machines, CD players, laser discs, tuners, even synthesizers or other mixing consoles can be connected using these jacks. NOTE: Plug mono audio sources into both left and right inputs using a “Y” cable connector.
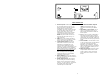
FRONT PANEL FEATURES 1. 2. 3. 4. 5. 6. 7. 8. 9. DJ Mic 1: This section has the gain and tone controls for the ¼”/XLR combination mic input. Mic 2: This section has the gain and tone controls for Mic 2 Mic 3: This section has the gain and tone controls for Mic 3 Mic 2&3 Echo: This knob controls the echo effect amount on microphones 2 and 3. Mic 2&3 Delay: This knob controls the delay time of the echo effect on microphones 2 and 3 Line Faders: Control volume levels in the mix.
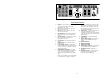
1 2 3 10 11 4 12 6 8 13 14 15 9 CD PLAYER FEATURES 1. 2. 3. 4. 5. 6. 7. 8. 9. 10. SEARCH WHEEL (OUTER RING) - 3 OPEN/CLOSE (Disc Tray Open/Close) - Press to load or eject the disc. Each press will open or close the disc tray on the transport. NOTE: Tray will not open unless the disc has been paused. Tray will automatically close after 30 seconds. TIME (Time Button) - Switches the time display between elapsed playing time and remaining time on the track and remaining time on the entire CD.
started. Steady lighting of this LED indicates the ready condition. 13. START/PAUSE (Play/Pause Button) - Each press of the Play/Pause Button causes the operation to change from play to pause or from pause to play. 14. BPM/PITCH BUTTON - Switches the mode of the display between showing the BPM and the percentage change in pitch. 15. TAP BUTTON - Tap this button with the beat of the music to determine the current Beats Per Minute (BPM). LCD DISPLAY FEATURES 1. 2. 3. 4. 5. 6. 7.
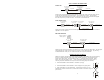
PLAY / PAUSE & CUE OPERATIONS PLAY & CUE Press "PLAY/PAUSE" to start music Press "CUE" return to last starting point Play Interval Position on Disc Back Cue Operation Pressing the “PLAY/PAUSE” button starts the disc. Pressing the “CUE” button will reset the disc to the last place where the disc was started. This is called the cue point. By alternately pressing the “PLAY/PAUSE” button and the “CUE” button, the disc may be returned and played from the cue point any number of times.
4. If the beat of channel 2 (in the headphones) slower than the beat of channel 1, speed up the beat using the pitch control. USING THE BPM DISPLAY FEATURE Press the BPM button to select the BPM feature on the display on the side of the CD player that you wish to set. Tap the Counter button to the beat of the music. You will see the BPM number appear in the display. The more times you tap the more accurate your number will be.
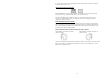
EXAMPLE OF MIXING USING BOTH PLAYERS OF YOUR CD PLAYER While playing a disc on PLAYER 1, load a disc into PLAYER 2 and select your next track, match its pitch to the track playing on PLAYER1 and when you are ready use the crossfader on your mixer to fade from PLAYER 1 to PLAYER 2. P LAYER 1 P LAYER 1 P LAYER 1 Load a disc in PLAYER 1 and select the track and press PLAY. Loa d a dis c a nd pre s s the OPEN/CLOS E button. S e le ct the tra ck to be pla yed.
INSTALACIÓN RÁPIDA (ESPAÑOL) 1. 2. 3. 4. 5. 6. 7. Asegúrese de que todos los artículos incluidos al inicio de este manual están incluidos en la caja. LEA EL FOLLETO DE INSTRUCCIONES DE SEGURIDAD ANTES DE UTILIZAR EL PRODUCTO. Estudie este diagrama de instalación. Coloque la estación de mezclas en una posición adecuada para su funcionamiento. Asegúrese de que todos los dispositivos están apagados y de que todos los faders y potenciómetros de ganancia están en posición “cero”.
CONEXIONES TRASERAS 1. 2. 3. 4. 5. 6. 7. Entradas de canal: Jacks RCA no balanceados para la conexión de fuentes externas. La salida de Phono/Línea es seleccionada utilizando el interruptor de palanca del panel delantero.
LAS CARACTERÍSTICAS DEL PANEL FRONTAL 1. DJ Mic 1: Esta sección tiene los controles del aumento y del tono para la combinación mic de 6.3mm/XLR entrado. 2. Mic 2: Esta sección tiene los controles del aumento y del tono para Mic 2 3. Mic 3: Esta sección tiene los controles del aumento y del tono para Mic 3 4. Mic 2&3 Eco: Esta perilla controla el efecto del eco sobre los micrófonos 2 y 3 5. Mic 2&3 Delay: Esta perilla controla retrasa la época del efecto del eco sobre los micrófonos 2 y 6.
1 2 3 10 11 4 12 6 8 13 14 15 9 Características del reproductor de CD 1. 2. 3. 4. 5. 6. 7. 8. 9. 10. 11. ABRIR/CERRAR (Bandeja de disco Abrir/Cerrar) – Púlselo para introducir o expulsar el disco. Cada vez que lo pulse se abrirá o cerrará la bandeja del disco en la unidad. NOTA: La bandeja no se abrirá a menos que el disco haya sido detenido. La bandeja se cerrará automáticamente a los 30 segundos.
Características de la pantalla LCD 1. 2. 3. 4. 5. 6. PLAY: Está activo si la unidad está reproduciendo un CD en ese momento. PAUSE: Está activo si la unidad está en pausa. CUE: Parpadea si la unidad está determinando un punto cue. Se ilumina de forma continua si la unidad está detenida en un punto cue. PROGRAMA: Se utiliza para programar con antelación el orden de las pistas que van a ser reproducidas automáticamente por la unidad.
MODIFICACIÓN DEL PUNTO CUE Ajuste el punto "CUE" con la rueda de avance lento (jog wheel). Pulse "PLAY/PLAUSE" para que comience la m úsica Pulse "CUE" para volver al último punto de partida Posición en el disco Reproduzca la m úsica durante cierto tiempo Operación de back cue Si la rueda interna se gira cuando se establece un punto cue, podrá hallarse un nuevo punto cue. El reproductor de CD reproducirá repetidamente fragmentos cortos del CD a medida que lo mueve a la posición deseada.
Una vez haya igualado los BPM, ajuste el pitch provisionalmente como se muestra a continuación: Cuando el reproductor 2 esté adelantado, gire la rueda de avance lento (jog wheel) en el sentido contrario a las agujas del reloj Cuando el reproductor 2 esté retrasado, gire la rueda de avance lento (jog wheel) en el sentido de las agujas del reloj El pitch cambia de forma automática a medida que se gira la rueda de avance lento. Cuanto más rápido gire la rueda, más cambiará.
KMX01 SCHNELLAUFBAU (DEUTSCH) 1. 2. 3. 4. 5. 6. 7. 8. Versichern Sie sich, daß alle auf der Vorderseite dieser Anleitung aufgeführten Gegenstände in der Schachtel enthalten sind. LESEN SIE DIE SICHERHEITSHINWEISE, BEVOR SIE DAS PRODUKT IN BETRIEB NEHMEN. Sehen Sie sich dieses Aufbaudiagramm genau an. Stellen Sie das CDMIX-Bedienpult an eine für den Betrieb geeignete Stelle.
ANSCHLÜSSE RÜCKSEITE 1. 2. 3. 4. Kanalanschlüsse: Unbalancierte RCABuchsen zum Anschluss von externen Quellen. Der Phono/Line-Anschluss wird über den Kippschalter an der Vorderseite des Gerätes selektiert. Plattenspieler, HiFi VCRs, Kassetten- und Tonbanddecks, DATMaschinen, CD-Spieler, Laser Discs, Tuner, sogar Synthesizer oder andere MixBedienpulte können über diese Buchsen angeschlossen werden.
BEDIENUNGSELEMENTE VORDERSEITE 1. DJ Mikrofon 1: Dieser Bereich hat einen 6.3 mm Klinken/XLR Kombinations Stecker mit Gainregelung und Klangregelung. 2. Mikrofon 2: Dieser Bereich hat einen Gainregler und eine Klangregler. 3. Mikrofon 3: Dieser Bereich hat einen Gainregler und eine Klangregler. 4. Mikro 2 und 3 Echo: Dieser Regler kontolliert das Echo für das Mikrofon 2 und 3. 5. Mikro 2 und 3 Delay: Dieser Regler kontolliert die verzögerung des Echos für das Mikrofon 2 und 3. 6.
8. 9. 10. 11. löschen, halten Sie entweder die Programmtaste für mehr als 2 Sekunden gedrückt während das Gerät gestoppt ist, öffnen die Einlegevorrichtung oder schalten den Strom ab. TONLAGE (Tonlagentaste) – Aktiviert den Tonlagenschieberegler. TONLAGEN-SCHIEBEREGLER – Die Tonlage kann bis zu +/-16% verändert werden, indem man die TONLAGE-Taste drückt, so daß das TONLAGE LED aufleuchtet und dann den Schiebeblendregler bewegt. Die Tonlage wird nicht verändert, wenn das TONLAGE LED nicht aufleuhtet.
PLAY/PAUSE & CUE-FUNKTIONEN: PLAY & CUE: Drücken Sie "PLAY/PAUSE", um Musik abzuspielen. Drücken Sie "CUE", um zum letzten Anfangspunkt zurückzukehren Position auf Disc Abspielintervall Rück-Cue-Funktion Ein Drücken der “PLAY/PAUSE”-Taste startet die Disc. Wird die “CUE”-Taste gedrückt, wird die Disc zum letzten Anfangspunkt zurückgesetzt. Dies ist der Cue-Punkt. Abwechselndes Drücken der Tasten “PLAY/PAUSE” und “CUE” führt zum beliebig oftmaligen Abspielen der CD, angefangen von derselben Position.
VERWENDUNG DER TPM-ANZEIGEFUNKTION Drücken Sie die TPM-Taste, um die TPM-Funktion in der Anzeige auf der Seite jenes CD-Spielers, welchen Sie einstellen möchten, auszuwählen. Tippen Sie die Zählertaste im Takt der Musik an. Die TPM-Anzahl erscheint in der Anzeige. Je öfter Sie antippen, umso genauer wird diese Anzahl sein. Wenn Sie den TonlagenSchieberegler einstellen, wird sich diese Anzahl um einen entsprechenden Prozentsatz ändern.
MONTAGGIO RAPIDO KMX01 (ITALIANO) 1. 2. 3. 4. 5. 6. 7. Verificare che tutti gli elementi elencati sul frontespizio di questo manuale siano inclusi nella confezione. PRIMA DI UTILIZZARE IL PRODOTTO LEGGERE IL LIBRETTO DELLE ISTRUZIONI DI SICUREZZA. Esaminare attentamente lo schema di montaggio. Posizionare la console CDMIX in modo adeguato all’operazione. Assicurarsi che tutti i dispositivi siano spenti e che tutti i fader e le manopole di guadagno siano a “zero”.
COLLEGAMENTI POSTERIORI 1. 2. 3. 4. Ingressi Canale: Jack RCA non bilanciati per il collegamento di sorgenti esterne. L’ingresso Phono/Linea viene selezionato utilizzando il commutatore situato sul pannello anteriore. Utilizzando questi jack è possibile collegare giradischi, VCR HiFi, macchine a cassette e reel-toreel, macchine DAT, lettori CD, laser disc, tuner, e perfino sintetizzatori o altre console di missaggio.
1 2 3 10 11 4 12 6 8 13 14 15 9 Caratteristiche Lettore CD 1. 2. 3. 4. 5. 6. 7. 8. 9. 10. 11. OPEN/CLOSE (Apertura/Chiusura del Vassoio del Disco) – Va premuto per caricare o estrarre il disco. Ciascuna pressione aprirà o chiuderà il vassoio. NOTA: Se il disco non è stato messo in pausa il vassoio non si aprirà. Il vassoio si chiuderà automaticamente dopo 30 secondi.
Caratteristiche Display LCD 1. 2. 3. 4. 5. 6. PLAY: Ativo quando l’apparecchio riproduce un CD. PAUSE: Attivo quando l’apparecchio è in pausa. CUE: Lampeggia quando l’apparecchio sta impostando un punto cue. È acceso in maniera fissa in pausa e al punto cue. PROGRAM: Usato per pre-programmare l’ordine di riproduzione automatica delle tracce. Questa è un’ottima funzione nel caso in cui si debba lasciare il lettore CD da solo. TIME MODE: (Elapsed) mostra il tempo trascorso in via di riproduzione.
PLAY, PAUSE e CUE Premere "PLAY/PAUSE" per avviare la musica Premere "CUE" per tornare Premere "PLAY/PAUSE" all'ultimo punto di avvio per avviare la musica Intervallo di Riproduzione Premere "CUE" per tornare all'ultimo punto di avvio Intervallo di Riproduzione Posizione sul disco Operare il Back Cue Quando la riproduzione è stata interrotta momentaneamente e quindi ripresa, la posizione di ritorno per il back cue verrà aggiornata su questa nuova posizione.
USO DEL DISPLAY BPM Premere il tasto BPM per selezionare la funzione BPM a display dal lato del lettore CD che si desidera impostare. Battere il tasto Counter al ritmo della musica. A display apparirà il numero di BPM. Più volte si batte, più il numero sarà preciso. Quando viene regolato il cursore del pitch il numero a display varierà di una pari percentuale.
GUIDE D’INSTALLATION SIMPLIFIÉE (FRANÇAIS) 1. 2. 3. 4. 5. 6. 7. 8. Assurez-vous que tous les articles énumérés sur la page couverture de ce guide sont inclus dans la boîte. LIRE LE LIVRET DES CONSIGNES DE SÉCURITÉ AVANT D’UTILISER LE PRODUIT. Examinez bien le schéma d’installation. Placer la station de mixage CDMIX dans une position appropriée pour l’utilisation. Assurez-vous que tous les appareils sont hors tension et que tous les atténuateurs et le gain sont réglés à « zéro ».
CARACTÉRISTIQUES DU PANNEAU ARRIÈRE 1. 2. 3. 4. Entrées canaux : Des entrées RCA asymétriques pour brancher des sources externes. L’entrée Phono/Line est sélectionnée en activant l’interrupteur sur le panneau avant. Tournedisques, magnétoscopes à vidéocassette HIFI, magnétophones à bobines, appareils audionumériques, lecteurs CD, disques lasers, syntoniseurs, même des synthétiseurs ou autres consoleS de mixage peuvent être connectés à ces entrées.
soulevez et débranchez son câble. Remplacez le avec un crossfader et revissez la plaque de montage à l’appareil. Et vous êtes en affaires! 12. Bouton Stéréo/Mono : Permet de modifier la sortie principale du mode mono à stéréo. 13, 14, 15. Stéréo EQ : Ajuste l’égalisation des aigus, des moyens et des graves du signal principal. 16. Sélecteur de canal de pré-écoute : Permet d’acheminer le signal à votre casque d’écoute. 17. Niveau du casque d’écoute : Permet de régler le volume de pré-écoute. 18.
LCaractéristiques de l’afficheur LCD 1. 2. 3. 4. 5. 6. PLAY : Activé lorsque le lecteur est en mode lecture. PAUSE : Activé lorsque le lecteur est en mode pausé. CUE : Clignote lorsque le lecteur programme un point de référence. Allumé lorsque le lecteur est en mode pause au point de référence. PROGRAM : Activé lorsque le lecteur est programmé pour faire la lecture automatique des pistes dans un ordre prédéterminé. Grâce à ette fonction vous n’êtes pas confiné à surveiller l’appareil.
LECTURE/PAUSE ET DE PRÉ-ÉCOUTE Appuyez sur la touche PLAY/PAUSE pour commencer la lecture du disque. Appuyez sur la touche PLAY/PAUSE pour mettre le lecteur en mode pause. Appuyez sur la touche CUE pour retourner au dernier point de départ. Appuyez sur la touche PLAY/PAUSE pour commencer la lecture du disque.
LA SYNCHRONISATION DU TEMPO AVEC LA FONCTION PITCH BEND Si toutefois les BPM (Battements par minute ou tempo) sont identiques mais que les basses ne sont pas synchronisées, vous devrez modifier temporairement la tonalité. L’illustration suivante démontre comment synchroniser le rythme du lecteur 2 avec le rythme de la musique qui joue sur le lecteur 1.
Specifications: Model KMX01A, Dual front loading CD player with mixer. 2. POWER DC12V 3.0A 3. DIMENSION 445 (W) x 258 (D) x156 (H)mm 4. WEIGHT 5.4 Kgs 5. FEATURES: (1) 3 band EQ for master output. (2) Super wide viewing angle display. (3) Power on/off muting. (4) Cross Fader Start Function. (5) Mic Echo System. (6) Peak Level Meter. (7) CDG Function. (8) VCA controlled channel and crossfader. 6.